
Vowel Blender Manual
Version 1.4.1
1. Welcome & Overview
Vowel Blender turns any sound into a voice. Drag a single cursor across a 2D phonetic pad and the source starts to speak, sing, or whisper the vowels you point at. From a barely-there formant tint that adds character to a vocal, to a full talkbox effect on a synth lead, to slow morphing motion paths that breathe between EE, AH, and OH, this is a focused, deeply playable formant filter.
Most vowel filters give you a few presets and a morph slider. Vowel Blender gives you 10 vowels from the International Phonetic Alphabet (IPA) (i, ɪ, ɛ, æ, ɑ, ʌ, ɔ, o, ʊ, u) on a 2D pad (front/back on X, close/open on Y), 7 voice models built from real-world voice data (Peterson & Barney 1952, Hillenbrand 1995), a motion recorder that loops your gestures in sync with the host, and a full modulation system with nine modulator types (LFO, MSEG, Step Seq, Audio Osc, Env Gen, Env Follower, Macro, MIDI, XY). A pre-formant pitch shifter sits in front of the filter for higher highs, lower lows, and unison effects. A phase-matched LOWS crossover in the bottom bar lets the bass band bypass the formant chain entirely, so heavy resonance on a bass track or a full mix never costs you the foundation.
It runs at low latency, and every control links to perception first. Joy to use, joy to hear.
Available formats: AU, VST3, CLAP, AAX
Platforms: macOS (10.13+; versions before macOS 11 are not tested), Windows (64-bit), Linux (64-bit)
2. Quick Start, First Great Sound in 60 Seconds
- Insert Vowel Blender on a sustained source (a synth pad, a held vocal note, a string section).
- Load the preset "Vintage Vowel" from the Synth/Keys category. An MSEG modulator immediately starts arcing the formants in tempo with your host, so you hear motion right away without configuring anything.
- Drag the XY pad while the modulation runs. The cursor position becomes the centre of the arc, so you steer the modulated motion through different vowel territories.
- Tune the resonance: turn Q down for a smoother, more vocal feel, or up for sharper, more synthetic vowels. Around 1.0 is the sweet spot.
- Set the blend: MIX at 100% gives you a full vowel filter sound. Lower it to 60% for a subtle vowel tint that sits behind the original.
- Compare: click the preset name to switch back to "Init", then back to "Vintage Vowel". Your ear hears the difference instantly.
3. Typical Use Cases
On Vocals
Load "Vowel Emphasis" (Vocals). The XY pad sits on AH, an envelope follower drives the formants from the vocal's own dynamics, and the Mix is at 35% so the original vocal stays in front. The result is a vocal with extra body and resonance, like the singer leaned into the mic.
Adjust Mix between 25% and 50% to taste. If the effect feels too obvious, drag the XY cursor toward the centre of the pad. For a darker tone, switch the Voice Model to Man 2. For a brighter, smaller-headed feel, try Kids.
On Synth Leads
Load "Talking Synth" (Synth/Keys). An envelope follower drives the XY pad from the synth's own envelope, so every note speaks. Drive at 30%, Q at 1.0, and the response curve animates as the source plays.
For a more aggressive talkbox sound, push Drive to 60%. For a slower, breathier mouth, raise the envelope follower's Release in the modulation panel. Try the "Robot Keys" preset for a step-sequenced vowel pattern that follows your tempo.
On Bass
Load "Vowel Sub" (Bass). The XY pad sits on OH (back close-mid rounded), a low Q gives broad formants that thicken the body, and a touch of Drive adds weight. The source keeps its fundamental while the upper harmonics get vowel character.
If the low end thins out, turn on LOWS in the bottom bar (default 100 Hz) so the sub bypasses the formant chain entirely. For a synth bass that pulses, try "Growl": an LFO modulates Shift in a slow tempo-synced wobble.
Preserving Bass on a Full Mix or Drum Bus
Drop Vowel Blender on a drum bus, a full mix, or any source with a serious low end. Set the XY pad to AH or EH for a vocal-ish midrange colour, push Q to 1.5–2.0 for noticeable peaks, then turn on LOWS and drag the handle on the response curve up to around 200–300 Hz. Everything below the handle bypasses the formant chain so the kick, the sub, and the body of the snare stay clean. Only the mids and highs get formant-shaped.
The crossover is phase-matched (Linkwitz-Riley 24 dB/oct), so the low and high bands sum back cleanly at MIX=0 (the curve goes flat). Push Drive and Alien as hard as you want, knowing the foundation will not move.
On Drums & Percussion
Load "Percussion Vowelize" (Sound Design). Each transient triggers a vowel, turning a drum loop into a stuttering vocal pattern. The envelope follower drives the XY pad, the motion recorder adds a subtle wobble, and the Voice Model is set to Man 1 for warmth.
Switch the Voice Model to Kids for higher, brighter pitched vowels. Lower the envelope follower's Amount (in the modulation panel) for a less obvious effect that just colours the drums.
Creative Sound Design
Load "Vowel Sweep" (Sound Design). The motion recorder plays a 2-bar diphthong path looped in pingpong sync. Combine with the pre-formant Pitch (transpose +12 semitones) for a chipmunk effect, or -12 for a sub-vowel. Try "Vowel Heart" for a heart-shaped path that turns any pad into a love song, or "Pitched Riser" for an MSEG-driven build that morphs vowel and pitch together.
4. Interface Overview
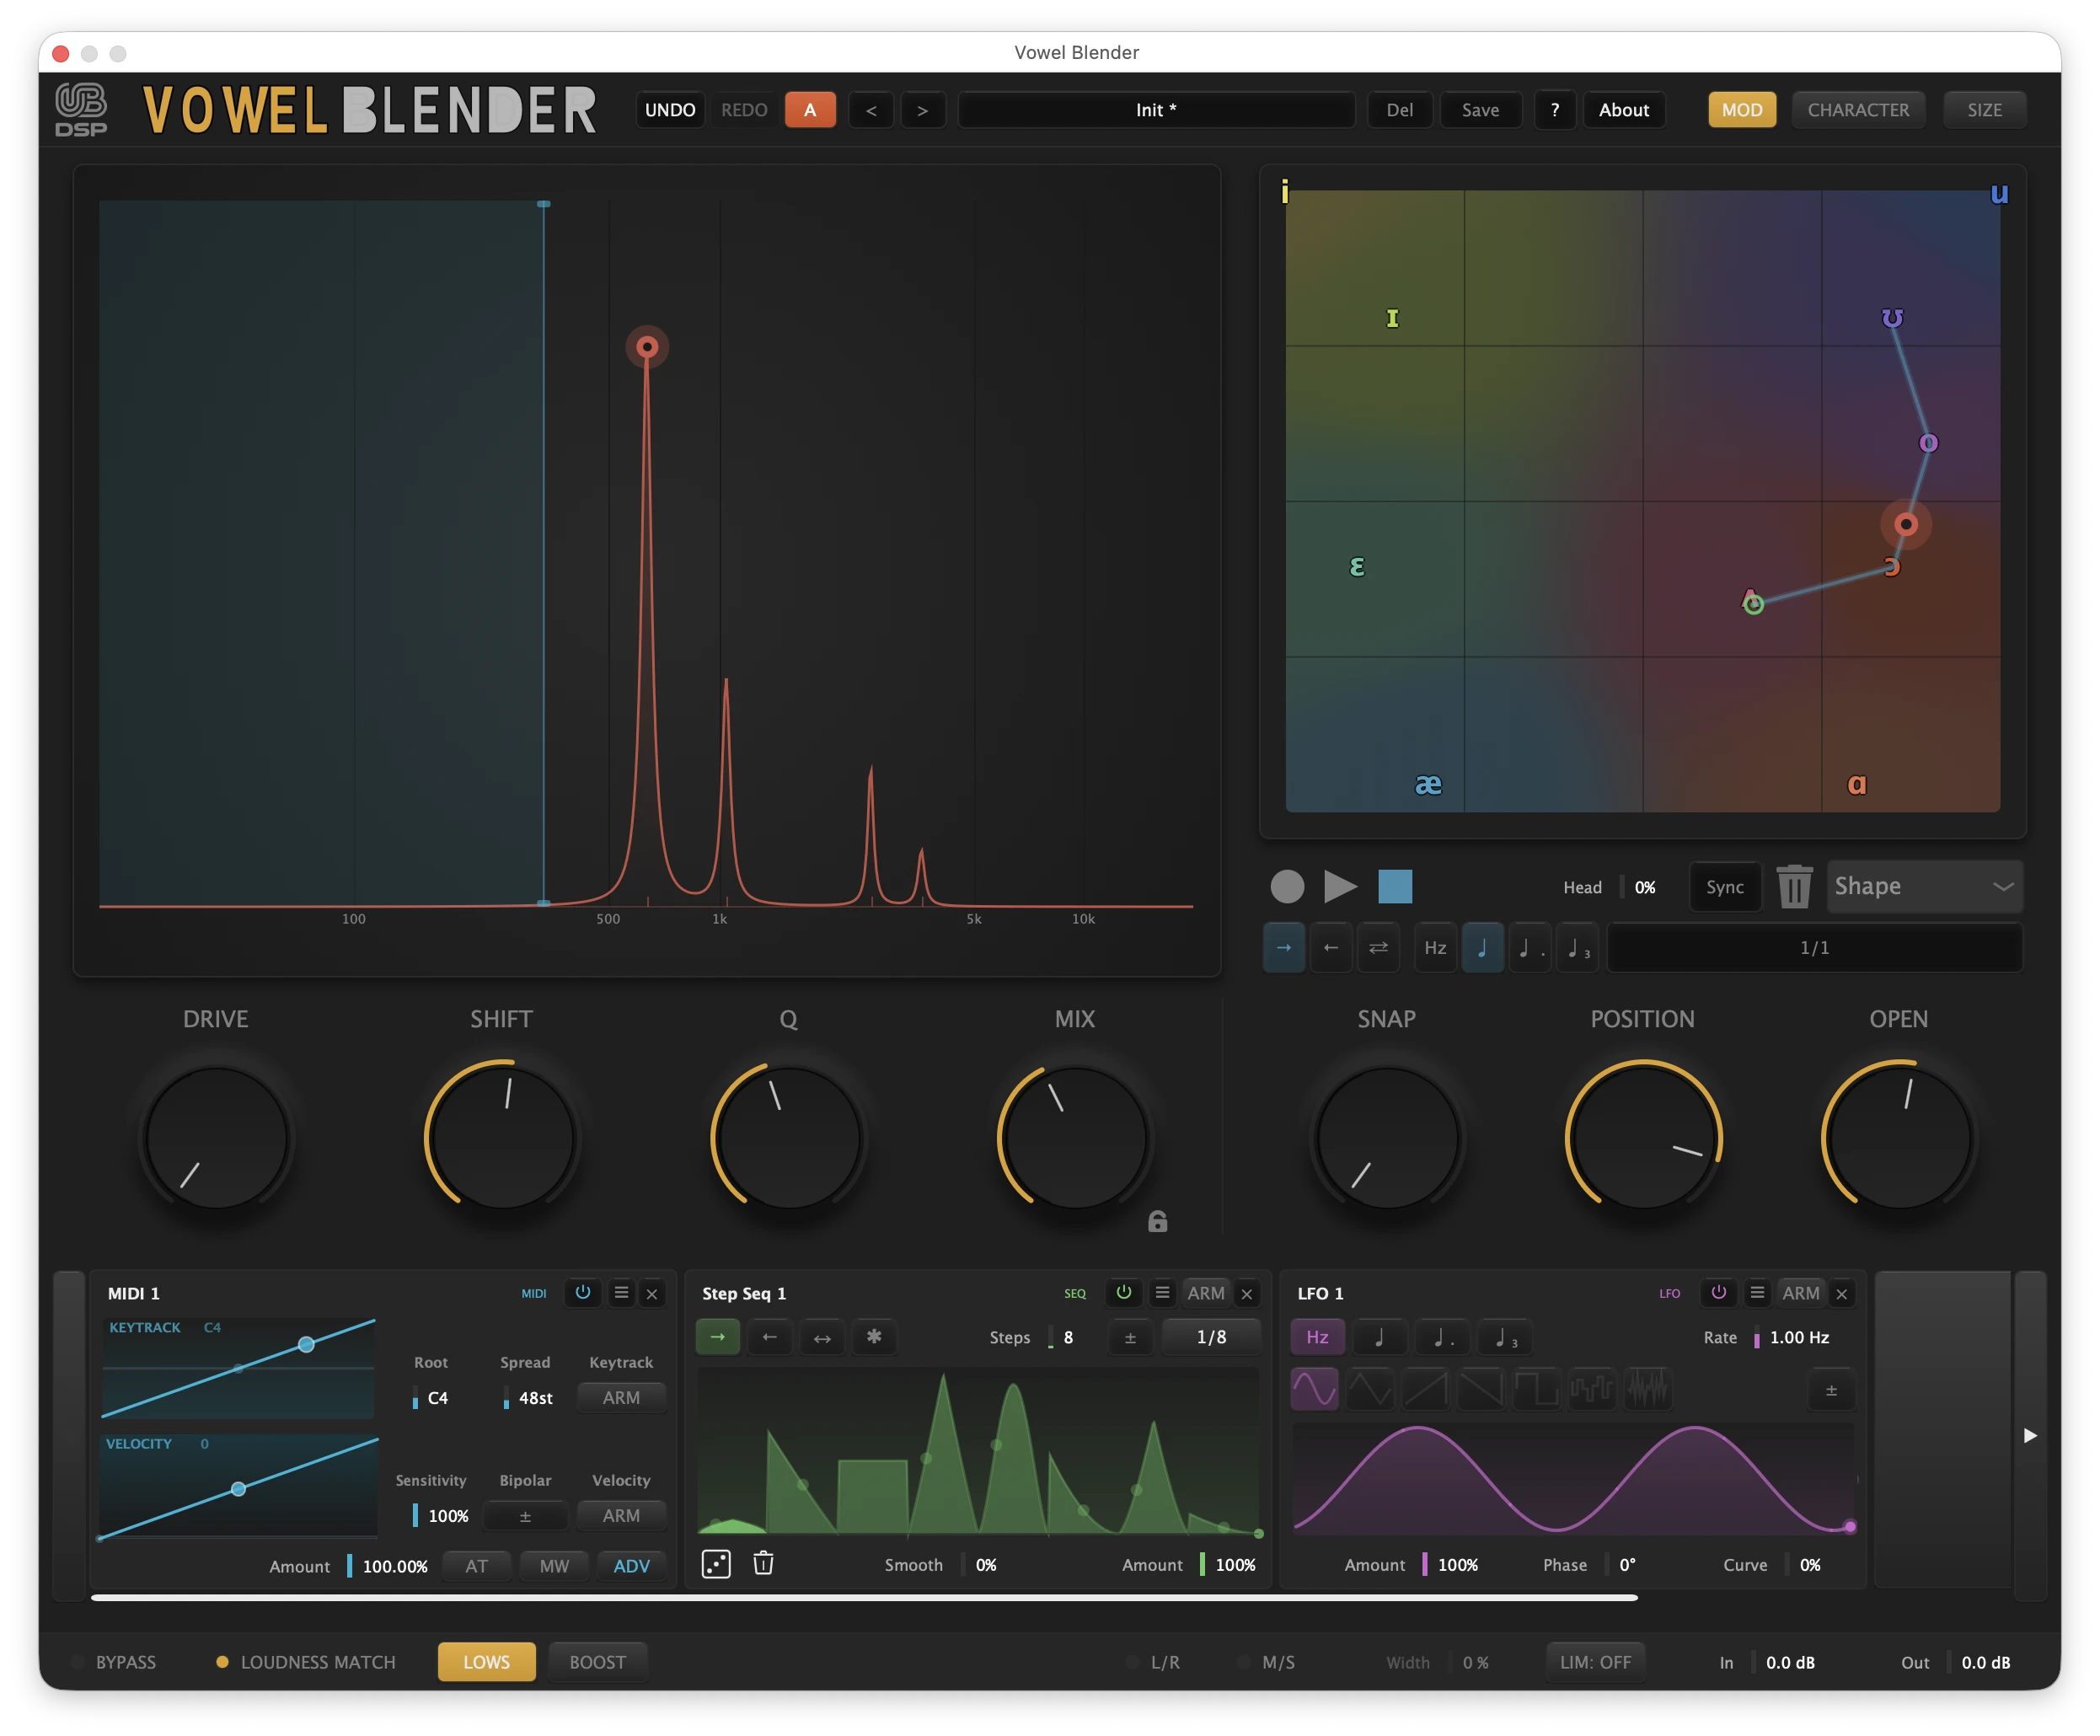
The interface is organised into five zones:
Preset Bar (top)

The top bar gives you full undo history, A/B comparison, and the categorised preset browser with previous/next arrows. Click the preset name to open the menu organised by category (Init/Basics, Vocals, Synth/Keys, Bass, Creative, Sound Design). The ? button toggles Help mode (hover any control for a contextual bubble). The About button opens the version and settings dialog.
The 41 factory presets are also exposed to your DAW's own preset browser through CLAP preset discovery. In Bitwig, REAPER, or any CLAP host with native browsing, you can audition Vowel Blender presets from the host's interface without opening the plugin window. The internal browser remains the most direct path and is what the previous / next arrows and category menu drive. A preset you load from the host's browser shows its name in the preset bar, and the arrows step on from it.
The XY Pad (centre-left)
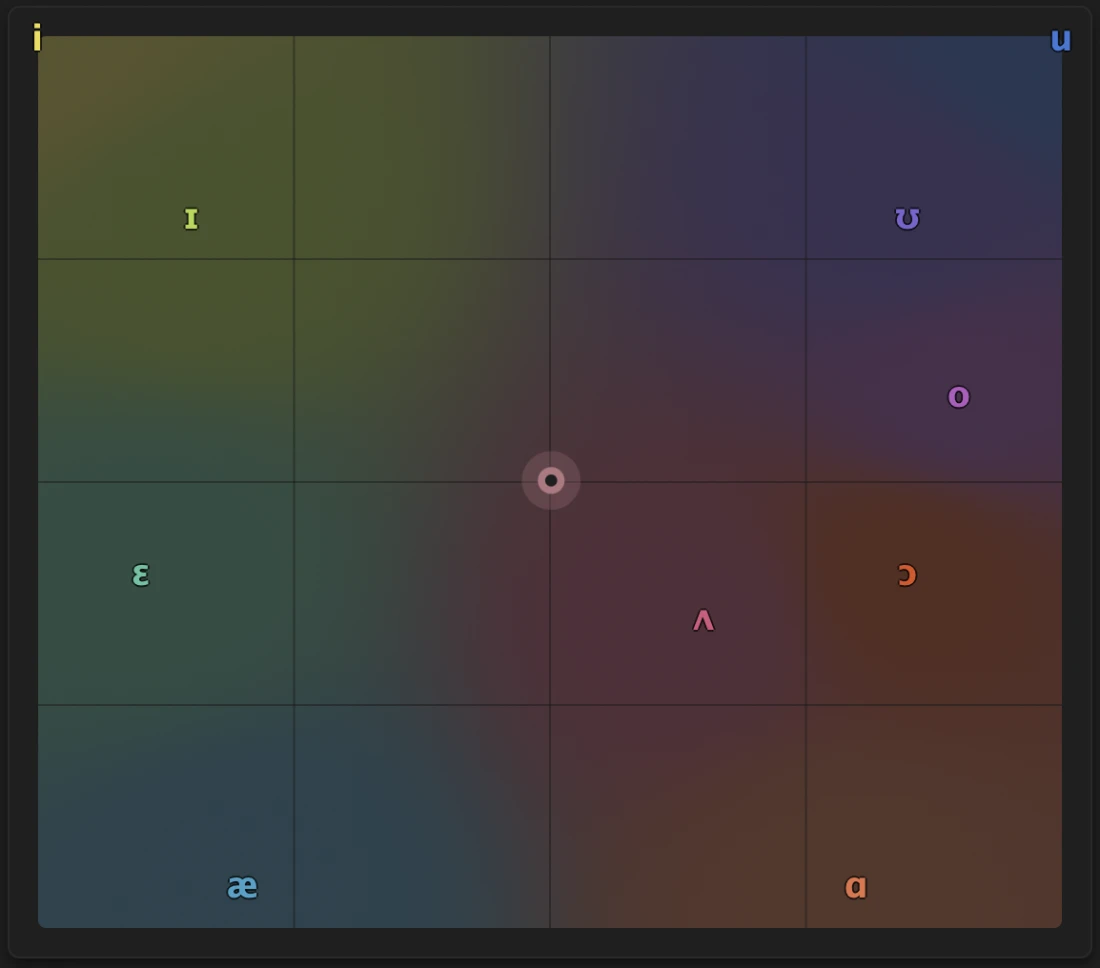
This is the playable surface. Drag the cursor anywhere inside the pad and the four-formant filter morphs to the corresponding vowel. The 10 IPA phonemes are laid out exactly as they appear on a vowel chart: EE (i) top-left (close-front), UU (u) top-right (close-back), AE (æ) bottom-left (near-open-front), AH (ɑ) bottom-right (open-back). Modulation halos around the cursor show active modulation routes.
The 10 vowels available, with their IPA glyphs and approximate English equivalents:
| Glyph | Name | Sounds like | Position |
|---|---|---|---|
| i | EE | "see" | front, close |
| ɪ | IH | "sit" | front, near-close |
| ɛ | EH | "bed" | front, open-mid |
| æ | AE | "cat" | front, near-open |
| ɑ | AH | "father" | back, open |
| ʌ | UH | "cup" | back, open-mid |
| ɔ | AW | "thought" | back, open-mid rounded |
| o | OH | "go" | back, close-mid rounded |
| ʊ | OO | "foot" | back, near-close rounded |
| u | UU | "boot" | back, close |
Vowel Row (under the pad)

Each button snaps the XY pad to the corresponding vowel. Use it for precise vowel choices, A/B testing between phonemes, or as a starting point before drag-tweaking.
Voice Model Selector
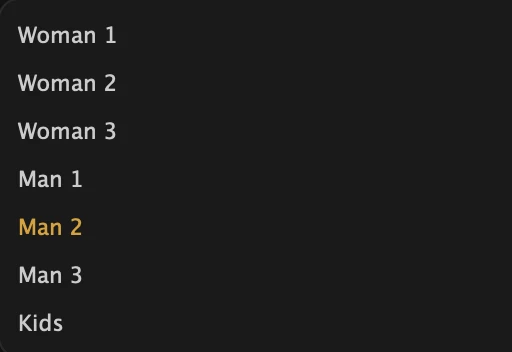
Choose between seven head-size and gender presets. Each model uses different formant frequencies measured from real speakers (Peterson & Barney 1952 for the Man series, Hillenbrand 1995 for the Woman series and Kids). Switching models changes the timbral character of every vowel without changing the pad position.
Main Knobs (right)
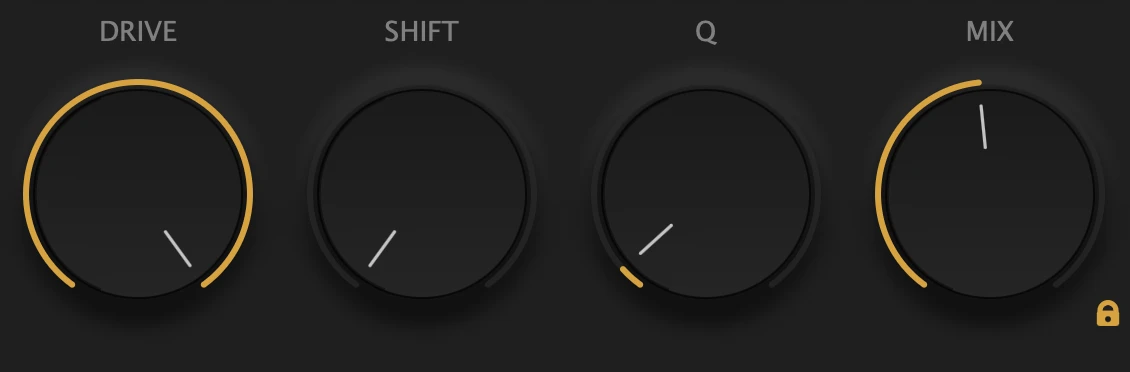
The four knobs that shape the filter response. Shift transposes all formants up or down (-12 to +12 semitones). Q sets the resonance width. Drive pushes the source through a soft saturator before the filter. Mix controls the dry/wet balance.
Response Curve
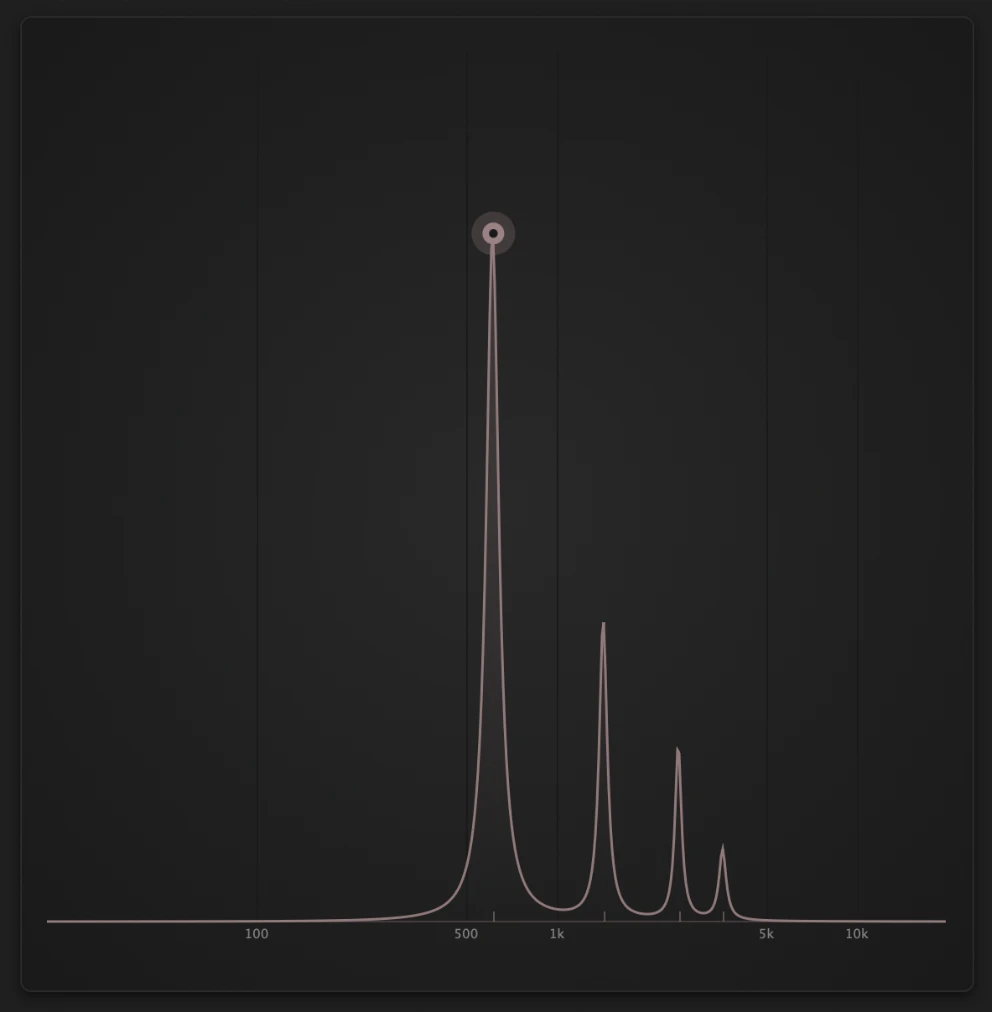
A live frequency response display showing how the filter is shaping your signal right now. The four peaks are the four formants. Their position changes when you drag the XY pad, when modulation moves the Shift parameter, when the motion recorder plays back a path.
The curve is also interactive: drag anywhere to set Shift (horizontal) and Q (vertical, drag down for more resonance). Double-click resets both to neutral. When LOWS is on, a vertical blue handle appears on the curve: drag it left or right to tune the crossover cutoff between 20 and 500 Hz. The shaded zone to its left marks the bass band that bypasses the formant chain.
Motion Transport Bar (below the pad)

The Motion Transport Bar drives the motion recorder. You can record a drag on the pad, replay it in sync with the host, or pick one of thirteen procedural shapes (smooth curves, geometric loops, and the signature Heart). See section 6.
Bottom Bar

The bottom bar holds global processing toggles (left cluster) and the output stage (right cluster). BYPASS mutes processing with a smooth crossfade, and it is the one your host's own bypass button works. LOUDNESS MATCH auto-compensates the output level so an honest A/B against the dry signal does not get fooled by saturation-induced loudness. LOWS activates a low-frequency crossover so the bass stays intact even with extreme formant settings. BOOST/NOTCH flips the formant filter between imposing the vowel (Boost) and carving it out (Notch). See the Controls Reference for both. The right side hosts the stereo mode selector and the output gain.
5. Controls Reference
Knob and Pad Interaction
Every knob and the XY pad share the same gesture vocabulary, so once you learn it you can dial in values precisely without leaving the mouse.
- Drag a knob (vertically or in a circle) to change its value. Drag the XY pad to set position and openness together.
- Hold Shift while dragging for about 10× finer precision. Use this when you need a specific semitone, a tight Q tweak, or a careful XY placement near a vowel target.
- Scroll wheel over a knob nudges it by one fine step. Useful while you keep the cursor near the value display, no need to grab the knob.
- Double-click a knob to reset it to its default value.
- Right-click the XY pad to reset the cursor to the centre.
The XY Pad
VOWEL X (0.0–1.0, default 0.5)
What you hear: Moves the vowel between front (left, EE / IH / EH / AE) and back (right, AH / UH / AW / OH / OO / UU). Front vowels feel bright and forward. Back vowels feel rounded and deep.
Maps to the second formant (F2) primarily. Front vowels have a high F2 around 2200 Hz, back vowels have a low F2 around 900 Hz. Right-click the pad to reset to the centre.
VOWEL Y (0.0–1.0, default 0.5)
What you hear: Moves the vowel between close (top, narrow mouth, EE / UU) and open (bottom, wide mouth, AE / AH). Close vowels sound focused. Open vowels sound expansive.
Maps to the first formant (F1) primarily. Close vowels have a low F1 around 300 Hz, open vowels have a high F1 around 800 Hz. The cursor position blends the four nearest IPA vowels using log-frequency interpolation, so the morph stays perceptually smooth.
Voice Model
VOICE MODEL (7 options)
What you hear: Changes the formant frequency map without changing the pad position. Woman models have higher formants and sound feminine or younger. Man models have lower formants and sound masculine or deeper. Kids has the highest formants of all, with a small-headed, bright character.
Seven options: Woman 1, Woman 2, Woman 3 (each with slight formant variations from the Hillenbrand 1995 dataset), Man 1, Man 2, Man 3 (Peterson & Barney 1952), and Kids (Hillenbrand 1995). The choice affects all 10 vowels at once. The default is Man 2, a neutral baritone.
Main Knobs
SHIFT (-12 to +12 semitones, default 0)
What you hear: Transposes all four formants up or down. Positive values raise the formants and make the source sound smaller, brighter, more childlike. Negative values lower them and make it bigger, darker, more masculine.
Multiplies all formant frequencies by a single semitone factor. Independent from the pre-formant pitch shifter (which transposes the source itself). Combine the two for vocoder-style effects.
Q (0.4–2.5, default 1.0)
What you hear: Sharpens or widens the formant peaks. Low Q sounds smooth, broad, vocal. High Q sounds sharp, resonant, synthetic, robotic.
Each formant is a band-pass filter with this Q applied. The SLOPE control in the Character popup sets how steeply each formant is carved, from Soft to Sharp, with Classic as the default. Gain compensation (Q^0.7) keeps the perceived loudness consistent as you change resonance.
DRIVE (0.0–1.0, default 0.2)
What you hear: Pushes more signal through a soft saturator before the vowel filter. Adds harmonics and weight. At low values you hear subtle warmth. At higher values the source compresses and gains body.
A pre-filter soft clipper. Gain is implicit: drive raises both the level and the harmonic content. The output is auto-compensated so loudness stays roughly stable.
MIX (0.0–1.0, default 1.0)
What you hear: At 1.0, you hear only the filtered (vowel) signal. Lowering Mix blends in the original dry signal. At 0.5, you get equal parts dry and vowel, a great way to add formant character without losing the source's clarity.
Phase-aligned crossfade between the dry input and the fully processed signal. The pre-formant pitch shifter, when active, is on the wet path only, so Mix at 0% gives you a perfectly transparent dry signal even when Pitch is on.
Mix lock (cadenas) — the small padlock at the bottom-right of the MIX knob. Click to lock your current dry/wet value: every preset you load afterwards keeps your Mix where you set it, and any modulation route the preset would assign to Mix is silently stripped. Made for auditioning factory presets on a real mix without your dry/wet jumping around. Click again to unlock; the choice is remembered across sessions.
The Pad Knobs (under the XY pad)
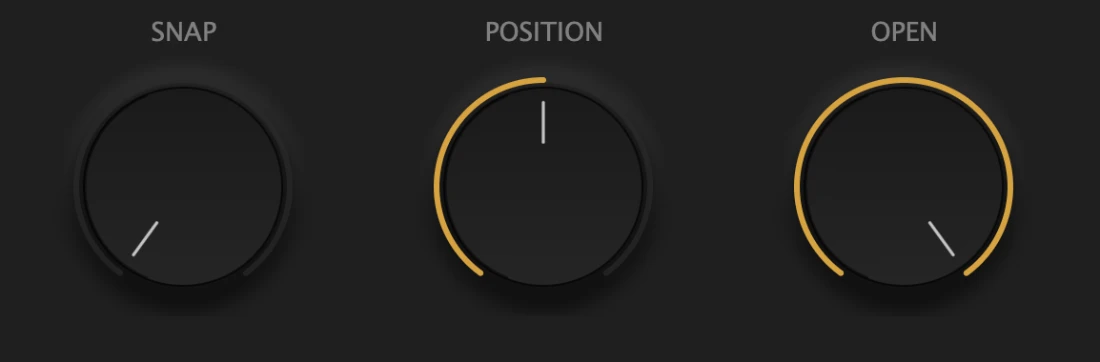
POSITION and OPEN are the two coordinates of the XY pad cursor, exposed as separate knobs. They are useful when you want to set a precise vowel by typing a value, or when a host wants to automate them via standard parameter automation rather than a 2D control. Modulating either of them moves the pad cursor in real time.
POSITION (0.0–1.0, default 0.5)
What you hear: Same as dragging the XY pad horizontally. Front vowels on the left (EE, IH, EH, AE), back vowels on the right (AH, UH, AW, OH, OO, UU).
APVTS parameter vowelX. Modulation destination id 37 ("Position").
OPEN (0.0–1.0, default 1.0)
What you hear: Same as dragging the XY pad vertically. Close vowels at the top (EE, UU), open vowels at the bottom (AE, AH).
APVTS parameter vowelY. Modulation destination id 38 ("Openness").
SNAP (0.0–1.0, default 0.0)
What you hear: Pulls the pad cursor toward the nearest of the 10 IPA reference points. At 0, the cursor moves freely. At 1, it locks fully to the nearest phoneme. In between, it bends the trajectory so the pad always passes through (or near) recognisable vowels.
A magnetisation factor applied to both the live drag and the motion-recorder playback. Useful when you want the pad to "speak" actual vowels rather than slide through their interpolated mid-points. Modulation destination id 40.
The Character Popup
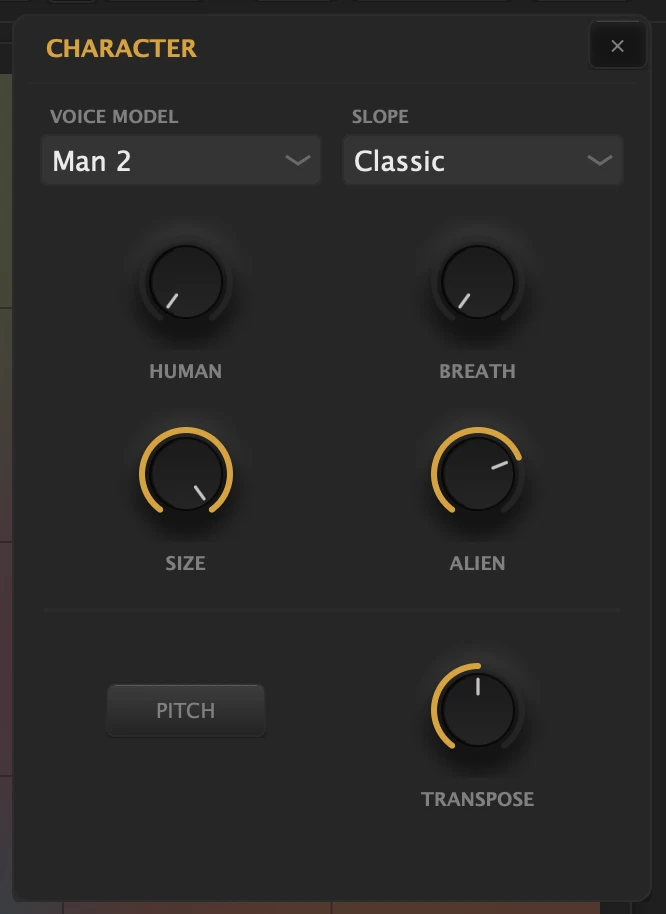
Click the Character button in the top bar to open this popup. The controls let you push the vowel sound away from neutral towards specific characters: softer or sharper in focus, alive, breathy, big-headed, alien, transposed.
SLOPE (Soft / Classic / Sharp, default Classic)
What you hear: Sets how hard the filter carves vowels out of the source. Soft lets more of the original sound through for a natural, gentle colour. Classic is the standard response. Sharp tightens and steepens the formants into focused, vocoder-leaning peaks. Same vowels, different intensity.
Each formant is a stack of cascaded band-pass stages. Slope taps that stack at a softer (gentler) or sharper (steeper) point, so Sharp is both steeper and narrower than Soft. Sits next to Voice Model at the top of the popup. Switching is click-free, and the control is automatable.
HUMANIZE (0.0–1.0, default 0.08)
What you hear: Adds slow random drift to the formant positions, like a real singer's mouth never holds a vowel perfectly still. Subtle at low values, obvious at high values.
A low-rate per-formant random LFO that wobbles each formant independently. Different from Shift modulation: this is per-formant, not global. The result feels organic rather than mechanical.
BREATH (0.0–1.0, default 0.0)
What you hear: Adds a noise component shaped by the same vowel filter. The result is a whispered or breathy quality, as if the source were also whispering through clenched teeth.
Pink noise routed through a duplicate of the vowel filter, then mixed back with the dry signal. Volume is independent from the source level, so silent input still produces breath if Breath is non-zero.
SIZE (0.5–2.0, default 1.0)
What you hear: Changes the shape of the voice rather than its pitch. F1, the formant that carries most of the vowel's body, stays exactly where it is. Below 1.0 the formants above it pack in toward it: darker, denser, the resonances crowding into one another. Above 1.0 they spread apart: thinner, brighter, more hollow. Nothing moves up or down as a whole, so the voice keeps its register while its character changes underneath.
F1 is the anchor and is never moved. Each formant above it keeps its ratio to F1, raised to an exponent taken from the knob, so the pattern compresses toward F1 below 1.0 and stretches away from it above. Ratios rather than fixed distances, because the ear hears pitch logarithmically and because those ratios are what tell one vowel from another. Bandwidths are untouched, so every resonance keeps its width in Hz. On /iː/ with Men 2, F2 to F4 sit around 1.1–1.4 kHz at SIZE 0.5 and 5.0–9.4 kHz at 2.0, while F1 stays at 342 Hz throughout.
ALIEN (0.0–1.0, default 0.0)
What you hear: Inverts and warps the formant relationships, producing vowels no human mouth could make. At low values, sounds slightly off; at high values, fully alien.
Applies non-linear remapping to the formant ratios. Useful for sci-fi voices, granular sound design, and effects that need to feel inhuman.
The Pre-Formant Pitch Shifter
PITCH (toggle, default off)
What you hear: When on, the source is transposed by the Transpose knob before reaching the vowel filter. Up an octave for chipmunk effects, down an octave for sub vowels. The vowel filter still tracks at its own pitch, so you can detune the source while keeping the vowels speaking at their natural frequency.
A phase vocoder shifter (FFT 512, hop 128, oversample 4) sits in front of the formant filter on the wet path. Latency is ~12 ms from the first time the toggle goes on, and zero in a session that never turns it on. Turning Pitch off again keeps both the reported latency and the delay itself for as long as the plugin stays loaded: a change in reported latency makes the host re-plan its audio graph, which you hear as several seconds of silence, so presets that transpose and presets that do not can follow each other without a dropout. The dry path is delay-aligned, so Mix at 0% gives you a perfectly transparent dry signal regardless of the toggle state.
TRANSPOSE (-12 to +12 semitones, default 0)
What you hear: Transposes the source up or down before the vowel filter. Combine with the Voice Model and Shift to build full vocoder effects. For example: source +12, Man 1 model, Shift +0 gives a chipmunk speaking with a man's vocal tract.
Only active when the Pitch toggle is on. Independent from Shift. Modulatable via a routable destination (id 46), so an LFO or MSEG can sweep the transpose for vibrato-like or pitch-rising effects.
Mono, Stereo, and Mono → Stereo
Vowel Blender supports three input/output configurations. Your DAW exposes them as separate plugin variants:
- Stereo → Stereo: the default. Use on stereo tracks. All controls active.
- Mono → Mono: automatic on mono tracks. The plugin still runs internally as dual mono so the formant filter and modulators behave identically, but the output stays mono. The L/R, M/S, and Width controls are greyed out on this configuration, since stereo width has no audible effect on a single output channel.
- Mono → Stereo: the variant you want when you have a mono source (a vocal take, a mono synth) and you want stereo width as an output. The plugin duplicates the mono input across both internal channels, then the L/R or M/S mode does its formant detune to produce real stereo divergence.
Stereo Mode
STEREO MODE (Off / L/R / M/S, default Off)
What you hear: Splits the stereo signal for independent vowel processing per channel. In L/R mode, left and right are processed with different XY positions, creating a vowel-stereo image. In M/S mode, the centre and the sides are processed with different vowels, useful for adding width without affecting the centre.
Off bypasses the stereo processing entirely (zero overhead). The Stereo Amount knob controls how strongly the channels diverge. At 0%, both channels track the same XY position. At 100%, they swing fully to opposite quadrants of the pad.
STEREO AMOUNT (0–100, default 0)
What you hear: Controls the spread between the two channels. At 0%, both channels track the same XY position. At higher values, they diverge: in L/R mode, the left channel might land on EE while the right lands on OO. The wider the spread, the more vivid the stereo vowel image.
Modulatable via destination 45. Modulating it with a slow LFO creates a stereo motion that breathes left to right.
LOWS Crossover
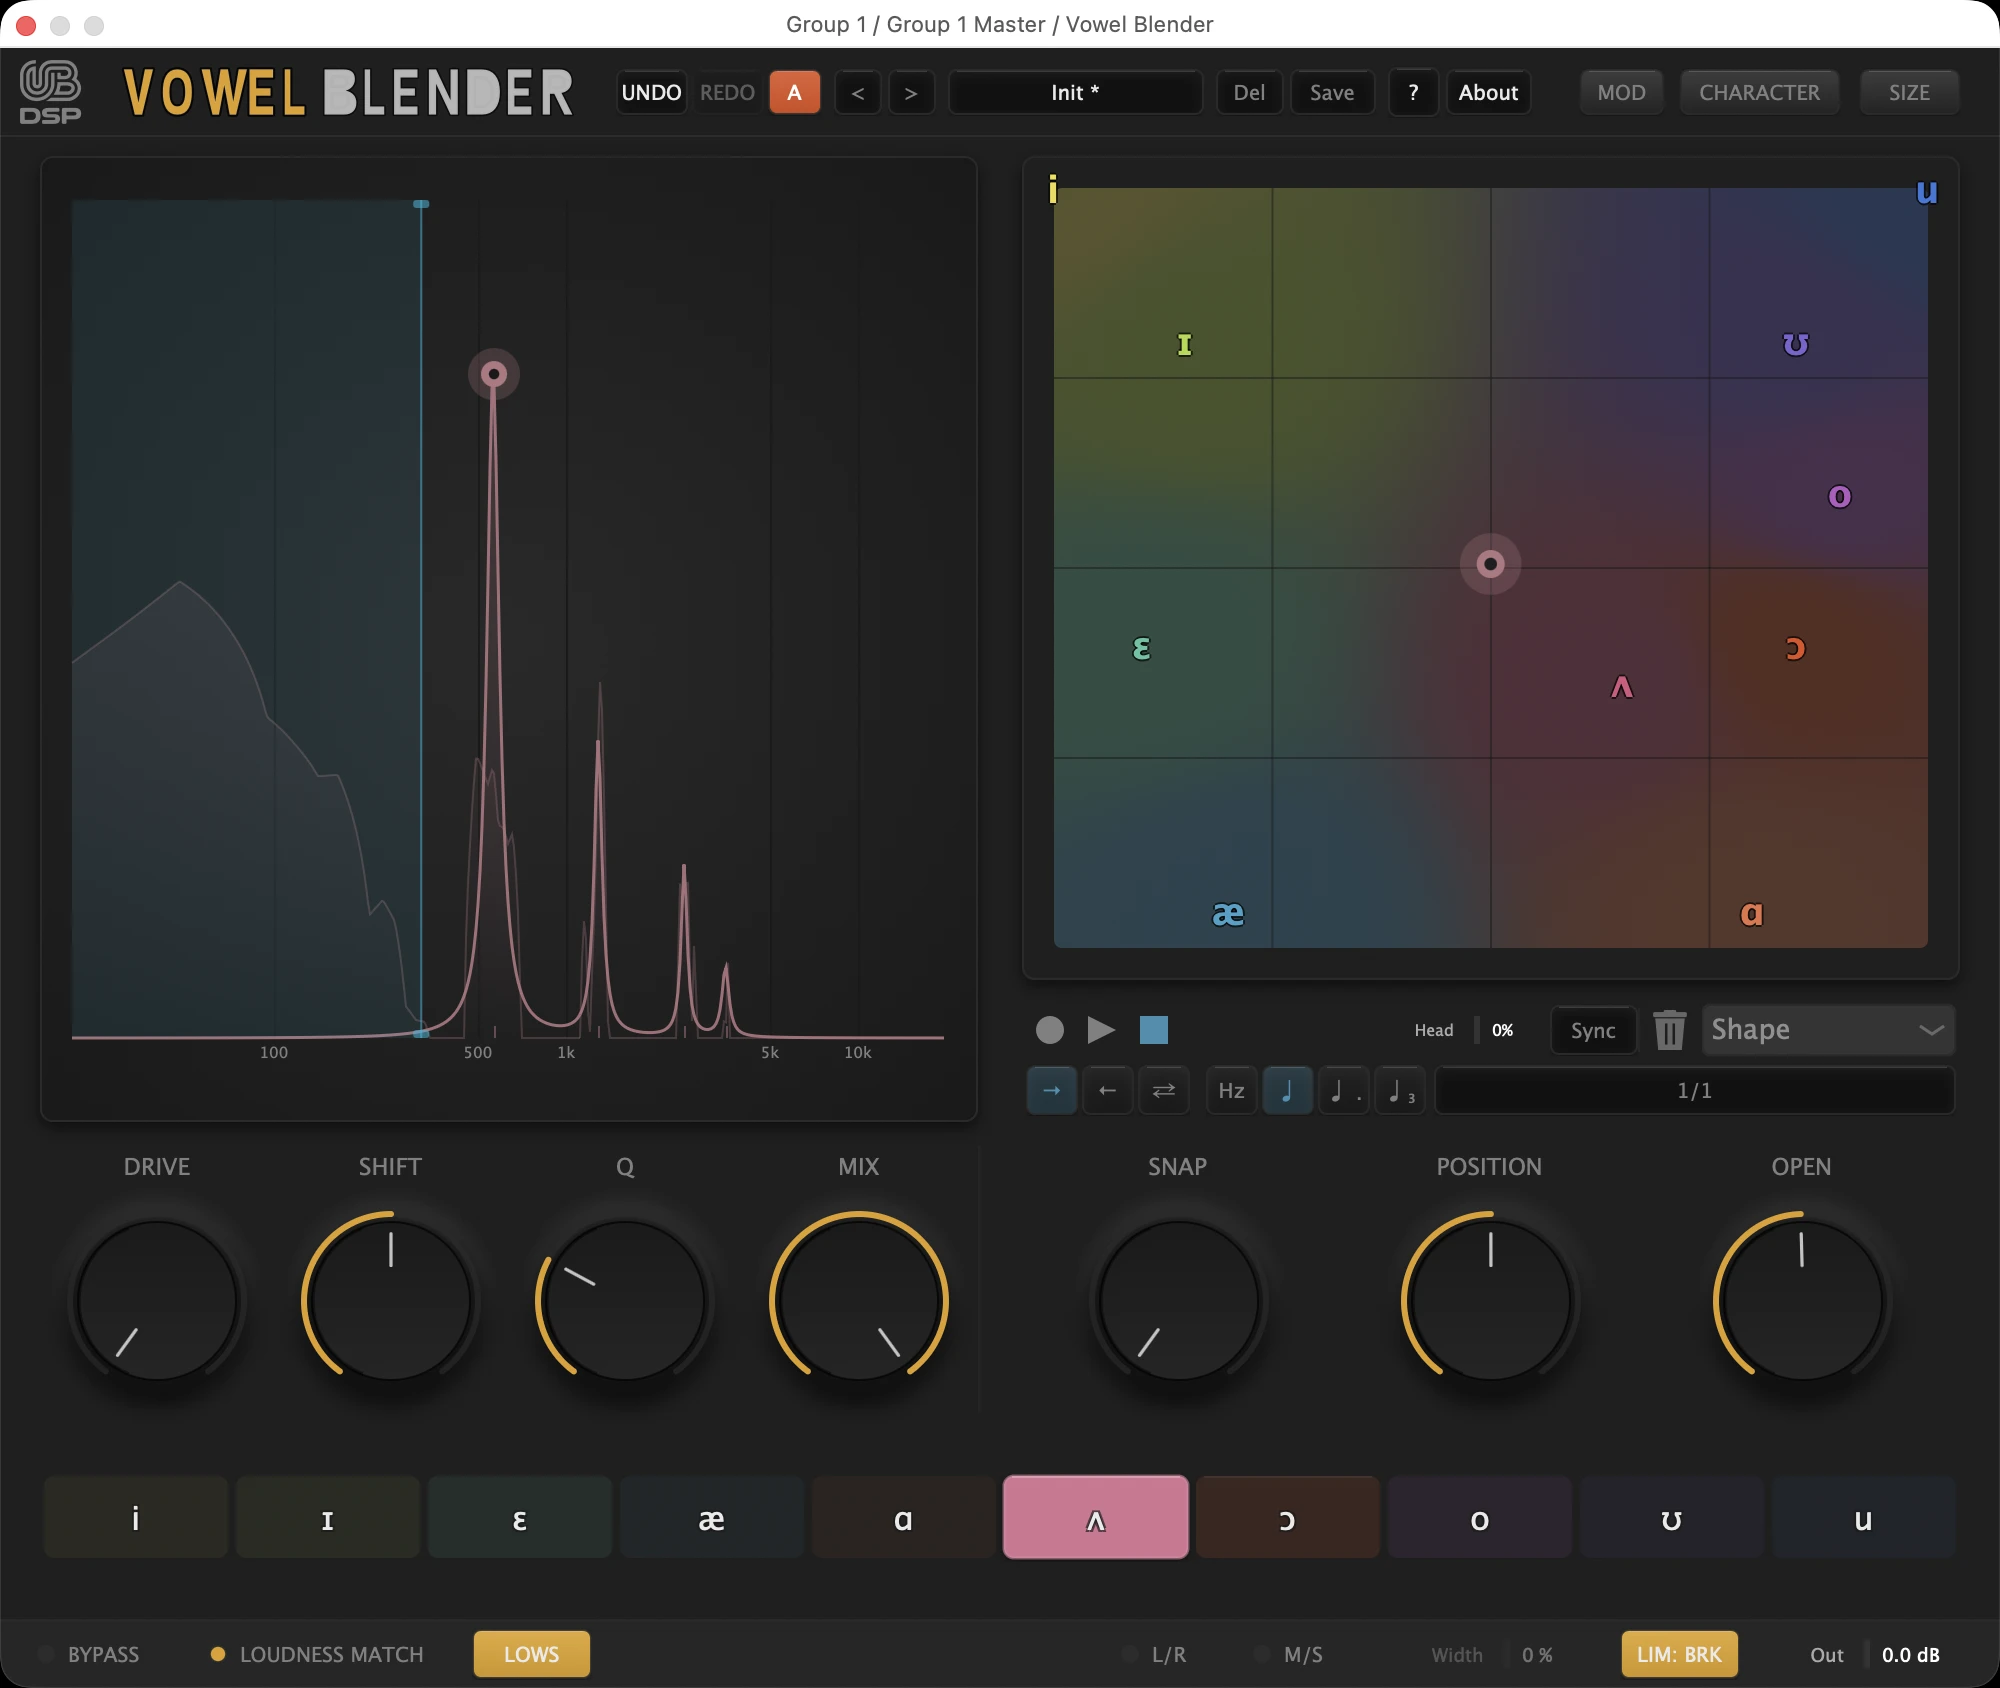
LOWS (toggle, default off)
What you hear: Everything below the crossover frequency bypasses the formant filter entirely. The bass stays clean and intact while the mids and highs get fully formant-shaped. Toggling LOWS on or off is click-free, even at heavy Q values.
A Linkwitz-Riley 4th-order filter (24 dB/oct) splits the signal into a low band and a high band that recombine without phase issues. The low band goes straight to the output. The high band feeds the formant chain, gets coloured by everything you have dialled in (vowel, Q, Drive, Breath, Size, Alien, pitch shifter, stereo modes, modulators), then sums back with the untouched low band at the end. Essential for bass tracks, full mixes, and any source where you want to vowel-shape the body without losing the kick or sub.
CROSSOVER FREQ (20–500 Hz, default 100)
What you hear: Sets where the bass band ends and the formant-shaped band begins. Lower values (20–60 Hz) preserve only the deepest sub. Higher values (200–500 Hz) protect a much larger portion of the spectrum, including the body of kicks and the lower register of vocals.
Drag the blue vertical handle on the response curve to set this. The cutoff value is preserved across LOWS toggles, so if you set it to 250 Hz, switch LOWS off, then switch it back on, you land back at 250. Double-click the handle to reset to 100 Hz. Tooltip shows the live value while you hover or drag.
Formant Mode: Boost / Notch
BOOST / NOTCH (toggle in the bottom bar, default Boost)
What you hear: BOOST is the normal mode. The vowel you point at is imposed on the sound, so its formants stand out. NOTCH does the opposite: instead of adding the vowel's formants, it carves them out. Point at the vowel that is resonating and it gets scooped from the signal. The response curve flips from peaks to dips so you can see exactly what is being cut, and MIX becomes the cut depth.
In Notch mode the four formants of the selected vowel are removed with a true band-reject cascade (unity passband, a deep null at each formant centre). Because the nulls come from the filter's own damping, every formant carves an equal-depth dip regardless of its level, and the cut is a real attenuation, never a phase-flipped bump. The Q knob sets the notch width: high Q is narrow and surgical, low Q is wide. MIX sets the depth, from a gentle scoop up to a full carve. Switching between Boost and Notch is click-free.
Preset Bar Controls
UNDO / REDO
Revert or restore parameter changes. Vowel Blender captures a snapshot every 0.5 seconds when parameters change, keeping up to 29 undo steps per session.
A / B
Toggle between two independent parameter states. Orange = Slot A, blue = Slot B. The plugin saves your current state before switching, so you never lose a setting. Great for comparing two different vowel choices on the same track.
PRESET NAME
Click to open the categorised preset menu (Init/Basics, Vocals, Synth/Keys, Bass, Creative, Sound Design). The arrows on either side step through presets one by one.
The name follows every load, wherever it comes from: the host's preset browser, a controller (see Controllers & Automation) or this menu. The arrows step on from the last preset loaded, and reopening the window shows that preset, not “Init”.
SAVE / DEL
Save your current settings as a user preset, or delete the active user preset. Factory presets cannot be overwritten or deleted. The Save dialog shows a live preview of the final filename: if a name is taken, you see "Will be saved as 'X 2' (name taken)" in amber italic before you commit. If you save over an existing user preset, a confirmation dialog asks before overwriting.
? (Help)
Activates Help mode. Hover over any control to see a contextual tooltip describing what it does. Click ? again to deactivate.
ABOUT
Opens the About dialog with version, license status, settings (telemetry consent, update checks), and a link to the diagnostic tool.
6. The Motion Recorder
The Motion Recorder lets you capture a movement on the XY pad and play it back in sync with your host. Record a hand-drawn diphthong, pick one of thirteen procedural shapes (Heart, Spiral, Star, Square Spiral, …), and have it loop forever in time with the music.
Modes
LIVE
The XY pad responds to your direct mouse input. No recording, no playback. Default mode.
RECORD
Click record, drag the XY pad, click stop. The path is captured. The plugin automatically switches to Replay mode when you stop recording.
REPLAY
The recorded path plays back in sync with the host transport. The XY cursor follows the recorded gesture. You can scrub it manually with the Head knob.
Loop Modes
Three loop options: Forward (loops from start to end), Backward (loops end to start), PingPong (alternates direction each pass). PingPong is the most musical for diphthongs and breathing motion.
Sync
The path can loop in free Hz (any rate independent from the host) or tempo-synced divisions: 1/8, 1/4, 1/2, 1/1, 2 bars, 4 bars, 8 bars. Tempo-synced motion locks to your host's bar grid, so the vowel sweep arrives on the downbeat every time.
Shape Generator
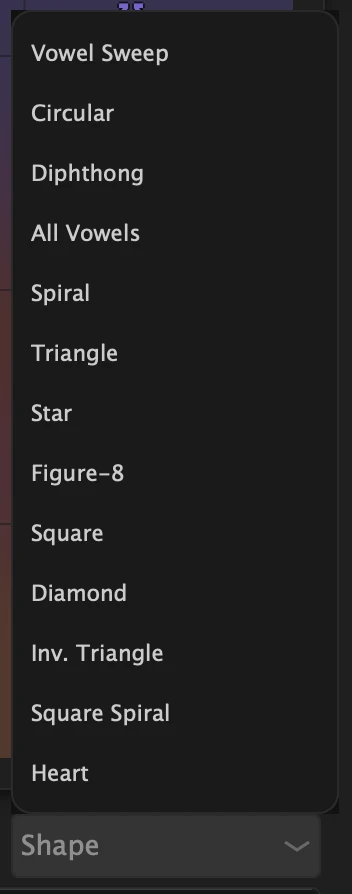
Thirteen built-in shapes generate ready-made motion paths. The dropdown lists them in the order below — the same order they appear in the menu, grouped roughly from smooth curves to geometric loops to the signature one:
| Shape | What you hear | Best for |
|---|---|---|
| Vowel Sweep | A slow diagonal pass from one corner of the pad to the opposite corner. | Risers, slow morphs, transitions. |
| Circular | A loop that traces a circle around the centre of the pad. | Sustained pads, ambient movement. |
| Diphthong | An arc between two specific vowels, then back. | Vocal-like glides (EH to IH, OH to UU). |
| All Vowels | A path that visits all 10 IPA vowels in sequence. | Chant effects, vocoder showcases. |
| Spiral | A smooth inward or outward spiral. | Tension builds, evolving textures. |
| Triangle | A three-vertex closed path — three sharp vowel landings per loop. | Three-syllable chants, rhythmic vowel patterns. |
| Star | A pentagram-style multi-pointed loop that alternates outward tips and inward dips. | Psychedelic shimmer, experimental textures. |
| Figure-8 | A lemniscate that crosses itself at the centre of the pad. | Dreamy, cyclical motion with a recurring centre pause. |
| Square | A four-vertex right-angled loop — four sharp vowel transitions per cycle. | Aggressive, robotic, step-like passages. |
| Diamond | A square rotated 45° so its vertices land on the extreme close/open and front/back positions. | Balanced rotation that hits every vowel extreme. |
| Inv. Triangle | The Triangle with its apex pointing down instead of up — different vowel emphasis (open instead of close). | Counterpart chant pattern, dark-flavoured rhythmic loops. |
| Square Spiral | A spiral built from right-angled segments instead of a smooth curve — stepped rather than continuous. | Glitch, IDM, stuttered build-ups. |
| Heart | A heart-shaped loop centred on the pad. | Playful, emotional motion. Signature shape. |
Head
HEAD
Manual scrub of the playback position (0 to 1). Useful for freezing the path at a specific point or for automating playback offset.
Modulatable via destination 36, so an LFO or step sequencer can drive the head position non-linearly.
Note on Snap: The SNAP knob (covered in the Pad Knobs section of the Controls Reference) is a pad-wide control, not a motion-recorder-only one. It pulls the cursor toward the nearest IPA vowel regardless of how the cursor got there: a hand drag, a motion-recorder path, or a modulator. With Snap above 0.6, motion loops hit crisp vowel landings rather than melting between them.
7. The Modulation System
Vowel Blender ships with a deep modulation engine: nine modulator types, multi-instance, intermodulation supported. Click the MOD button in the top bar to open the panel.

The Nine Modulator Types
| Type | Character | Best for |
|---|---|---|
| LFO | Periodic shape (sine, triangle, saw up, saw down, square, S&H, noise), free Hz or tempo-synced. | Vibrato, wobble, tempo-locked motion. |
| MSEG | Multi-segment envelope. Draw any shape with up to 128 points. | Risers, custom rhythmic shapes, evolving textures. |
| Step Sequencer | 1 to 64 steps, per-step value + shape + curve, tempo-synced. | Vowel patterns, gated motion, rhythmic articulation. |
| Audio Oscillator | An audio-rate oscillator: five waveforms, 20 Hz to 20 kHz. | FM-style modulation, audible artifacts, sound design. |
| Envelope Generator | AHDSR envelope fired by your audio crossing a threshold, or by MIDI notes. | Plucked vowel attacks, per-hit motion on drums, one envelope per note on a MIDI line. |
| Envelope Follower | Tracks the input level. Fast attack, slow release. | Talkbox effects, source-driven motion, dynamic vowels. |
| Macro | A 4-output controller (Knob 1, Knob 2, Button 1, Button 2). Each output routes independently. | Performance control, single-knob morphs. |
| MIDI | Keytrack, velocity, aftertouch and mod wheel (CC1) as modulation sources. | Live performance, expressive control surfaces. |
| XY Pad | A free 2D pad whose X and Y positions are independently routable. | Two-parameter macros, performance shapes. |
Routing a Modulator to a Parameter
- Click + ADD MODULATOR at the end of the panel. Choose its type from the menu.
- Tweak the modulator's parameters in its card.
- Click ARM in the card header. The button lights up. Macro, MIDI and XY Pad have no header ARM: each of their outputs has its own button on the card.
- Click a control on the plugin (Vowel X, Vowel Y, Shift, Q, Mix, Snap, Drive). The route is created at 50%. To set the amount directly, drag up or down on the control instead: up for positive, down for negative. A ring around the knob shows the amount while the modulator is armed.
- Click ARM again to finish. Fine-tune any amount later in the Mod Routes popup, which also reaches the destinations that have no knob on the main panel.
The LFO Card
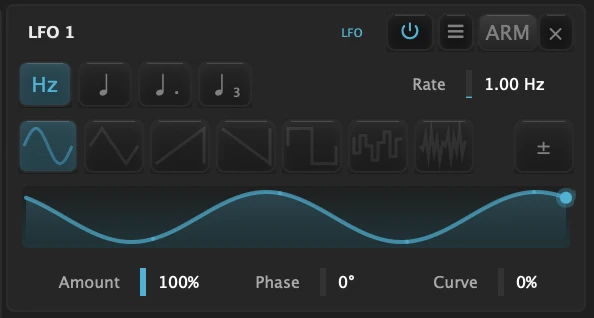
The LFO is the workhorse modulator. Seven waveforms: Sine, Triangle, Saw Up, Saw Down, Square, S&H and Noise. Rate runs from 0.01 to 20 Hz, or switch to tempo sync and pick a division from 8 bars down to 1/64, with dotted and triplet modes. Curve bends the shape: on Square it sets the pulse width, and it is greyed out on S&H and Noise. The ± switch chooses symmetrical modulation around the current value or one-sided motion.
The MSEG Card
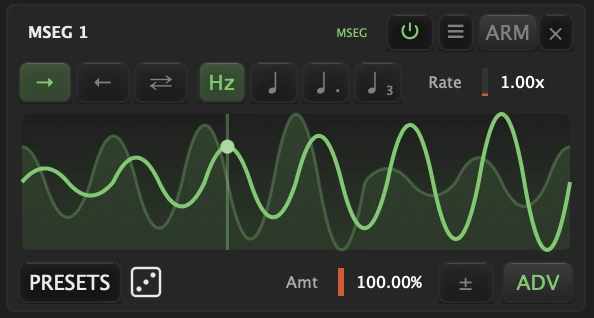
The MSEG is a draw-anything envelope. Up to 128 points, five curve types per segment (Linear, Smooth, S-Curve, Step, Hold), three play directions (forward, backward, ping-pong), snap grid. Click the ADV button on the card to open the full editor.
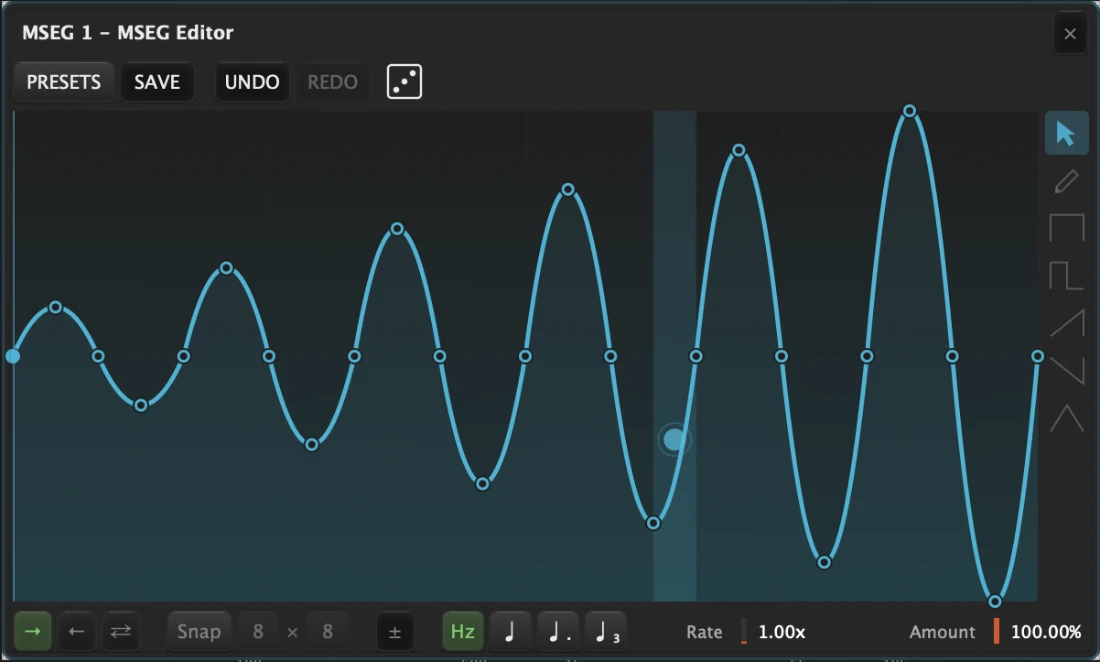
The editor offers seven drawing tools (Pointer, Pencil, Square, Pulse, Ramp Up, Ramp Down, Triangle). Stamp tools let you drop pre-made shapes. With the Pointer, click an empty spot to add a point, double-click a point to delete it, and right-click a segment to choose its curve type. The dice button generates a random shape, as dense as the horizontal snap grid (great for inspiration). SAVE stores your shape for reuse, PRESETS opens the shape browser.
The Step Sequencer Card
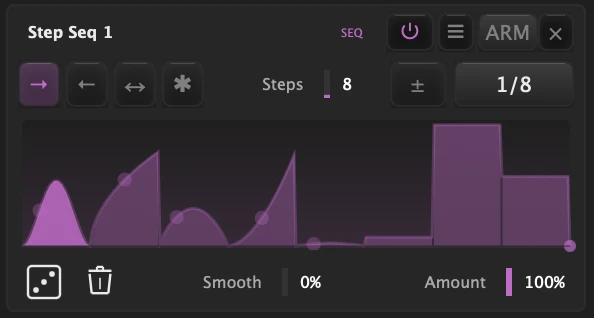
1 to 64 steps. Each step has a value (0 to 1), a shape (Flat, Ramp Up, Ramp Down, Triangle, Sine), and a curve (-1 to +1: 0 = linear, >0 = exponential, <0 = logarithmic). Drag vertically on a step to set its value. Right-click a step to choose its shape, or apply one shape to all steps. On a shaped step, drag its small handle up or down to bend the curve. The dice randomises values, shapes and curves at once.
The Audio Oscillator Card
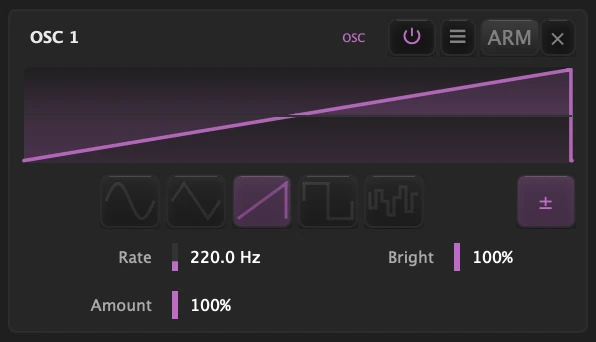
Unlike the LFO (sub-audio rate), the Audio Oscillator runs at audible frequencies: Rate goes from 20 Hz to 20 kHz (default 220 Hz). Route it to a parameter for FM-style modulation, audible artifacts, or pure sound design effects. Five waveforms: Sine, Triangle, Saw, Square and S&H. The Shape field changes job with the waveform, and its label follows: Drive, Symmetry, Bright, Duty (the pulse width of the Square) and Smooth. Anti-aliasing is always on.
The Envelope Generator Card
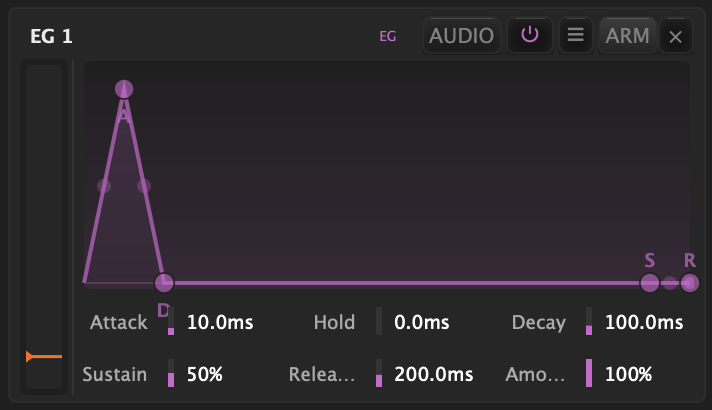
An AHDSR envelope with two ways to fire it, chosen with the AUDIO / MIDI button in the card's header:
- AUDIO (the default): your audio plays it. Each time the input rises above the threshold, the envelope runs its Attack, Hold and Decay, stays at Sustain while the sound stays loud, and falls through Release when it drops away. No MIDI needed: a drum hit, a plucked note or a sung phrase each fire it. Set the threshold by dragging on the meter at the left of the card (-60 to 0 dB, default -20 dB).
- MIDI: your keyboard plays it. Every note-on restarts the attack, even with the previous key still down, and the envelope stays at Sustain until the last key comes up. Use it on a legato line, where the audio never drops far enough between notes to fire the envelope again. The meter becomes a light that shows the gate open.
Hold keeps the envelope at its peak before the decay starts, for percussive shapes.
The Envelope Follower Card
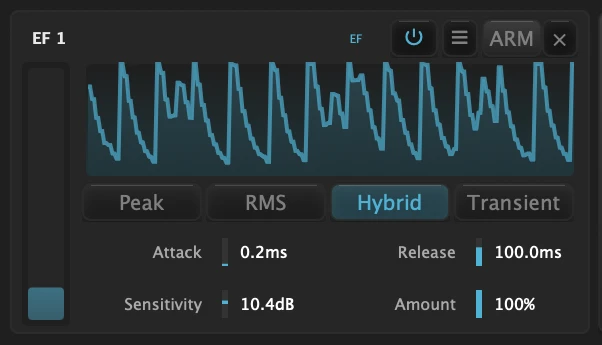
The Envelope Follower turns your audio's loudness into modulation. Fast attack catches transients, slow release smooths the decay. Sensitivity (-12 to +24 dB) sets how much level it takes to reach full modulation: raise it for quiet sources. Detection mode chooses how it listens:
- Peak follows the literal level.
- RMS follows the averaged loudness, smoother and slower.
- Hybrid (the default) grabs the attack like Peak and releases smoothly like RMS.
- Transient ignores the sustained level and fires on each attack: a hit out of silence gives full modulation, a softer re-attack less, and a held note nothing after its onset. Turning the source down does not change it, since it measures how sharp the attack is, not how loud.
Route it to Vowel X and Vowel Y at different amounts and the pad cursor will trace a 2D pattern driven by the source dynamics. This is the heart of the talkbox effect.
The Macro Card
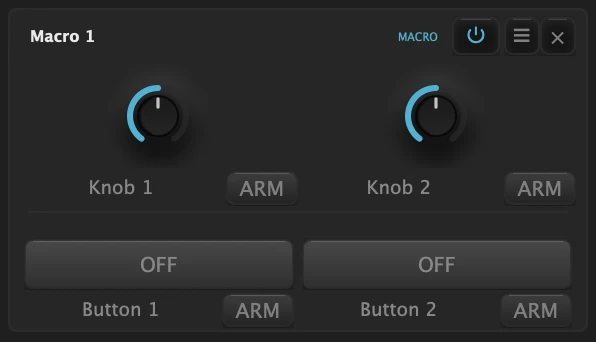
The Macro is your performance hub. One Macro modulator gives you four routable outputs: Knob 1, Knob 2, Button 1, Button 2. Each can drive a different parameter at a different depth. Use it to build "single knob morphs" that change three or four things at once when you turn a single control.
The MIDI Card
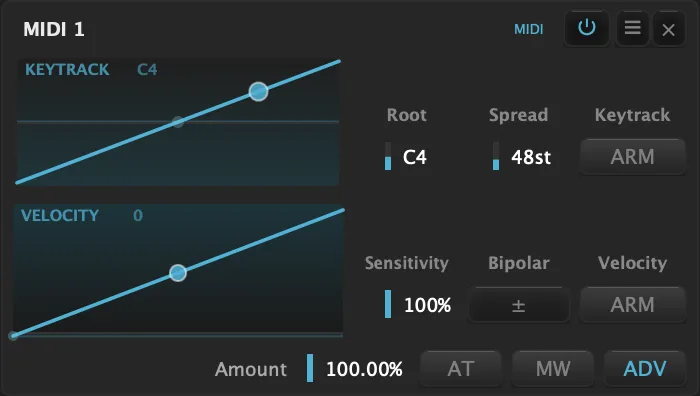
The MIDI modulator carries four sources at once, each routable to its own destination at its own amount:
- Keytrack: where you play on the keyboard. Set a Root note and a Spread in semitones, and the note position maps across the response curve. Play higher to open a vowel, lower to close it.
- Velocity: how hard you strike a key, captured at note-on. Good for adding bite on accents.
- Aftertouch: channel pressure. Lean into a held key and the vowel shifts under your finger.
- Mod Wheel: CC1, the classic expression wheel. Slide your physical wheel between close and open vowels in real time.
To route a source, arm it on the card, then click a destination. Keytrack and Velocity each have their own ARM button, Aftertouch arms from AT and Mod Wheel from MW. Each source has its own smoothing, so you can keep velocity instant while letting aftertouch glide.
The ADV Panel
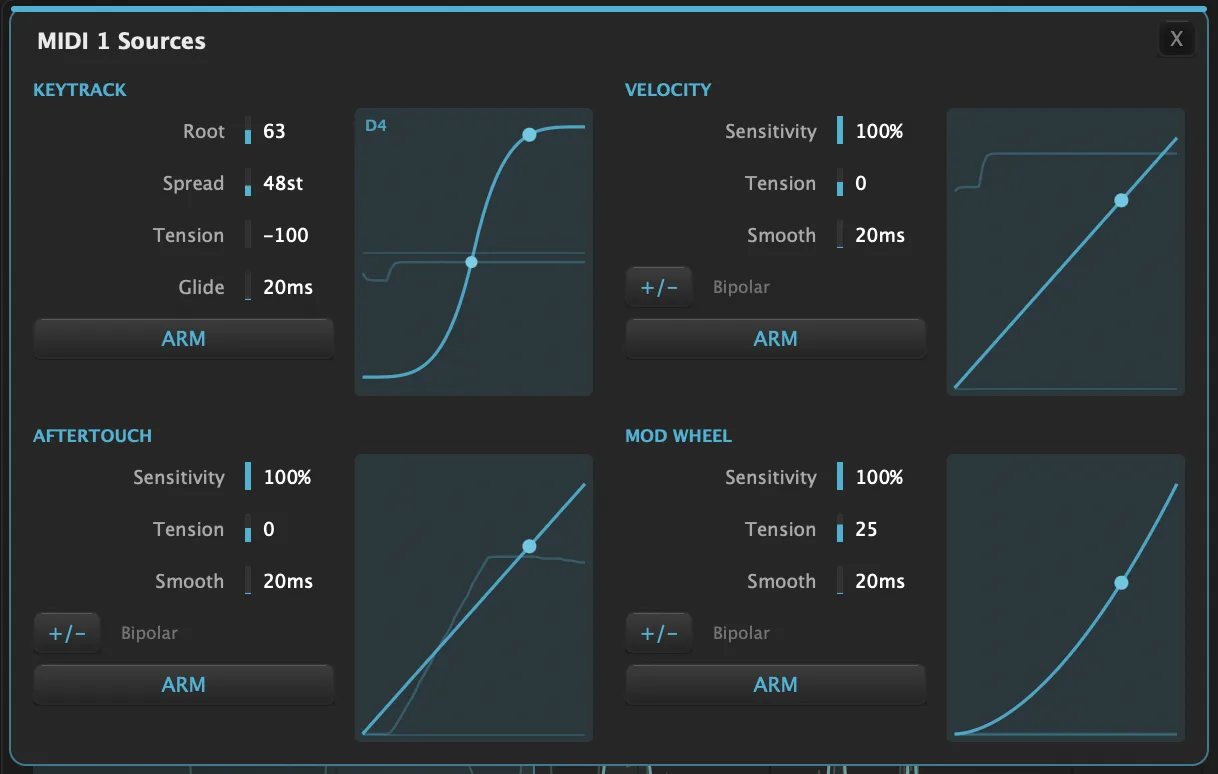
Click ADV on the MIDI card to open the per-source editor, one cell per source. Velocity, Aftertouch and Mod Wheel each get a Sensitivity amount, a Tension that bends the response curve (drag the handle on the curve itself), a Smooth time, and a ± bipolar toggle. Keytrack works on notes rather than levels, so its cell has Root, Spread, Tension and Glide instead, and shows the incoming note. Every curve animates in real time with a trace of the live signal, so you can see exactly how your playing maps to modulation. You can ARM a source from here too, and the panel closes so you can click the destination.
The XY Pad Card
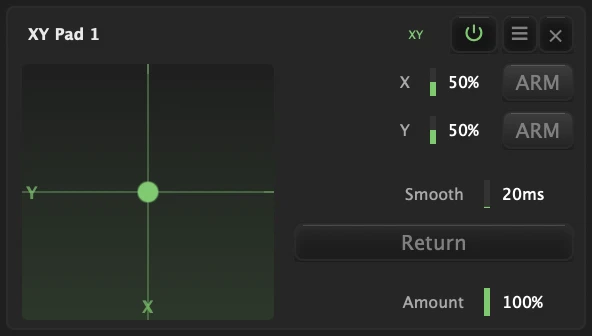
A second XY pad, this time used as a modulation source rather than the formant filter's main control. The pad has two outputs (X and Y), each with its own ARM button, so each can drive a different parameter. Drag the cursor while the track plays for two-parameter moves. Smooth takes the jitter out of your hand. Different from the main vowel pad: this one only generates modulation, it does not select a vowel.
The Mod Routes Panel
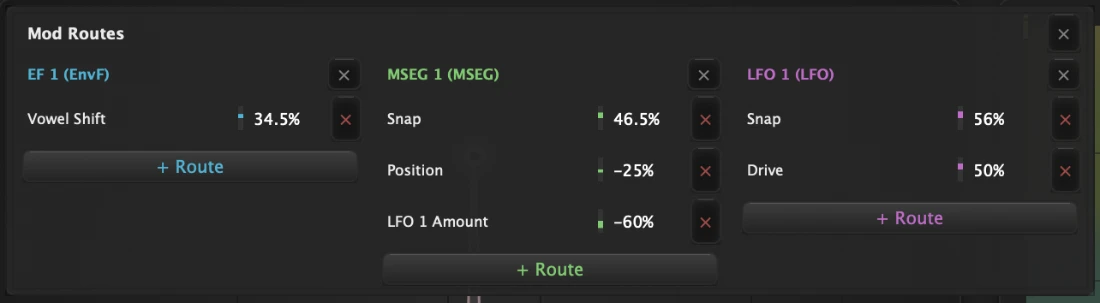
Click ☰ on any modulator card to open Mod Routes. Each modulator gets a column listing every route that leaves it: destination and amount (-100% to +100%). Drag an amount to fine-tune it, click × to remove the route. + Route adds a route from a list of every destination, including the ones with no knob on the main panel (Breath and Humanize from the Character popup, and the fields of the other modulators). The Macro column has a separate + under Knob 1, Knob 2, Button 1 and Button 2. You do not have to open this popup to unmap something: right-click a modulated knob on the main panel and its routes are listed for removal. When a knob carries more than one, the menu also offers Remove all modulations.
Intermodulation
Modulators can modulate other modulators' parameters. Examples:
- An LFO modulating an MSEG's Amount: the MSEG breathes in and out over time.
- An Envelope Follower modulating a Step Sequencer's Smooth: the steps glide when the source plays loud and snap back into place when it goes quiet.
- A Macro knob driving the Rate of two LFOs at once (both in Hz mode): you control the global modulation speed with one knob.
Arm a modulator, then drag up or down on a field inside another modulator's card. A click without a drag creates nothing. The fields that take modulation are the LFO's Rate (in Hz mode), Amount, Phase and Curve, the Envelope Follower's Attack, Release, Sensitivity and Amount, the Envelope Generator's times, Sustain and Amount, the Step Sequencer's Smooth and Amount, the MSEG's Rate and Amount, the Audio Oscillator's Rate, Shape and Amount, the XY Pad's X, Y, Smooth and Amount, and the Macro's Knob 1 and Knob 2. The Audio Oscillator cannot drive an LFO or MSEG Rate: at audio rate that modulation averages out to nothing.
8. Advanced Tips & Workflows
Vocoder-Style Effects
Combine three things: source pitched up by Pitch +12, a low Q (around 0.7) for smooth formants, and an Envelope Follower routed to Vowel X with a high amount. The result is a classic vocoder texture: pitched-up source dynamically shaping vowels in time with its own envelope. Add a slight Breath (0.10) for the consonant feel.
Talkbox Effects
The opposite of vocoder. Use the Envelope Follower routed to both Vowel X and Vowel Y at different amounts. Now the pad cursor traces a 2D pattern driven by the input level. Push Drive to 0.5 and Q above 1.5 for a tight, robotic talkbox quality. Try the "Talkbox" preset as a starting point.
Diphthong Glides
Record a slow drag from one vowel to another (EH to IH works beautifully, sounds like "ay") using the Motion Recorder. Set Sync to 2 bars, Loop to PingPong. The result is a continuous, breathing diphthong. Combine with a slow LFO on Shift for melodic glides on top.
Single-Knob Morphs with Macro
Add a Macro modulator. Route Knob 1 to Vowel X at 80%, to Q at 40%, to Drive at 30%. Now turning Knob 1 morphs three things at once: pad position, resonance, and saturation. Turn it while the track plays for a live performance move.
Step-Sequenced Vowel Patterns
Add a Step Sequencer at 16 steps, sync 1/16. Route to Vowel X. Set each step to a different value. Each 16th note now jumps to a different vowel. Add curves to soften the jumps, or push curves negative for snappy gates. Try the "Step Sequencer Vowels" preset for an immediate example.
MSEG Risers and Drops
Open an MSEG, draw a slow exponential rise from 0 to 1 over 4 bars. Route to Shift at a 100% amount. The formants rise an octave smoothly across the bar count. For a drop, draw the inverse. For a riser-then-drop, do both. The "Pitched Riser" preset combines this with the pre-formant pitch shifter for a full sweep effect.
Live Performance with the XY Pad and MIDI
Add a MIDI modulator. Route the mod wheel to Vowel Y. Now your mod wheel slides the vowel between close (top) and open (bottom) in real time. Map an aftertouch or velocity layer for additional expressiveness. Combine with a slow LFO on Shift for vibrato that always speaks the right vowel.
Stereo Width Without Phase Issues
Set Stereo Mode to M/S. The mid channel keeps your chosen XY position. The side channel goes to a different vowel based on the Stereo Amount (30 to 50% works well). The result is wider stereo without affecting the centre. Compare to running two instances on a duplicated track: M/S mode gives you a similar effect with a single instance and no phase risk.
Building Evolving Pads
Stack three modulators on the same destination at different rates. For example, on Shift: an LFO at 1/4 (fast wobble), an LFO at 4 bars (slow drift), an MSEG at 8 bars (long evolution). They sum together. The result is motion that never repeats audibly.
9. Factory Presets
Vowel Blender ships with 41 factory presets across six categories. Click the preset name in the top bar to open the menu: each category (Init / Basics, Vocals, Synth / Keys, Bass, Creative, Sound Design) opens its own sub-menu, and User lists everything you have saved.
Key Presets
| Preset | Category | What it sounds like | Tweak tip |
|---|---|---|---|
| Subtle Vowel | Init/Basics | Barely-there vowel tint. Adds character without announcing itself. | Push Mix above 60% for a more obvious effect. |
| Drive Open | Init/Basics | Open AH vowel with moderate Drive. Warm, weighty starting point. | Drag the XY cursor up for a brighter EE feel. |
| Vocoder Lead | Vocals | Classic vocoder texture: pitched-up source, low Q, envelope follower drives Vowel X. | Lower Pitch Transpose to +7 for a less extreme sound. |
| Talkbox | Vocals | Robotic, talking-box quality. Envelope follower routed to both X and Y, high Q, Drive at 0.5. | Reduce Q to 1.0 for a smoother, more vocal feel. |
| Breathy Harmonizer | Vocals | Whispered, intimate vowel layer. High Breath, low Mix, gentle Voice Model. | Increase Breath to 0.6 for a true ASMR feel. |
| Talking Synth | Synth/Keys | Synth pad that speaks. Envelope follower drives the pad position from the synth's envelope. | Switch the Voice Model to Kids for a brighter, smaller-headed feel. |
| Vowel Pad | Synth/Keys | A motion-recorded heart-shape loop drives the XY pad. Slow, breathing vowel motion. | Change the loop sync from 4 bars to 8 bars for a longer breath. |
| Vintage Vowel | Synth/Keys | An MSEG arc modulates Shift in tempo sync. Vintage talkbox feel. | Open the MSEG ADV editor and redraw the arc for a different rhythm. |
| Vowel Sub | Bass | OH position with broad formants. Adds vocal weight to a bass synth. | Lower Pitch Transpose to -12 for a sub-vowel an octave below. |
| Growl | Bass | An LFO at 1/8 modulates Shift, creating a slow wobble in the formants. | Increase Drive to 0.7 for a more aggressive growl. |
| Step Sequencer Vowels | Creative | 16-step sequencer drives Vowel X at 1/16. Each step is a different vowel. | Open the Step Sequencer card, click the dice for a random pattern. |
| Vowel Heart | Creative | A heart-shaped motion path loops over 4 bars. Signature playful preset. | Switch the loop to PingPong for a different feel. |
| Vowel Sweep | Sound Design | A 2-bar diphthong path looped in PingPong. Slow morph from one vowel to another. | Change the Voice Model to Kids for a brighter sweep. |
| Pitched Riser | Sound Design | An MSEG sweeps both Shift and Transpose together over 4 bars. Cinematic riser. | Lower Mix to 70% to keep the dry source audible underneath. |
| De-Nasal | Sound Design | Notch mode. Carves a narrow front-vowel resonance out of a vocal. Sweep the pad to find the nasal spot, then set the depth with Mix. | Raise Q for a more surgical cut, lower it to scoop a wider band. |
| Anti-Honk | Sound Design | Notch mode. Tames the boxy, honky open-back resonance on vocals and midrange sources. | Point the pad slightly higher or lower to chase the exact honk. |
| Carve Vowel | Sound Design | Notch mode. A wide, full-depth carve that hollows the vowel character out of a synth or pad in a way plain EQ cannot. | Automate the pad position to make the hollow move through the sound. |
All Categories
- Init/Basics (3 presets): Init, Subtle Vowel, Drive Open. Start here.
- Vocals (10 presets): Vocoder Lead, Talkbox, Vowel Emphasis, Narrow Whisper, Breathy Harmonizer, Ad-Lib Color, Wide Stereo Vocal, Octave Doubler, 5th Harmony, Diphthong Lead.
- Synth/Keys (6 presets): Talking Synth, Vowel Pad, Formant Lead, Robot Keys, Choir, Vintage Vowel.
- Bass (5 presets): Talking Bass, Vowel Sub, Formant Bass, Growl, Sub Voice.
- Creative (7 presets): Alien, Monster Size, Chipmunk, Step Sequencer Vowels, Dual-LFO Chaos, Vowel Heart, Spiral Vowel.
- Sound Design (10 presets): Riser Vowel, Percussion Vowelize, Intermod Granular, Vowel Sweep, Mono Spread, Pitched Riser, All Vowels Chant, and three Notch-mode presets: De-Nasal, Anti-Honk, Carve Vowel.
Saving Your Own Presets
Click SAVE in the preset bar to save your current settings as a user preset. The dialog shows a live preview: if your typed name collides with an existing preset, the line below the field reads "Will be saved as 'X 2' (name taken)" in amber italic. If you save over an existing user preset, a confirmation dialog asks before overwriting. User presets are stored at:
- macOS:
~/Library/UB DSP/Vowel Blender/presets/ - Windows:
%APPDATA%\UB DSP\Vowel Blender\presets\ - Linux:
~/.config/UB DSP/Vowel Blender/presets/
User presets capture the full state, including the modulation graph, the motion recorder path, and all parameters. Factory presets cannot be overwritten or deleted.
10. Controllers & Automation
Every knob of Vowel Blender is a parameter your DAW can automate and a controller can play. The host shows each value with its unit or its name: Crossover Freq reads “100 Hz”, Shift a value in semitones, Voice Model “Man 2”. Type a value into the host and it lands where it says.
Remote Control Pages (Bitwig Studio)
In Bitwig Studio (CLAP), Vowel Blender puts itself on the eight knobs of any controller, in four pages:
| Page | The eight knobs |
|---|---|
| Vowel | POSITION, OPEN, Shift, Q, Drive, Breath, Mix, SNAP |
| Character | Voice Model, Slope, BOOST/NOTCH, Humanize, Size, Alien, Pitch on/off, Transpose |
| Output | In, Out, Stereo Mode, Stereo Amount, LOWS, Crossover Freq, Limiter, LOUDNESS MATCH |
| Perform | Prev Preset, Next Preset, Prev Vowel, Next Vowel, Motion Play, HEAD, Host Sync, BYPASS |
The Vowel page starts with POSITION and OPEN, the two coordinates of the XY pad: on a controller, two knobs walk the vowel space. Live and Push do not read these pages (see Other Hosts below).
Buttons You Can Reach
Prev Preset, Next Preset, Prev Vowel, Next Vowel and Motion Play are parameters, so a controller button can press them. Prev Vowel and Next Vowel put the cursor on the vowel before or after the nearest one, in the order of the vowel row under the pad, like a click on that row. Motion Play starts and stops the motion recorder, and the transport bar shows PLAY when a controller started it.
They are on the Perform page in Bitwig. In Ableton Live with Push (VST3), they come at the end of the parameter list: use Configure in Live to bring them forward. They work with the plugin window closed, and every press fires, whether the controller button toggles or springs back. Nothing records them: not the session, not undo, not presets.
Other Hosts
Hosts that do not read the remote pages, Live and Push among them, list the parameters in banks of eight, in the plugin's own order. The buttons above, added in 1.4.1, come last.
11. About & Settings
Click the ABOUT button in the preset bar to open the About dialog. This panel shows plugin version, license status, website and support links, and a Settings section with preferences you can toggle.
Settings Toggles
Check for updates
When enabled, the plugin checks for new versions on launch and shows a banner if an update is available. Disable to suppress all update checks. No personal data is sent. The check is a simple version request.
Help improve Vowel Blender (anonymous)
Opt-in anonymous telemetry. When enabled, the plugin sends a small anonymous report each time it loads, smaller than a single MIDI note. This helps the developer understand which features are used and prioritise improvements. No personal information is ever collected or shared. You can toggle this at any time.
First Launch: Telemetry Consent
The very first time you open Vowel Blender, a small popup asks "Help me improve Vowel Blender". It explains that anonymous usage data can be sent to help the solo developer improve the plugin. Two options:
- "Sure, happy to help": enables anonymous telemetry.
- "No thanks": declines. No data is sent.
You can also click outside the popup to dismiss it (same as declining). Your choice is remembered. You can change your mind later in the Settings section.
Help Mode
Click the ? button in the preset bar to activate Help mode. Hover over any control (knob, button, panel) to see a contextual description bubble appear next to your cursor. Click ? again to deactivate.
Diagnostic Link
At the bottom of the About dialog, you will see a link: "Plugin not working? Run diagnostic". Clicking it opens the UB DSP Diagnostic Tool page, where you can download a standalone application that checks your system, scans for installed UB DSP plugins, and sends a diagnostic report directly to UB DSP support. This is the fastest way to get help if you encounter a technical issue.
12. Installation
macOS
Download the .pkg installer from ubdsp.com/downloads. Double-click to open the installer, then follow the steps. You can choose what to install (AU, VST3, CLAP, AAX and this manual as a PDF, all selected by default).
- AU:
/Library/Audio/Plug-Ins/Components/ - VST3:
/Library/Audio/Plug-Ins/VST3/ - CLAP:
/Library/Audio/Plug-Ins/CLAP/ - AAX:
/Library/Application Support/Avid/Audio/Plug-Ins/ - Manual (PDF):
/Library/Application Support/UB DSP/
The installer is signed and notarised by Apple.
Windows
Download the .exe installer and run it. The installer guides you through component selection (VST3, CLAP, AAX and this manual as a PDF, all included in the full installation). Administrator privileges are required.
- VST3:
C:\Program Files\Common Files\VST3\ - CLAP:
C:\Program Files\Common Files\CLAP\ - AAX:
C:\Program Files\Common Files\Avid\Audio\Plug-Ins\ - Manual (PDF):
C:\ProgramData\UB DSP\
To uninstall, use the Windows "Add or Remove Programs" panel.
Linux
Download the .tar.gz archive, extract it, and run ./install.sh. The script prompts you to choose which formats to install.
- User install (default):
~/.vst3/and~/.clap/ - System-wide:
sudo ./install.sh --systeminstalls to/usr/lib/vst3/and/usr/lib/clap/
After installing on any platform, restart your DAW and rescan plugins if needed.
13. Licensing & Activation
Trial Mode
Vowel Blender runs in trial mode until activated. All features are fully functional, but 2 seconds of silence are inserted every 40 seconds (with smooth fade-ins and fade-outs to avoid clicks). A "TRIAL" watermark is displayed on the interface.
This lets you evaluate the plugin's sound quality in your own sessions before purchasing.
Activating Your License
- Purchase a license at ubdsp.com.
- Download your
.ubkeyfilelicense file from your account. - In Vowel Blender, click the ACTIVATE button (visible in trial mode) or go to About → Activate License....
- Select your
.ubkeyfile. The plugin validates it instantly (offline, no internet required). - Done. The trial silences and watermark are removed. The About dialog shows "Licensed to: [Your Name]".
License Storage
Your license is cached locally so you don't need to re-activate after updates:
- macOS:
~/Library/UB DSP/Vowel Blender/ - Windows:
%APPDATA%\UB DSP\Vowel Blender\ - Linux:
~/.config/UB DSP/Vowel Blender/
.ubkeyfile again, including where you last loaded it from. If you have moved or deleted that file since (a copy left in Downloads, for example), the plugin goes back to trial mode and a LICENSE CHECK dialog tells you once per session. Click Activate and select the file. You can download it again from your account on ubdsp.com. This happens once: after that, the new cache carries your license through future updates.14. Troubleshooting & FAQ
The plugin doesn't appear in my DAW
Make sure the correct format is installed for your DAW. Rescan plugins in your DAW's preferences. On macOS, some DAWs require an AU validation: check the DAW's plugin manager. If using CLAP, make sure your DAW supports the CLAP format.
I hear silence every 40 seconds
This is the trial mode protection. Activate your license to remove it. See Licensing & Activation. If it started right after updating to 1.4.0 from an earlier version, your license file has most likely moved since you activated: the note under License Storage explains why, and how to fix it.
The vowel sound is too obvious
Lower Mix to 40 to 60% for parallel processing. Reduce Q below 1.0 for smoother, less synthetic vowels. Drag the XY cursor closer to the centre of the pad. If a Voice Model feels too "characterised", switch to Man 2 (the most neutral).
The bass disappears when I push Q or Drive
High Q narrows the formant peaks, which can suck out the body around 60–200 Hz. Heavy Drive on a full-range source can also push the bass into the saturation. Turn on LOWS in the bottom bar: it splits off the low band so it bypasses the formant chain entirely. Drag the handle on the response curve to set the split (100 Hz for bass tracks, 200–300 Hz for drum buses or full mixes). The transition is click-free and the cutoff is remembered across toggles.
The vowel sound is too subtle
Push Mix to 100% to hear only the wet signal. Increase Q above 1.2 for sharper formants. Add some Drive to push more harmonics into the filter. Make sure the source has enough harmonic content above 1 kHz: a pure sine wave will not produce vowel character.
I added a modulator but nothing is happening
A modulator does nothing until it has a route. Click ARM in its card header (it lights up), then click the parameter you want to modulate: a ring appears around it. Open Mod Routes (the ☰ on the card) to confirm the route exists with a non-zero amount, and check that the card's power button is on. Some modulators need an input to start outputting: the Envelope Follower listens to your audio, the MIDI modulator to incoming notes, and the Envelope Generator to either, depending on its AUDIO / MIDI button. In AUDIO mode, an Envelope Generator whose threshold sits above your signal never fires: drag the threshold down on its meter. In MIDI mode, check that your DAW sends MIDI to the plugin.
My motion recorder path doesn't play back
The mode must be set to Replay, not Live. The host must be playing for tempo-synced playback. Check the loop mode (Forward/Backward/PingPong): if the path is one-shot, it stops after one pass. If you saved a user preset that includes a motion path, loading it should automatically switch to Replay.
High CPU usage
The Pitch toggle adds an FFT-based pitch shifter (~12 ms latency, moderate CPU). Disable it if you don't need pitch shifting: that saves the CPU, while the latency stays until the plugin is reloaded. Reduce the number of active modulators (each one runs in real time). The Stereo Mode L/R or M/S processes two channels independently: switch to Off if you don't need stereo splitting.
My host's bypass automation stopped working after the update
Before 1.4.1, the VST3 and AAX versions showed two Bypass parameters: Vowel Blender's own, and one your host added, which its bypass button worked. There is now only one, Vowel Blender's. Automation written on the old host bypass (or, in Pro Tools, on the plugin's Bypass) has to be written again. A VST3 session saved with the host's bypass on reopens with the plugin active.
The plugin window looks cropped or too small
Resize the window by dragging the bottom-right corner.
The L/R, M/S, and Width controls are greyed out
The plugin output is mono. Stereo width modes have no audible effect on a single output channel, so the controls are disabled to avoid confusion. To get stereo width on a mono source, re-insert Vowel Blender as Mono → Stereo (Logic Pro shows this in the insert sub-menu, Pro Tools lists it as a separate stem). The track will become stereo from the insert point on. See the Mono, Stereo, and Mono → Stereo section above for details.
I dragged a knob with Shift and nothing felt different
Shift activates fine-precision drag, where the knob moves about 10× slower per pixel of mouse movement. Hold Shift first, then drag (or keep dragging while pressing Shift mid-gesture). Useful for setting an exact semitone on Shift, a precise Q value, or aligning the XY cursor on a specific vowel position. The same applies to the XY pad.
Presets sound different from what I expected
Presets are designed for typical input levels. If your source is very quiet or very loud, the formant filter and any envelope-following modulators will respond differently. Try adjusting the level going into the plugin (use a gain plugin before Vowel Blender if needed).
My step sequencer curves were lost when I saved a preset
This was a bug in versions before 1.0.0. Update to the latest build. Step sequencer curves are now correctly saved and restored as part of the modulation state.
Something is wrong and I need help
Open the About dialog and click "Plugin not working? Run diagnostic" at the bottom. This opens the Diagnostic Tool page where you can download a standalone application that automatically checks your system, scans for installed UB DSP plugins (with version and format details), and sends a full report to UB DSP support. It's the fastest way to get personalised help. You can also reach us at support@ubdsp.com.