
Filter Blender Manual
Version 1.1.1
1. Welcome & Overview
A filter sweep is the oldest move in the book, and the best part of a filter is the moment you move it: the sweep opens, the loop starts to breathe, and you lean in. Pick a ladder and you get the ladder, all the way through. Filter Blender is built for the moments when you want more than one character: the squelch of a diode filter on the attack, the silk of a state-variable filter in the tail, and everything in between.
Filter Blender puts three analog-style filters on the corners of a triangle and lets you play the space between them. Drag one dot and the sound moves from a warm transistor ladder to a screaming 2-pole to a lo-fi CMOS band, or sits anywhere in between. Each corner has its own cutoff, resonance and drive, so a blend is never just a crossfade: it is three filters, three slopes and three characters working on the same sound at once.
Around the triangle you get 12 filter models, a motion recorder that loops the gestures you draw on the triangle, four effects (Comb Delay, Ring Mod, Phaser, Vowel) that you can place before or after the filter, and a modulation system with nine modulator types. A LOWS crossover keeps the bass out of the whole chain when you want the resonance without losing the foundation.
Formats: AU, VST3, CLAP and AAX on macOS. VST3, CLAP and AAX on Windows. VST3 and CLAP on Linux.
Platforms: macOS 10.13 or later (Apple Silicon and Intel; versions before macOS 11 are not tested), Windows 64-bit, Linux 64-bit.
2. Quick Start: First Great Sound in 60 Seconds
- Insert Filter Blender on a drum loop or a drum bus.
- Click the preset name in the top bar and load "Loop Breather" from Drums & Loops. Press play: every bar, the loop walks from a dark resonant ladder to a crunchy band and back.
- Click MOD to see what moves it: one LFO pushing the LEVEL knobs, which moves the dot on the triangle. Click MOD again to hide the panel.
- Find your own blend: drag the dot toward the corner you like, then turn that corner's CUTOFF until the loop sits where you want it.
- Compare: turn on LOUDNESS in the bottom bar so the level stays close to the dry signal, then toggle BYPASS. You hear the change in tone, not a change in volume.
3. Typical Use Cases
On Drums & Loops
Load "Break Glue" (Drums & Loops). Three driven lowpasses sit between 1.5 and 5.5 kHz, the Soft limiter squashes the hits together and an envelope follower opens the two ladder corners on every hit, so the transients stay bright and the space between them goes dark. LOWS keeps the kick's sub out of the chain below 60 Hz.
For a pumping hi-hat loop, try "Hat Lift": a saw LFO on two highpass corners ducks the loop on every quarter note, like a sidechain without a sidechain. For metallic tails, "Crush Kit" puts the Comb Delay in front of the filter.
On Bass
Load "Acid Line" (Bass). An envelope follower opens two ladder corners by up to three octaves on a hard note and barely at all on a soft one, so the line gets its own squelch per note, with velocity built in.
For a tighter pluck, "Pluck Tight" uses a fast follower with a short release. For width on a mono bass, "Growl Wide" puts a 30 Hz ring modulator after the filter with its left and right carriers 90 degrees apart. If the low end thins out on any bass preset, turn on LOWS and drag its handle to 80 to 120 Hz.
On Vocals
Load "Air Lift" (Vocals). A Bell corner at 3.5 kHz lifts the presence while two highpass corners clean up the low end. A follower hands the blend to the Bell on every loud phrase and sweeps it toward 8 kHz, so the voice opens up when it sings out and stays lean when it is quiet.
For a talking effect, "Vowel Talk" sweeps the Vowel stage across the whole vowel range every bar. For a lo-fi, band-limited voice, "Radio Cab" clamps it into three narrow bands around 1.3 kHz and is mono on purpose.
On Synths, Pads & Keys
Load "Drift Pad" (Synth & Pads). A drawn MSEG envelope walks the blend over two bars, from a warm ladder to a resonant band and back, and drags the phaser's notches along with it. The pad changes filter character across a phrase instead of wobbling one filter.
On an electric piano, "Rhodes Silk" sways two warm lowpasses an octave either side of 1.5 to 2 kHz. On an organ, "Organ Grit" puts a 22-stage phaser in front of the filter. "Wah Pedal" rocks two band corners from about 400 Hz to 2 kHz on the half note.
Sound Design & Self-Oscillation
Load "Ring Before" (Sound Design). The Ring Mod runs first and the triangle carves its sidebands: a notch at 1.4 kHz, a screaming band at 2.2 kHz and a clean lowpass at 3.6 kHz. Moving an effect in front of the filter is a different sound, not just a different routing.
For motion, "Rosette Bloom" plays a three-petal path that keeps returning to a pure corner. For a filter that plays a melody on its own, the Self-Oscillation category pushes the resonance past the point where the filter starts to sing: "Ladder Song" is a good first stop.
4. Interface Overview
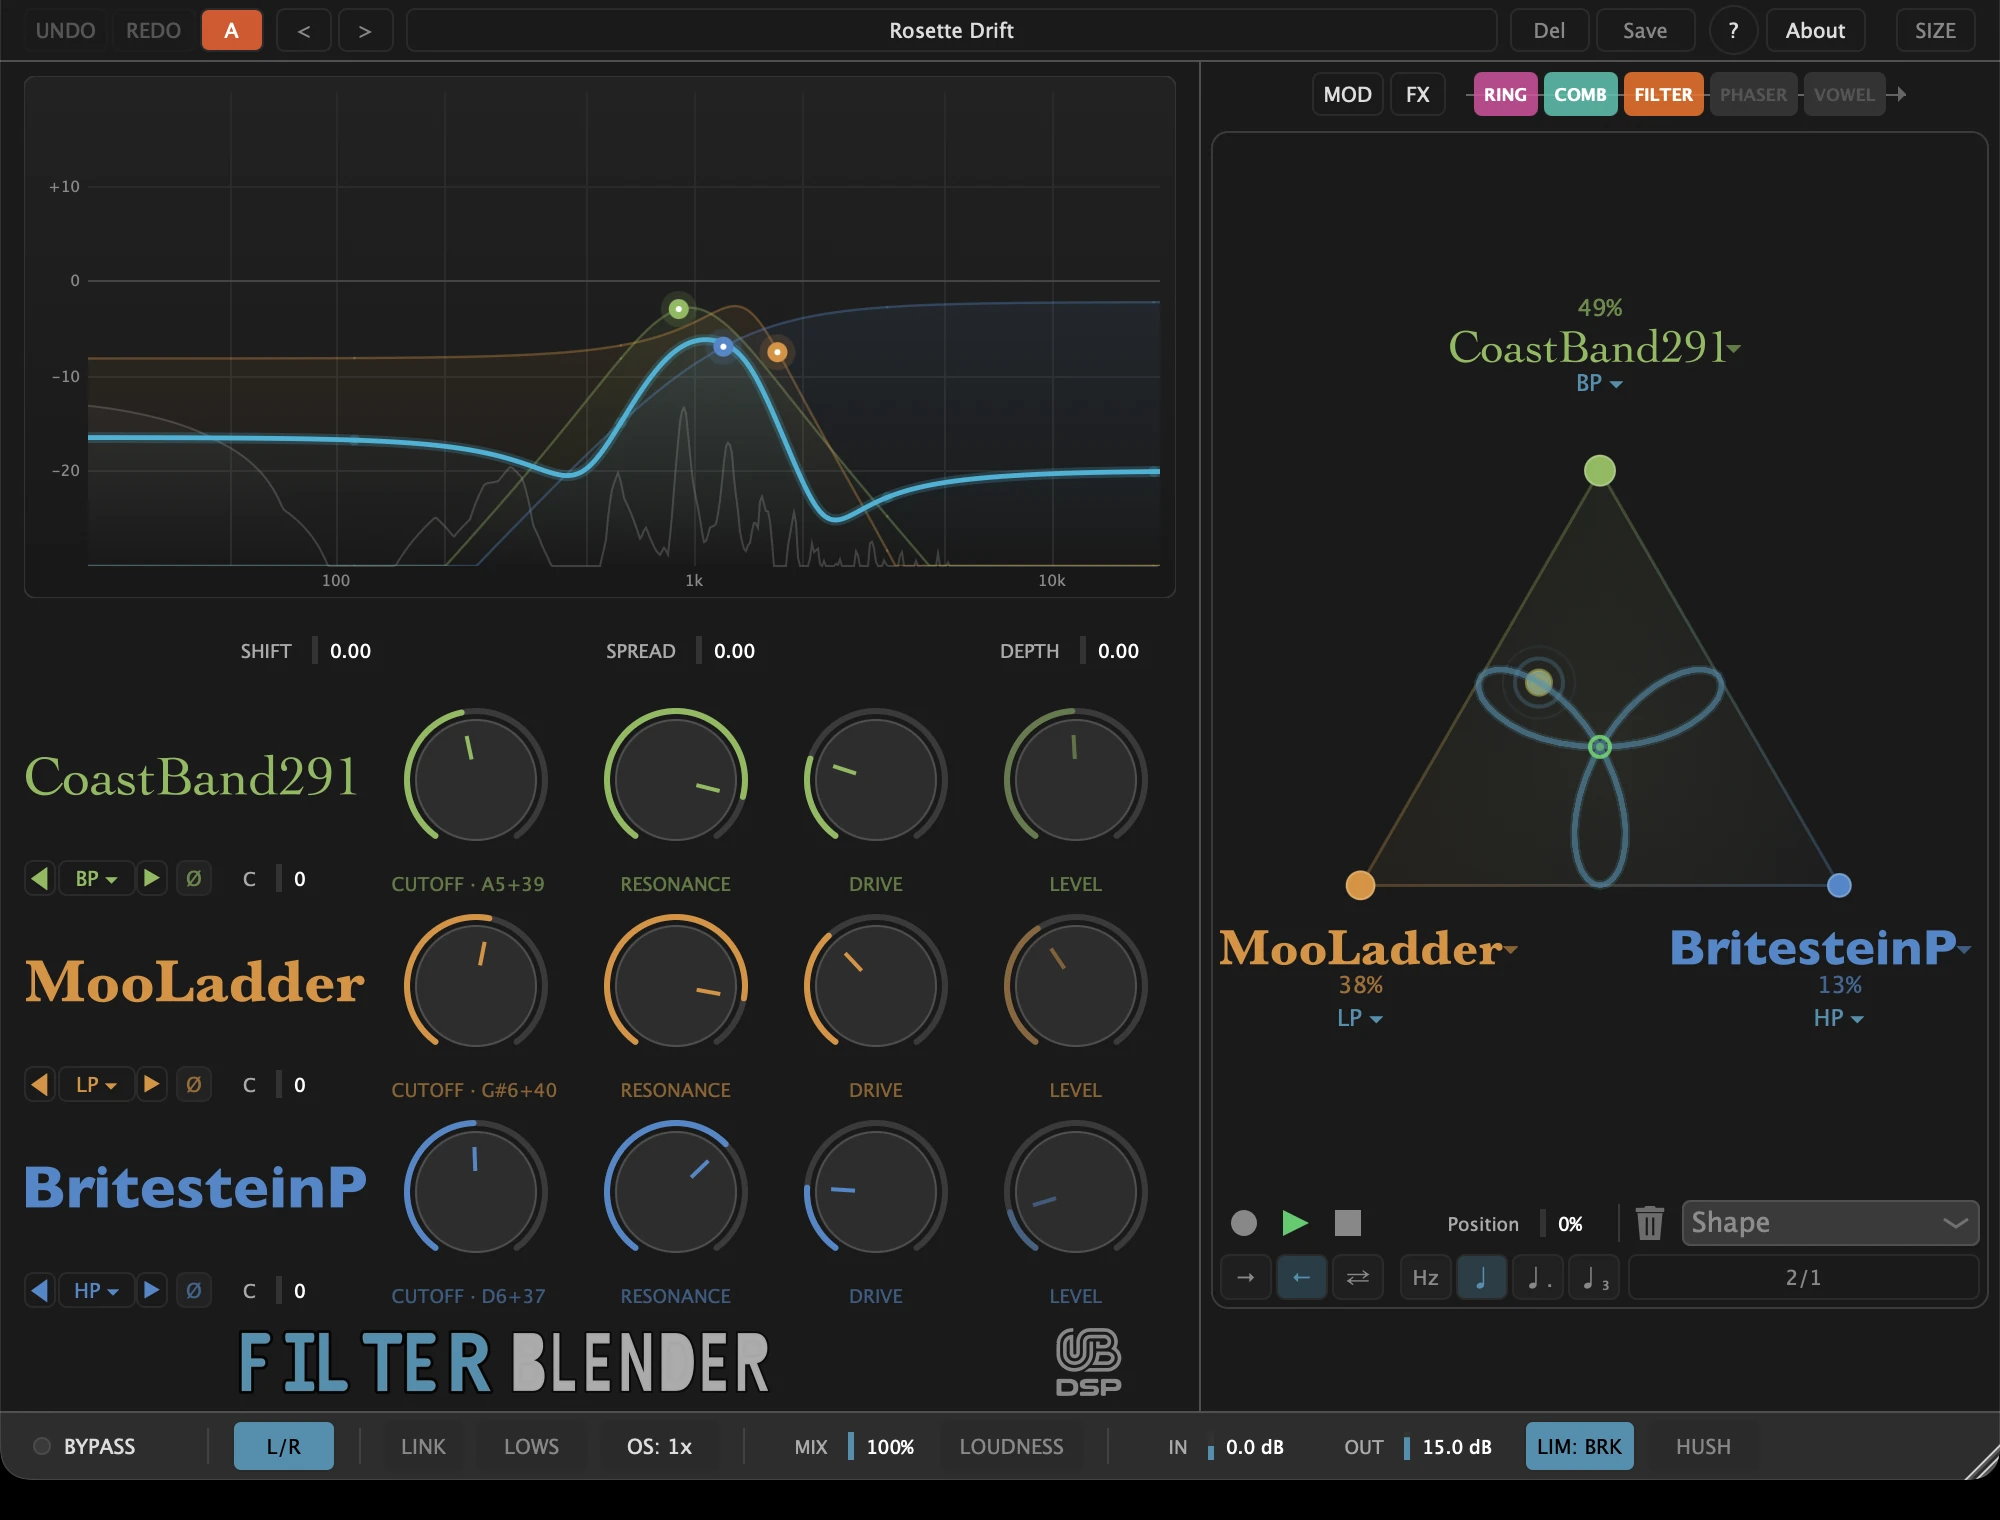
The window reads top to bottom, left to right. The left column is where you shape each filter. The right column is where you blend them.
Preset Bar (top)

Undo and redo, an A/B comparison, the preset browser, help mode, the About panel and the window size.
Response Curve
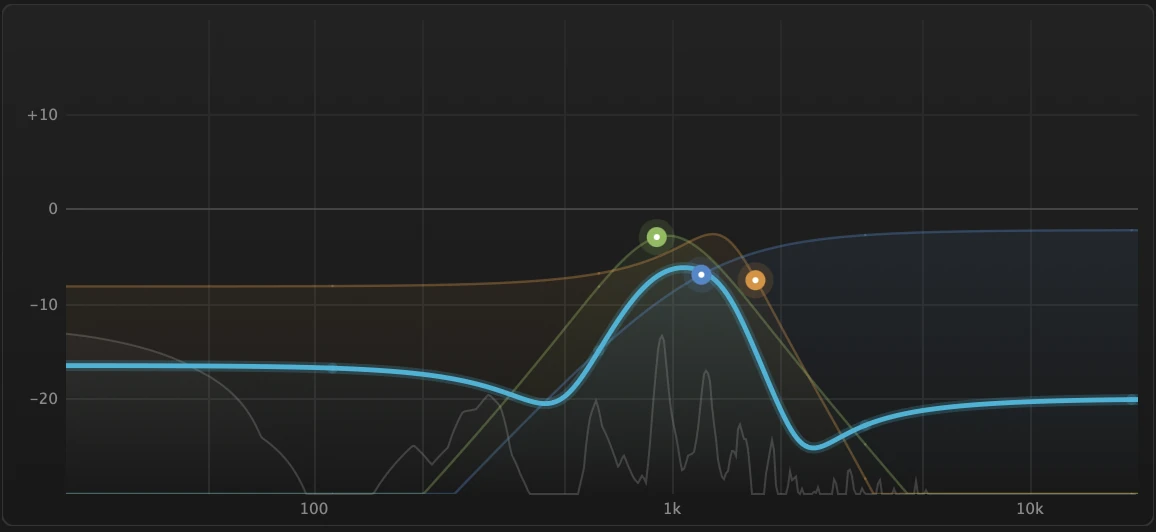
The frequency response you are hearing: one faint curve per corner and the blended result in teal, drawn from the same maths as the audio. Drag a handle left and right for cutoff, up and down for resonance.
Macros and Filter Rows
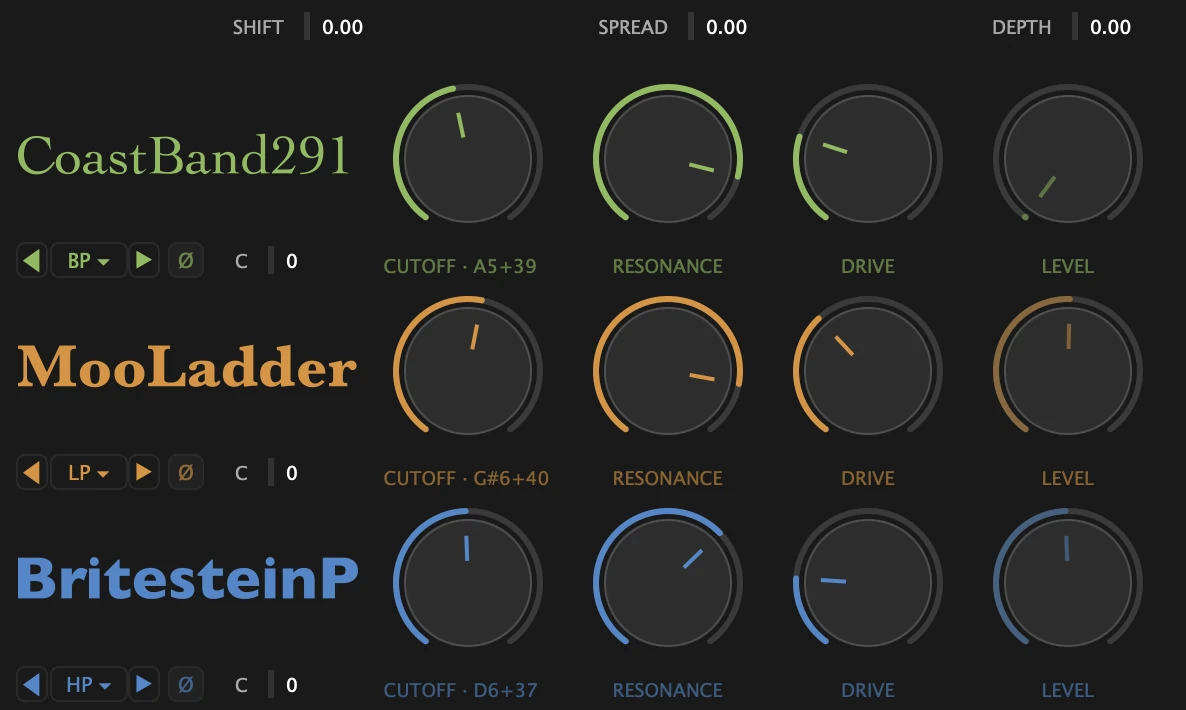
Three macros act on all three filters at once. Below them, one row per corner of the triangle (A on top, B bottom-left, C bottom-right) holds that filter's model, type and knobs.
Chain Strip and Triangle (right)
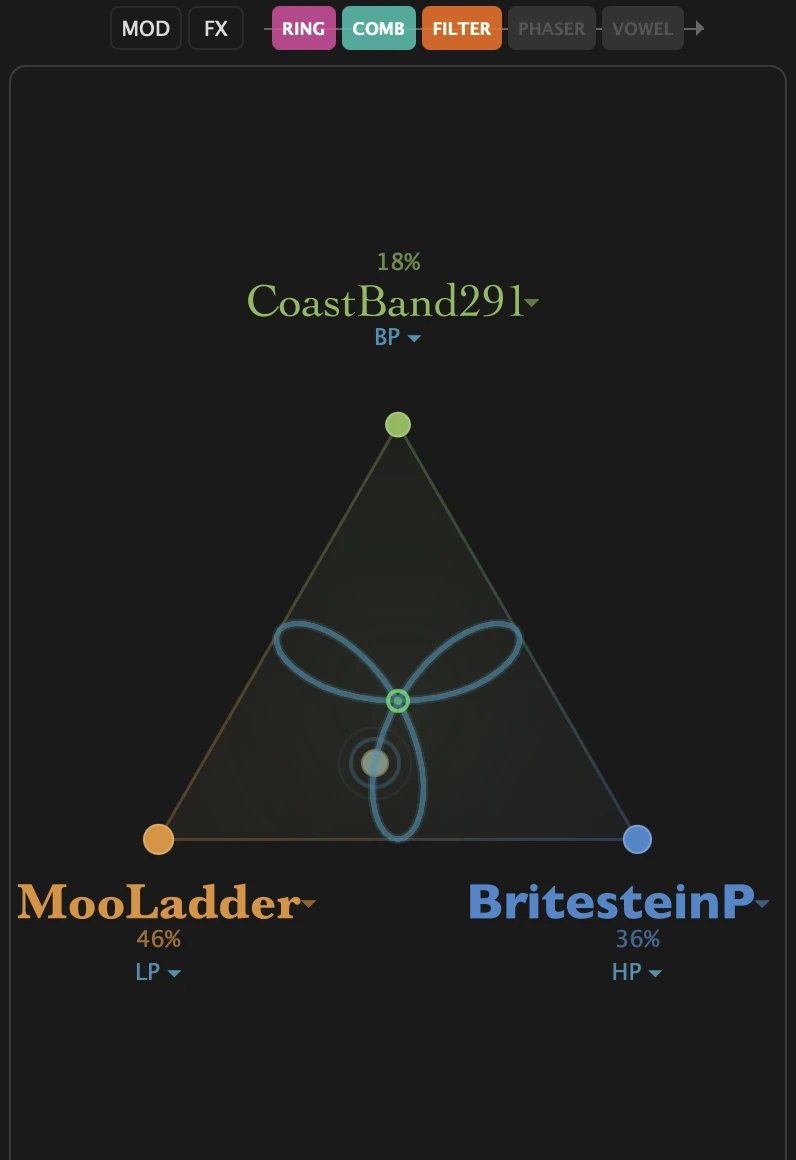
The strip at the top opens the modulation panel (MOD) and the effects panel (FX), and shows the processing order as five pills you can click and drag. The triangle below is the blend: the closer the dot to a corner, the more you hear that filter.
Motion Transport

Records the path you draw on the triangle and plays it back as motion. See The Motion Recorder.
Bottom Bar

Global settings, left to right: bypass, stereo topology, cutoff link, bass crossover and oversampling, then the output stage (mix, loudness match, input and output gain, limiter and the self-oscillation gate).
Modulation and FX Panels
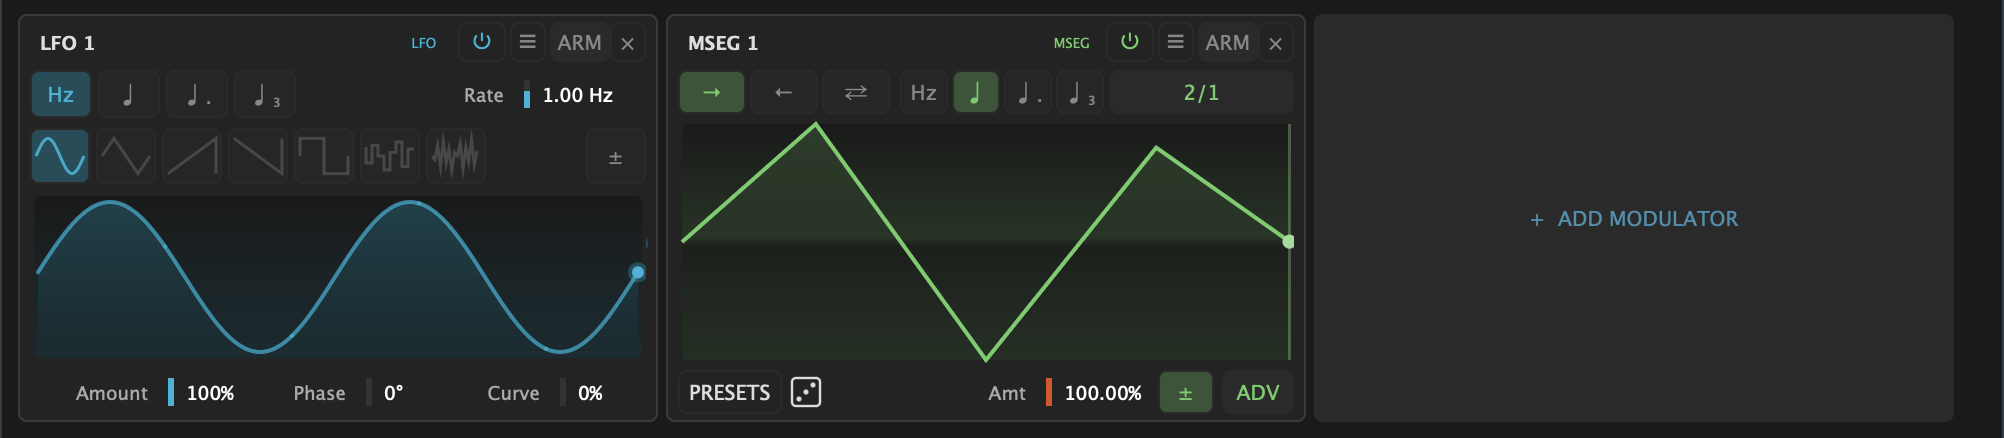
MOD opens the modulation panel across the bottom of the window. FX swaps the left column for the effects panel (the button then reads MAIN, click it to come back). Loading a preset opens the modulation panel when the preset has modulators and closes it when it has none.
5. Controls Reference
Top Bar
UNDO / REDO
What you hear: the sound you had a moment ago. Undo steps back through your last changes, redo steps forward again.
Up to 29 steps. Each step holds every parameter and the whole modulation setup. The chain order, the motion path and LINK are not part of the undo history. A new change after an undo clears the redo steps.
A / B
What you hear: two versions of your settings, one click apart. Tweak A, click to go to B, tweak B, then flip between them.
Your first click copies A into B, so nothing changes until you tweak B. After that, each click switches between the two and swaps the whole sound: the knobs, the modulators and their routes, the chain order, LINK and the motion path, with the same short fade as a preset change. IN, LOUDNESS and BYPASS stay as they are, as with a preset. A preset you load goes into the slot you are on, and each slot keeps its preset name. The two slots survive closing the window, but your project only keeps the one you were on.
< / > and the preset name
What you hear: the previous or next preset, straight away. Click the name to open the menu.
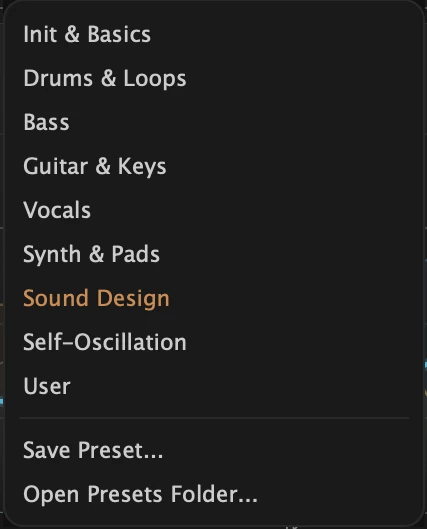
The menu lists the eight factory categories (Init & Basics, Drums & Loops, Bass, Guitar & Keys, Vocals, Synth & Pads, Sound Design, Self-Oscillation), then User, Save Preset... (always asks for a name, so it doubles as Save As) and Open Presets Folder.... The category holding the loaded preset is ticked. An asterisk after the name means you have changed something since it loaded. Loading a preset fades the output for a few milliseconds so the switch never clicks.
Save / Del
What you hear: nothing changes. Save keeps the current sound as a user preset, Del removes one.
With a factory preset or a fresh instance loaded, Save asks for a name. With one of your own presets loaded, Save asks before replacing it. To keep a copy under a new name, use Save Preset... in the preset menu. If the name you type is already taken, you are asked before that preset is replaced. Del only works on user presets and deletes the file for good (factory presets cannot be deleted), then loads Init.
? (help mode)
What you hear: nothing. While it is lit, hovering a control shows a short explanation next to it.
About / SIZE
What you get: About opens version, licence, theme and settings (see About & Settings). SIZE picks the window size.
SIZE offers Compact (850 × 700), Default (1000 × 760) and Large (1300 × 950). You can also drag the window corner anywhere between 850 × 520 and 1500 × 1200. Text and controls scale with the width.
Response Curve
Corner handles
What you hear: the same as turning that corner's CUTOFF and RESONANCE, in one gesture. Drag left for darker, right for brighter, up for more resonance.
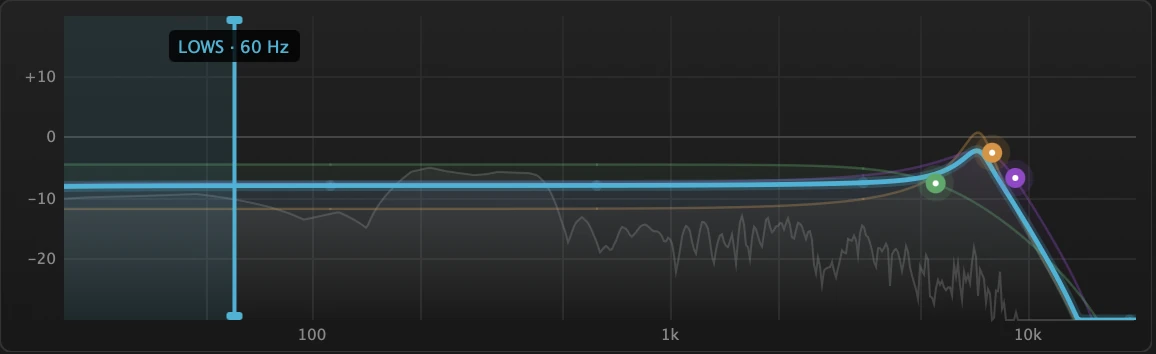
One handle per corner, in its model colour, sitting on that corner's own curve. The plot runs from 20 Hz to 20 kHz and from -30 to +20 dB. Everything drawn here includes the modulation that is running, the blend and the polarity flips, so the teal curve is what you hear.
LOWS handle (20 to 500 Hz, appears when LOWS is on)
What you hear: everything left of the line stays clean. Drag it right to keep more of the bass out of the filters and effects.
A vertical line with grips at both ends, the protected zone shaded to its left. Hovering shows the frequency. Double-click to go back to 100 Hz. See LOWS in the bottom bar.
Spectrum
What you see: the plugin's output, in grey, behind the curves.
On by default. Switch it off in the About panel ("Spectrum behind the response curve").
DRIVE window
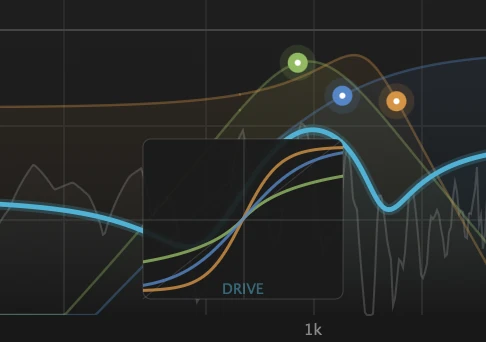
What you see: when you turn a DRIVE knob, a small graph at the bottom of the curve shows how each corner's saturation bends the signal. It fades out two seconds after you let go.
Each model has its own kind of saturation: tanh for the transistor ladder, diode curves for the diode filters, curves of their own for the OTA-style designs, hard clipping with quantisation for the CMOS-style filter.
Macros
Three bipolar controls between the curve and the filter rows. They act on all three filters at once, and every modulator you route to a knob works on top of them.
SHIFT (-1.00 to +1.00, default 0)
What you hear: the whole blend gets brighter or darker without changing its character. The three cutoffs move together, keeping their spacing.
±1 moves every cutoff two octaves up or down. Double-click to reset.
SPREAD (-1.00 to +1.00, default 0)
What you hear: the corners pull apart or close in. Positive values make the blend wider and more complex, negative values focus it.
SPREAD moves corner A's cutoff down and corner C's cutoff up (or the other way round for negative values), up to one octave each. Corner B does not move.
DEPTH (-1.00 to +1.00, default 0)
What you hear: more or less attitude from all three filters at once. Up makes the resonance and saturation stronger, down calms them.
Scales RESONANCE and DRIVE on every corner: +1 multiplies them by 1.5, -1 halves them. A corner set to 0 % stays at 0 %.
Filter Rows
One row per corner of the triangle: A on top, B bottom-left, C bottom-right. The knobs take the colour of the row's model.
Model name
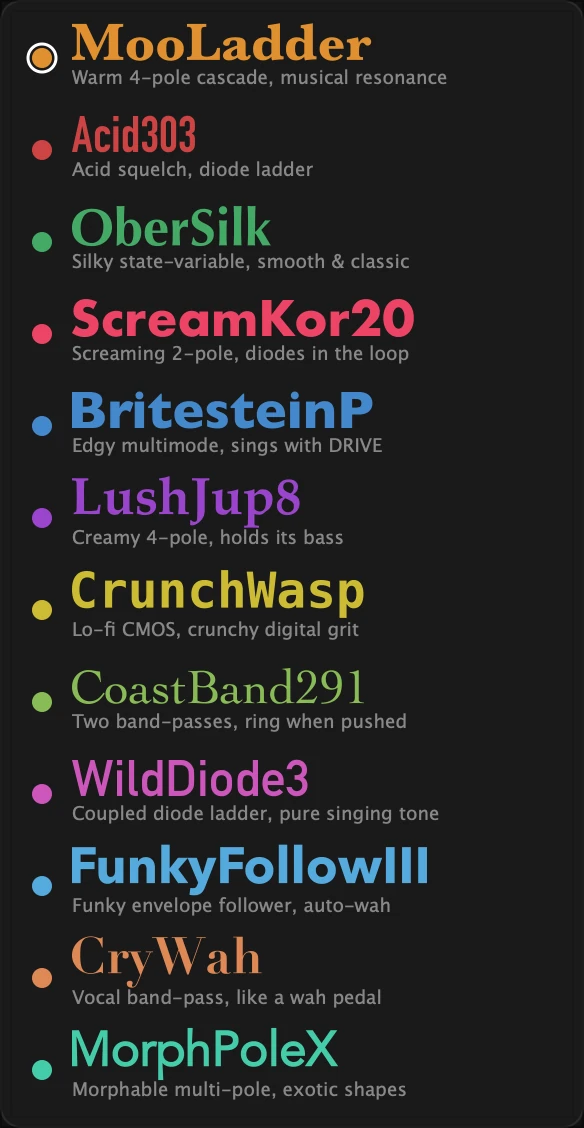
What you hear: a different filter character on this corner. Click the name to choose one of the 12 models.
You can use the same model on several corners (two ladders with different cutoffs make a great pair). If the new model does not offer the current type, the row switches to the model's first type. See The 12 Filter Models.
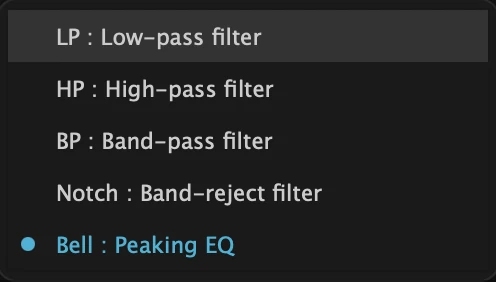
Type (LP, HP, BP, Notch, Bell, depending on the model)
What you hear: lowpass keeps the lows, highpass keeps the highs, band-pass keeps a band around the cutoff, Notch cuts one out, Bell lifts one.
Click the type to pick from the types this model offers, or step through them with ◀ and ▶. Most models offer LP, HP and BP. Acid303 offers LP and BP, OberSilk adds Notch, CryWah is band-pass only, and MorphPoleX is the only model with Bell.
Ø (polarity)
What you hear: on its own, nothing. Blended with the other corners, the flipped filter cancels part of them: hollow, phasey or thin tones that no single filter makes.
Inverts this corner's output before the three are added together. The response curve shows the cancellation.
Stereo field: W or L / C / R
What you hear: in M/S mode, W sets how wide this corner sounds (0 % mono, 100 % as is, 200 % extra wide). In L/R mode, the field balances this corner left or right.
The field only shows in the matching stereo mode, and not at all in MONO. W runs from 0 to 200 % (default 100 %). The balance runs from -100 to +100 (default 0) and its letter shows the side: L, C or R. The three corners' values are mixed by the blend weights, so as the dot moves, the width or the balance moves with it.
CUTOFF (20 Hz to 20 kHz, default 1 kHz)
What you hear: where the filter opens or closes. Turn it down for darker, up for brighter.
The label under the knob shows the cutoff as a note, with cents when it is between two notes (for example CUTOFF · A4 or CUTOFF · B5-14). Useful to set the cutoff against the key of the song. A self-oscillating MooLadder, LushJup8, MorphPoleX or WildDiode3 sings on that note. The other singing models land off it (see Self-Oscillation).
RESONANCE (0 to 100 %, default 0 %)
What you hear: an emphasis at the cutoff that turns into a whistle, then into a pitched tone.
Eight models can sing on their own (MooLadder, Acid303, ScreamKor20, BritesteinP, LushJup8, CrunchWasp, WildDiode3, MorphPoleX), and they need DRIVE to get there: with DRIVE up, they start to self-oscillate near the top of the RESONANCE travel. With DRIVE at 0, none of them sings. CoastBand291 rings instead of singing: in BP, with DRIVE up, the top of the RESONANCE travel turns every hit into a ping on one note, tuned by CUTOFF (hear it in "Circle Wobble" and "Rosette Drift"). The other three stop at their most resonant useful setting.
DRIVE (0 to 100 %, default 0 %)
What you hear: saturation inside the filter. Low values thicken the sound, high values grind and make the resonance more aggressive.
Each model saturates in its own way (see the DRIVE window above). On FunkyFollowIII, DRIVE also makes its built-in envelope react more strongly.
LEVEL (0 to 100 %)
What you hear: how much of this corner is in the blend. It is the triangle, as a knob.
The three LEVELs always add up to 100 %. Turning one rescales the other two and moves the dot on the triangle. LEVEL is also the way to modulate the blend: route an LFO to Level A, B or C and the dot moves on its own.
When modulation or the Level A ±, B ±, C ± parameters move the sound away from the dot (see Controllers & Automation), an arc in the ghost dot's colour runs from each LEVEL knob to the level you hear. The knob itself stays on the dot.
The Triangle
The blend dot
What you hear: in a corner, one filter alone. In the middle, all three at a third each. Anywhere in between, a mix weighted by the distance to each corner.
Click anywhere in the triangle to jump there, drag to move, hold Shift for fine moves. Each corner shows its model, its weight in percent and its type. Click a model name (or right-click near a corner) to change the model, click a type to step to the next one. A corner at 0 % is not computed at all, which saves CPU.
The ghost dot
What you see: a small blue dot showing where the blend really is once the modulation of Level A, B and C and the Level ± parameters are applied. The big dot stays where you put it.
Bottom Bar
BYPASS
What you hear: the dry signal, untouched.
A true bypass: nothing is processed while it is on. It is a regular parameter, so you can automate it, and it is the one your host's own bypass button works.
Stereo mode: L/R, M/S, MONO (click to cycle, default L/R)
What you hear: L/R filters left and right separately and keeps the stereo image as it is. M/S filters the centre (the mono sum) and lets the sides through, scaled by each corner's W. MONO filters the mono sum and outputs mono.
In M/S the sides go around the filters and the effects untouched, then join the centre before LOUDNESS and OUT, so OUT moves the whole output. The effects only see the centre in M/S, so their STEREO and SPREAD settings add no width there. M/S and MONO run the filters once instead of twice, which saves CPU. For a mono-summed filter that keeps the stereo image, use M/S.
LINK
What you hear: the three corners share one cutoff. Turn CUTOFF A and all three filters move to the same frequency.
B's and C's CUTOFF knobs grey out and follow A exactly. Modulation on Cutoff A drives all three, and modulation routed to Cutoff B or C is ignored while LINK is on. To move all three while keeping their spacing, use SHIFT instead. LINK is saved with presets but is not automatable.
LOWS (off, or on at 100 Hz, adjustable 20 to 500 Hz)
What you hear: the bass stays exactly as it was, however hard you push the resonance, the ring mod or the comb above it.
Splits the signal with a 24 dB/oct crossover. The low band skips the filters, the effects and the limiter, and is added back before LOUDNESS and OUT. Set the split with the handle on the response curve.
OS: 1x / 2x / 4x (default 1x)
What you hear: cleaner highs on bright, driven or resonant settings, where the filters would otherwise fold harsh tones back into the audio.
Oversamples the three filters (the effects always run at the host rate). Even at 1x, Filter Blender switches the filters to 2x on its own whenever a corner that you can hear has its cutoff above 8 kHz. Higher settings use more CPU. The latency is the same at every setting, so changing it, or loading a preset that does, never makes your DAW recompute its delay compensation.
MIX (0 to 100 %, default 100 %)
What you hear: 100 % is the full effect, 0 % the dry signal.
Blends the dry signal (after IN) with the fully processed one. The dry signal is delayed to arrive together with the processed one, so settings in between blend cleanly instead of phasing. Double-click to go back to 100 %.
LOUDNESS (off by default)
What you hear: the output held at about the level of the input, so a closing filter does not sound worse just because it is quieter, and a resonant one does not sound better because it is louder.
Compares perceived loudness before and after the plugin and corrects by up to 12 dB either way. It is a listening preference: presets neither save it nor change it.
IN / OUT (-24 to +24 dB, default 0 dB)
What you hear: IN drives the filters harder or softer, which changes how much they saturate. OUT sets the final level.
IN is applied before everything, the dry signal included, and presets leave it alone. OUT is the last gain stage, after LOUDNESS, and presets store it: the factory presets use it to land close to the level of your dry signal. Double-click either to reset.
LIM: OFF / BRK / SFT (default BRK)
What you hear: BRK catches the peaks of a screaming resonance without changing the tone. SFT squashes and warms, like a compressor pushed hard. OFF leaves the peaks alone.
BRK holds the peaks around -0.2 dBFS. SFT compresses 3:1 above -2 dBFS and adds tanh warmth that rounds the loudest peaks toward a soft ceiling around -0.8 dBFS. Below about -12 dBFS it leaves the level alone, like BRK. The small light in the button corner shows the gain reduction. The limiter sits right after the three filters: effects placed after the filter, the LOWS band, LOUDNESS and OUT come after it. A look-ahead option for BRK is in the About panel.
HUSH (off by default)
What you hear: a self-oscillating filter goes quiet when the music stops, instead of singing on forever.
When the input stays below -78 dBFS for 400 ms, the filter output fades out over 150 ms, and it comes back in 2 ms on the next sound. It listens to the input, so resonant tails after a note are left alone. All four Self-Oscillation presets turn it on. Leave it off if you want the drone.
6. The 12 Filter Models
Every model has its own slope, its own resonance and its own way of saturating. The names are ours, and each one is inspired by a classic circuit.
| Model | Character | Types | Sings | Best for |
|---|---|---|---|---|
| MooLadder | Warm 4-pole transistor ladder, round and musical resonance. | LP, HP, BP | Yes | Bass, pads, the classic sweep. |
| Acid303 | Diode ladder, about 18 dB per octave near the cutoff. Squelchy, the corner moves with how hard you play. | LP, BP | Yes | Acid lines, drums with attitude. |
| OberSilk | 2-pole state-variable, smooth and clean, with a gentle slope. | LP, HP, BP, Notch | No | Keys, vocals, subtle sweeps, notches. |
| ScreamKor20 | 2-pole filter with diodes inside its resonance loop, and diode grit after it as DRIVE rises. With DRIVE up, it screams at the top of RESONANCE. | LP, HP, BP | Yes | Aggressive leads, screaming sweeps. |
| BritesteinP | 2-pole multimode with an edgy resonance and a soft limiter in the loop. Turn up DRIVE and it starts to sing. | LP, HP, BP | Yes | Bright leads, hats, edgy highs. |
| LushJup8 | Creamy 4-pole cascade. In LP it keeps its bass as the resonance rises, and it rounds a loud peak off instead of letting it poke out. | LP, HP, BP | Yes | Pads, polysynth sheen. |
| CrunchWasp | Lo-fi CMOS-style filter: it clips hard, with a touch of digital grit on top. | LP, HP, BP | Yes | Drums, lo-fi textures. |
| CoastBand291 | Two band-passes in series, West Coast style. At low resonance they make a broad band. In BP, with RESONANCE and DRIVE up, they meet on one note and ring on every hit, without ever self-oscillating. LP and HP keep a soft peak. | LP, HP, BP | No | Pings on drums and plucks, ringing percussive tones, broad bands. |
| WildDiode3 | 4-pole diode ladder in the VCS3 style, its stages loading each other. RESONANCE scoops the bass out and lifts a peak on the note under CUTOFF. With DRIVE up it sings on that note, close to a pure sine. DRIVE also pushes its input into distortion. | LP, HP, BP | Yes | Pure singing tones, resonant basses, sound design. |
| FunkyFollowIII | State-variable with its own envelope follower: the cutoff rises with how loud you play, read in decibels, so quiet playing sweeps it too. Play harder, or raise IN or DRIVE, for a wider sweep. | LP, HP, BP | No | Funk guitar, clav, auto-wah. |
| CryWah | Swept, vocal band-pass, like a wah pedal. | BP | No | Guitar, vowel-like sweeps. |
| MorphPoleX | Pole-mixing multimode: the most shapes of any model, and the only Bell. | LP, HP, BP, Notch, Bell | Yes | EQ-like lifts, deep notches, exotic shapes. |
"Sings" means the model can self-oscillate, with DRIVE up and RESONANCE near the top, and turns into a tone generator tuned by its CUTOFF.
7. The Motion Recorder
Draw a path on the triangle once, and Filter Blender plays it back as motion: the blend travels between the three filters on its own, at the speed you choose, in or out of time with the song.
● REC
What it does: arms recording. Press on the triangle and draw: the path is captured until you let go, then the recorder returns to live control. It does not start playing on its own, so you can listen before you commit.
A new recording replaces the old path. The path is re-timed to a constant speed, so how fast you drew does not matter, only where you went. The panel gets a red outline while armed.
▶ PLAY / ■ STOP
What you hear: PLAY moves the blend along the path, starting from Position. STOP hands the dot back to you.
Playback runs inside the audio engine, so it keeps going with the plugin window closed. A preset that carries a path starts playing as soon as it loads.
Position (0 to 100 %, default 0 %)
What it does: where on the path playback starts. While stopped, dragging it scrubs the dot along the path.
Position is a modulation destination (Motion Position). While a path plays, it only sets the next start point, and a route to it shows MOD OFF on the field.
Clear (bin icon)
What it does: erases the path, after a confirmation.
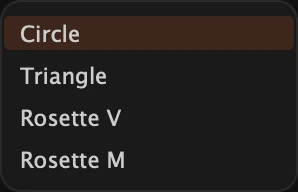
Shape
What it does: draws a ready-made path for you: Circle (touches each side), Triangle (visits each corner), Rosette V (three petals whose tips land on the corners, a blend arpeggio) and Rosette M (tips on the middle of each side, so it never reaches a pure filter).
Picking a shape does not start playback. Press PLAY.
→ ← ⇆ (loop direction, default →)
What you hear: forward loops the path from start to end, reverse from end to start, ping-pong goes back and forth.
Rate: Hz, ♩, ♩., ♩₃
What you hear: how long one pass of the path takes.
Hz is free speed: the Rate field runs from 0.10x to 4.00x, and one pass lasts 2 seconds at 1.00x (20 seconds at 0.10x, half a second at 4.00x). The note buttons lock one pass to a note value: regular (4/1, 3/1, 2/1, 1/1, 1/2, 1/4, 1/8, 1/16), dotted (2/1. to 1/8.) or triplet (2/1T to 1/8T). 1/4 is one beat, 1/1 one bar, 4/1 four bars. The recorder follows the host tempo, but it runs freely: it does not start or stop with your DAW's transport.
8. The FX Chain
Four effects share a chain with the filter: Comb Delay, Ring Mod, Phaser and Vowel. The filter does not have to come first. Put the ring modulator in front of it and the triangle carves the sidebands, instead of the sidebands being sprayed on top of a filtered sound.
The Chain Strip

The five pills above the triangle show the order the signal goes through, left to right. The default order is FILTER, COMB, RING, PHASER, VOWEL.
- Click a pill to switch that effect on or off. It is coloured when on, grey when off. FILTER is always on.
- Drag a pill to a new position: it is inserted there and the others shift along.
The chain order is saved with presets. It is not a parameter, so it cannot be automated.
The FX Panel
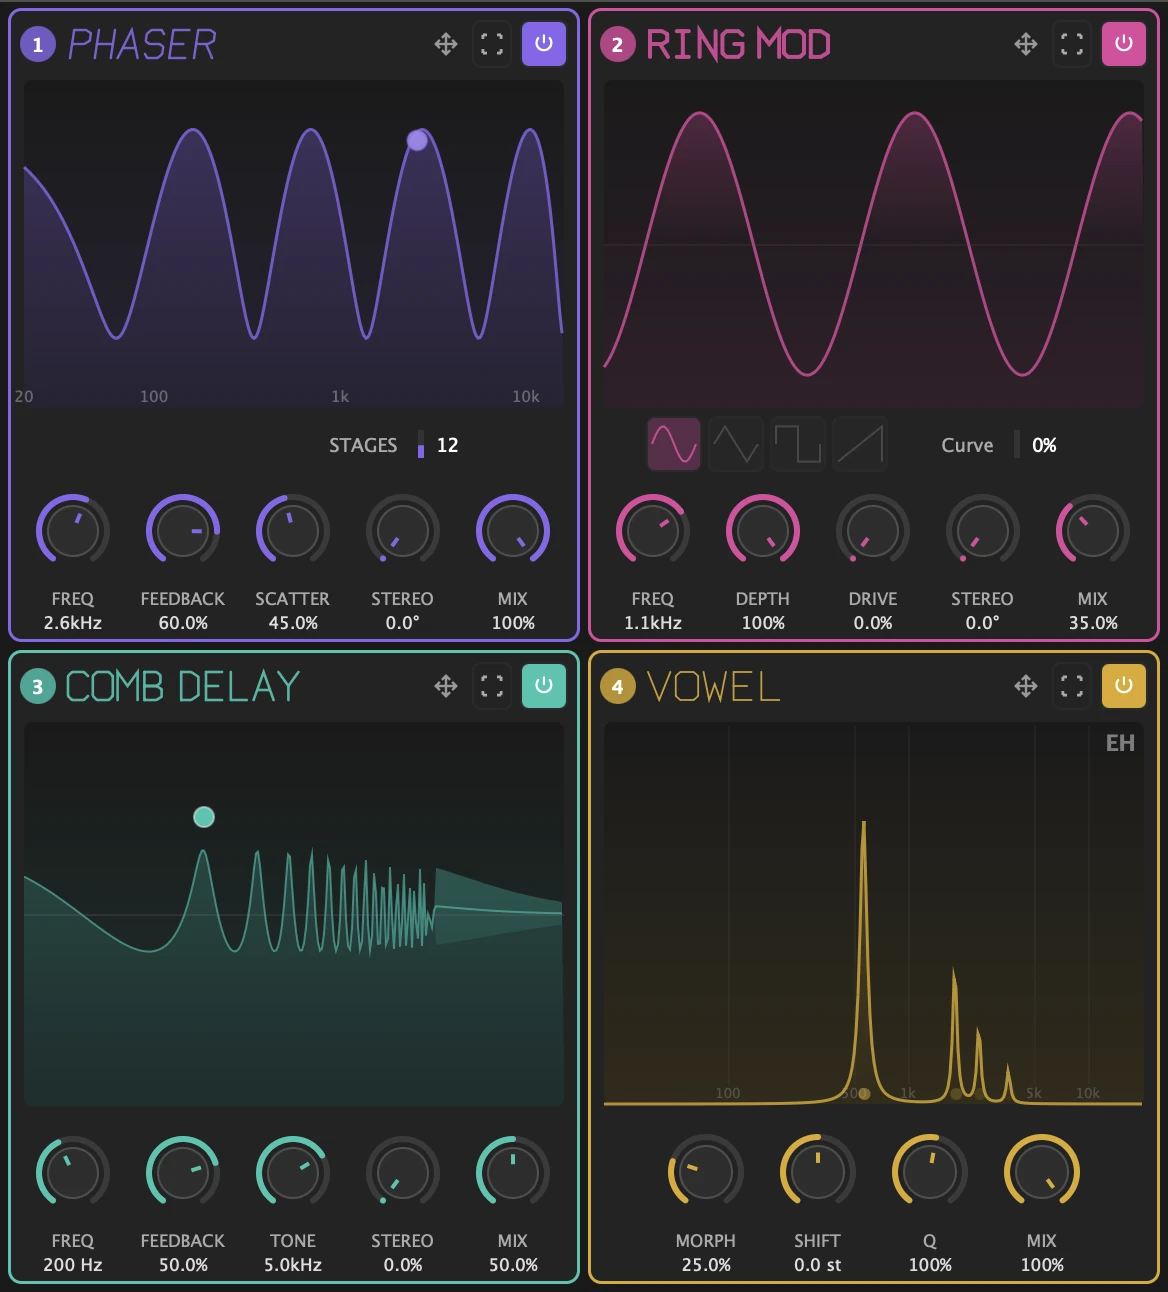
Click FX to swap the left column for the four effect cells (click MAIN to come back). Each cell has, from left to right in its title bar: its position in the chain, its name, a move handle, a zoom button and a power button.
- Power (or a click on the name) switches the effect on or off, like its pill.
- Zoom enlarges one cell to the whole panel. Click it again to return to the grid.
- Move handle: drag a cell onto another one to swap their places in the chain.
The effects run at the host's sample rate. Only the filters are oversampled.
Comb Delay
FREQ (20 to 3500 Hz, default 200 Hz)
What you hear: the pitch of the comb. Low values sound like a short metallic room, high values like a tuned, ringing string.
FEEDBACK (-99 to +99 %, default 50 %)
What you hear: how long the comb rings. Positive values ring on every harmonic. Negative values keep only the odd harmonics, for a hollower tone.
TONE (default 5 kHz)
What you hear: each repeat gets darker as it rings. Low values muffle the tail, high values keep it bright.
STEREO (0 to 100 %, default 0 %)
What you hear: a wider comb. Left and right are detuned from each other, up to 50 cents each way.
MIX (0 to 100 %, default 50 %)
What you hear: the balance between the signal and the comb.
Drag in the display to play FREQ (left and right) and FEEDBACK (up and down) at once.
Ring Mod
FREQ (0.5 to 5000 Hz, default 440 Hz)
What you hear: above about 20 Hz, metallic and bell-like tones that do not follow the pitch of the source. Below, the carrier becomes a pulsing tremolo or a growl.
Waveform buttons and Curve (Curve -100 to +100 %, default 0 %)
What you hear: the carrier's shape: Sine is the purest, Triangle, Square and Saw add more and more sidebands.
Curve bends the chosen waveform: positive values make it sharper, negative values rounder. On Square it sets the pulse width, from 10 to 90 %.
DEPTH / DRIVE (0 to 100 %, defaults 100 % and 0 %)
What you hear: DEPTH is how much ring modulation there is. DRIVE moves from a clean multiplication to the dirtier, bleeding sound of a vintage diode ring modulator.
STEREO (0 to 180°, default 0°) / MIX (default 50 %)
What you hear: STEREO offsets the right carrier from the left one, which makes even a mono source wide. MIX balances dry and ring-modulated.
Phaser
FREQ (20 Hz to 16 kHz, default 1 kHz)
What you hear: where the notches sit. A phaser only sounds like a phaser when this moves.
The phaser has no LFO of its own. When you switch it on from its cell, Filter Blender adds a modulator named Phaser LFO (a 1 Hz sine sweeping FREQ two octaves each way), unless something already modulates FREQ. Change it or replace it like any other modulator.
FEEDBACK (-95 to +95 %, default 50 %)
What you hear: positive values deepen the notches, negative values turn them into peaks, an inside-out phaser.
SCATTER (0 to 100 %, default 50 %)
What you hear: how the notches are spaced. Low values sound close to a flanger, high values give wide, unusual notch patterns.
STAGES (2 to 24, in steps of 2, default 4)
What you hear: more stages, more notches. 24 stages give 12 notches, a dense, swirling sweep.
STEREO (0 to 180°, default 0°) / MIX (default 100 %)
What you hear: STEREO pulls the left notches down and the right ones up, for width. MIX balances dry and phased.
The notches are deepest at MIX 100 %. Drag in the display to play FREQ and FEEDBACK at once.
Vowel
MORPH (0 to 100 %, default 25 %)
What you hear: the sound says a vowel. Sweep MORPH and it talks, from EE through IH, EH, AE, AH, UH, AW, OH and OO to UU.
0 % is EE, 100 % is UU. The display shows the current vowel.
SHIFT (-12 to +12 semitones, default 0) / Q (20 to 300 %, default 100 %) / MIX (default 100 %)
What you hear: SHIFT makes the voice smaller (up) or bigger (down). Q narrows the formants for a nasal, resonant vowel, or widens them for a breathy one. MIX balances dry and vowel.
9. The Modulation System
Filter Blender has nine modulator types, up to 16 at once, and modulators can modulate each other. Click MOD above the triangle to open the panel.
The Nine Modulator Types
| Type | Character | Best for |
|---|---|---|
| LFO | Periodic shape (sine, triangle, saw up, saw down, square, S&H, noise), free Hz or tempo-synced. | Sweeps, wobble, tempo-locked motion. |
| MSEG | Multi-segment envelope. Draw any shape with up to 128 points. | Slow blend choreography, risers, custom rhythms. |
| Step Sequencer | 1 to 64 steps, each with its value, shape and curve, tempo-synced. | Rhythmic filter patterns, acid lines. |
| Audio Oscillator | An audio-rate oscillator: five waveforms, 20 Hz to 20 kHz. | FM-style cutoff modulation, sidebands, sound design. |
| Envelope Generator | AHDSR envelope fired by your audio crossing a threshold, or by MIDI notes. | One filter envelope per hit or per note. |
| Envelope Follower | Follows the input level. Four detection modes. | Auto-wah, dynamics-driven filters, blend that follows the playing. |
| Macro | Two knobs and two buttons, each routable on its own. | One gesture that moves several things. |
| MIDI | Keytrack, velocity, aftertouch and mod wheel as modulation sources. | Keyboard tracking, expressive playing. |
| XY Pad | A 2D pad whose X and Y are routed separately. | Two-parameter moves by hand. |
Routing a Modulator
- Click + ADD MODULATOR at the end of the panel and choose a type.
- Set the modulator up in its card.
- Click ARM in the card header. It lights up and every control that can be modulated gets a blue outline. Macro, MIDI and XY Pad have no header ARM: each of their outputs has its own ARM button.
- Drag up or down on a control (a knob, a macro, an effect knob, the triangle's Position field): up for a positive amount, down for a negative one. A click without a drag creates the route at +50 %, so you hear it straight away; a route that already exists keeps its amount. While the modulator is armed, a ring around the knob shows the amount it moves.
- Click ARM again when you are done.
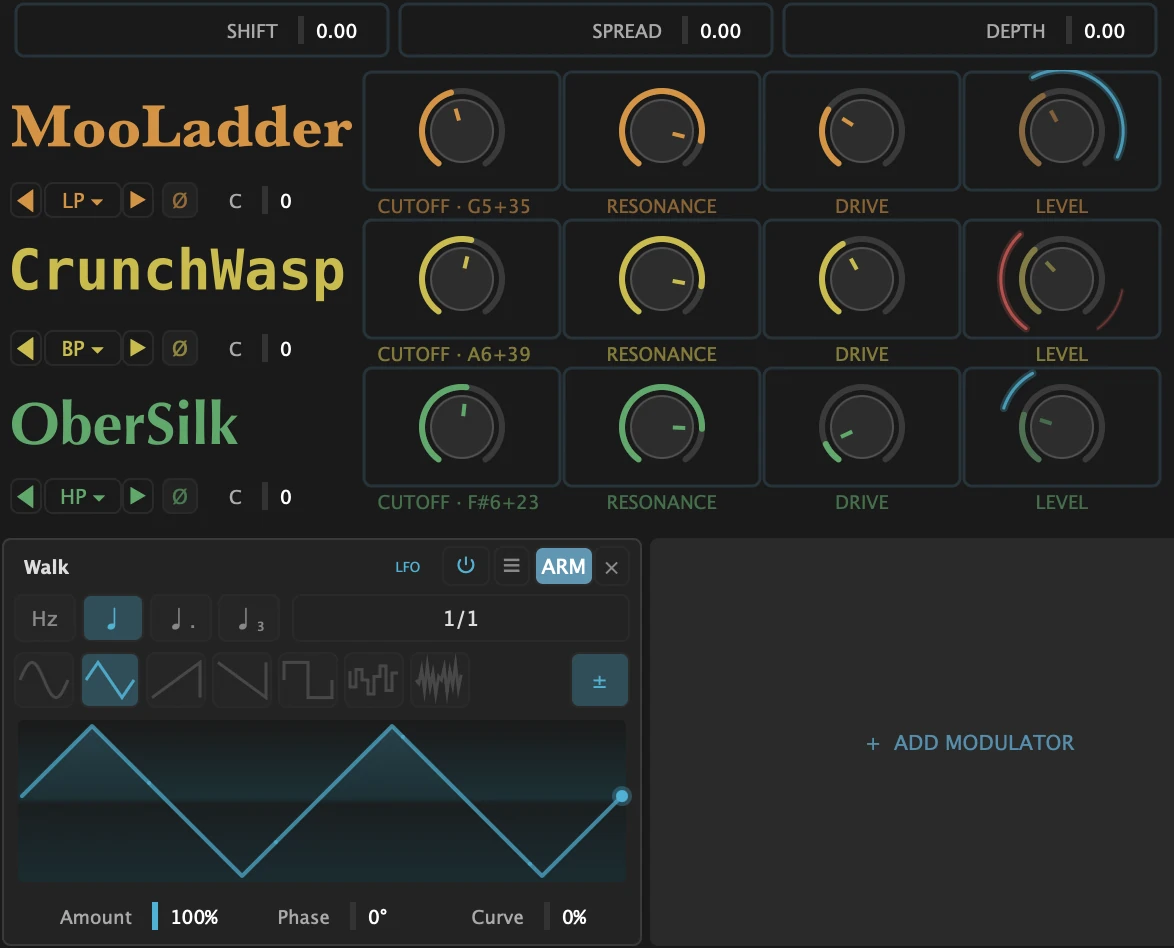
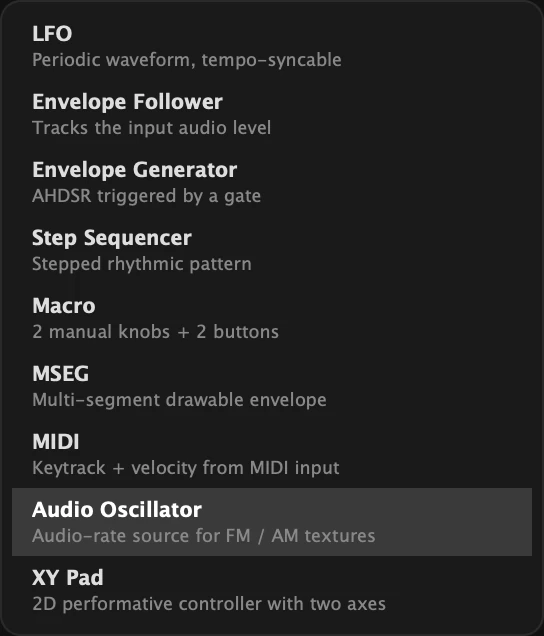
To remove a route, right-click the modulated knob and pick it from the list (Remove all modulations appears when there are several), or click × next to it in Mod Routes. Fields such as STAGES, Curve, the macros and Position show their modulation as a thin coloured bar along the top edge instead of a ring.
What Each Destination Does
At full amount (100 %, up or down):
| Destination | At full amount |
|---|---|
| Cutoff A, B, C | ±4 octaves. With LINK on, Cutoff A drives all three. |
| Reso A, B, C / Drive A, B, C | ±100 %, added to the knob. |
| Level A, B, C | Adds up to one full weight to that corner, then the three are rescaled: the blend moves (watch the ghost dot). |
| Macro Shift, Spread, Depth | The full range of the macro, added to its knob. |
| Comb Freq, Delay Tone, Ring Freq, Phaser Freq | ±4 octaves. |
| Ring Stereo, Phaser Stereo | ±180°. |
| Phaser Stages | ±12 stages. |
| Vowel Morph / Vowel Shift | The whole vowel range / ±12 semitones. |
| Every other effect control | Its whole range. |
| Motion Position | The whole path, while playback is stopped. |
The LFO Card
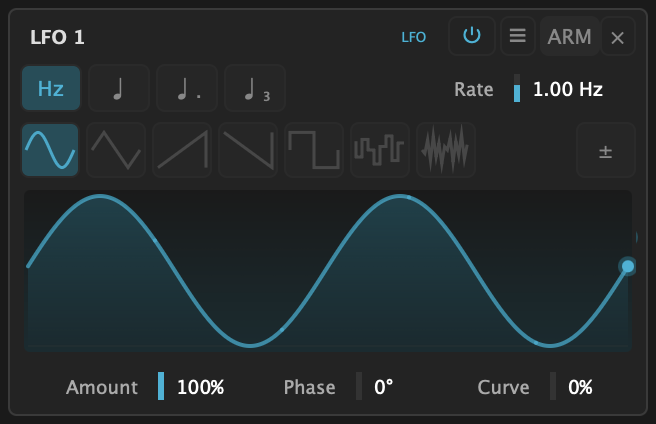
Seven waveforms: Sine, Triangle, Saw Up, Saw Down, Square, S&H and Noise. Rate runs from 0.01 to 20 Hz, or switch to tempo sync and pick a division from 8 bars down to 1/64, with dotted and triplet modes. Curve bends the shape: on Square it sets the pulse width, and it is greyed out on S&H and Noise. Phase offsets the start of the cycle. The ± switch chooses symmetrical modulation around the current value or one-sided motion.
The MSEG Card
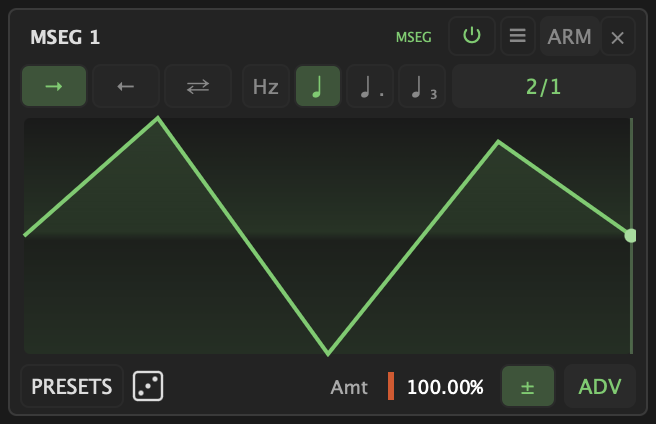
A draw-anything envelope. Up to 128 points, five curve types per segment (Linear, Smooth, S-Curve, Step, Hold), three play directions (forward, backward, ping-pong), free rate or tempo sync. PRESETS loads a stored shape, the dice draws a random one.
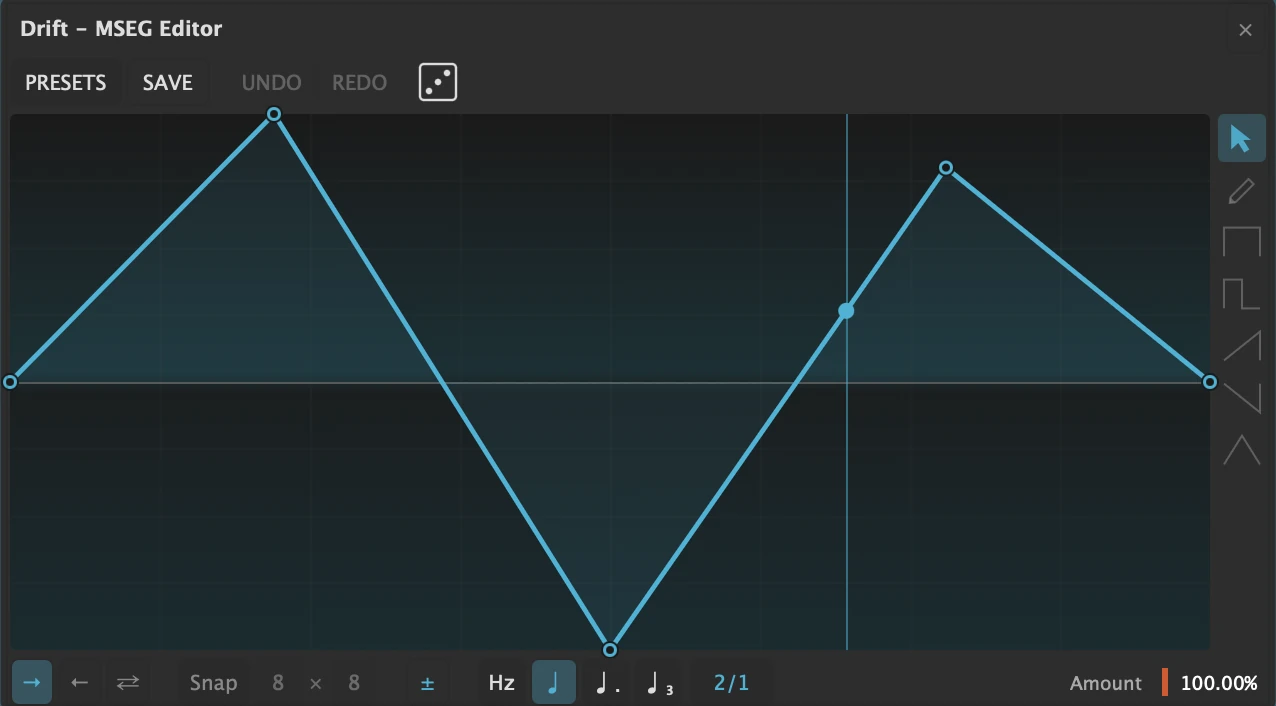
The editor offers seven drawing tools (Pointer, Pencil, Square, Pulse, Ramp Up, Ramp Down, Triangle). With the Pointer, click an empty spot to add a point, double-click a point to delete it, drag the middle of a segment to bend it, and right-click a segment to choose its curve type. The dice draws a random shape as dense as the horizontal snap grid. SAVE stores your shape, PRESETS opens the shape browser.
The Step Sequencer Card
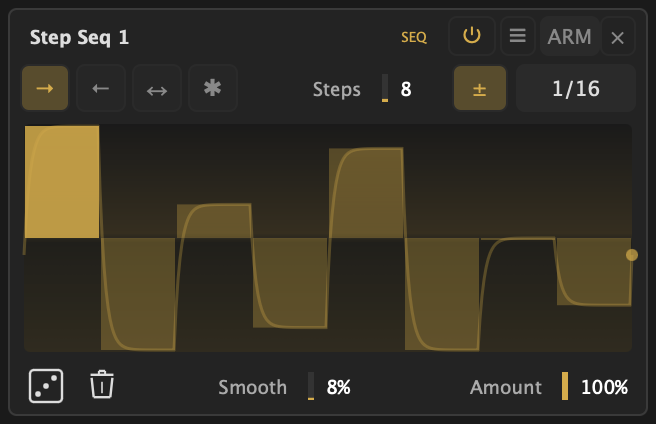
1 to 64 steps, synced to the host tempo. Each step has a value, a shape (Flat, Ramp Up, Ramp Down, Triangle, Sine) and a curve. Drag vertically on a step to set its value. Right-click a step to choose its shape, or apply one shape to all steps. On a shaped step, drag its small handle up or down to bend the curve. Smooth glides between steps, the direction buttons play forward, backward, ping-pong or random. The dice randomises values, shapes and curves, the bin resets the steps.
The Audio Oscillator Card
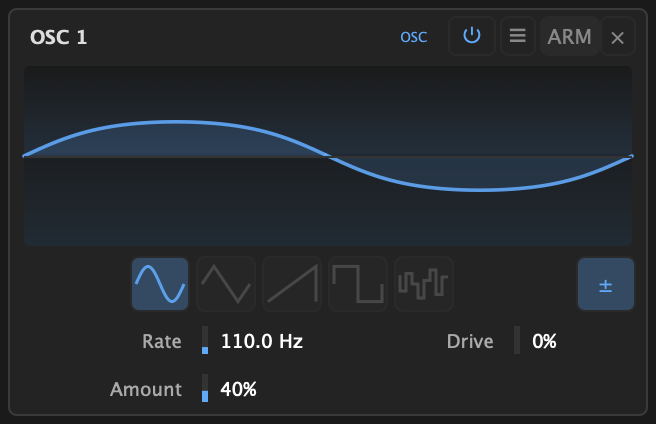
Unlike the LFO, it runs at audible frequencies: Rate goes from 20 Hz to 20 kHz (default 220 Hz). Routed to a cutoff, it gives FM-style sidebands and growl. Five waveforms: Sine, Triangle, Saw, Square and S&H. The Shape field changes job with the waveform, and its label follows: Drive, Symmetry, Bright, Duty (the pulse width of the Square) and Smooth. Anti-aliasing is always on.
The Envelope Generator Card
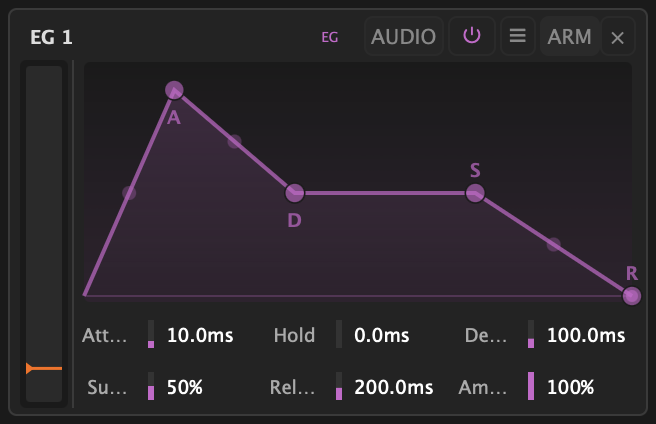
An AHDSR envelope with two ways to fire it, chosen with the AUDIO / MIDI button in the card's header:
- AUDIO (the default): your audio plays it. Each time the input rises above the threshold, the envelope runs its Attack, Hold and Decay, stays at Sustain while the sound stays loud, and falls through Release when it drops away. No MIDI needed. Set the threshold by dragging on the meter at the left of the card (-60 to 0 dB, default -20 dB).
- MIDI: your keyboard plays it. Every note-on restarts the attack, even with the previous key still down, and the envelope stays at Sustain until the last key comes up. Use it on a legato line, where the audio never drops far enough between notes to fire the envelope again. The meter becomes a light that shows the gate open.
Attack runs from 1 ms to 10 s, Hold from 0 to 10 s, Decay and Release from 10 ms to 10 s. You can also drag the handles on the shape.
The Envelope Follower Card
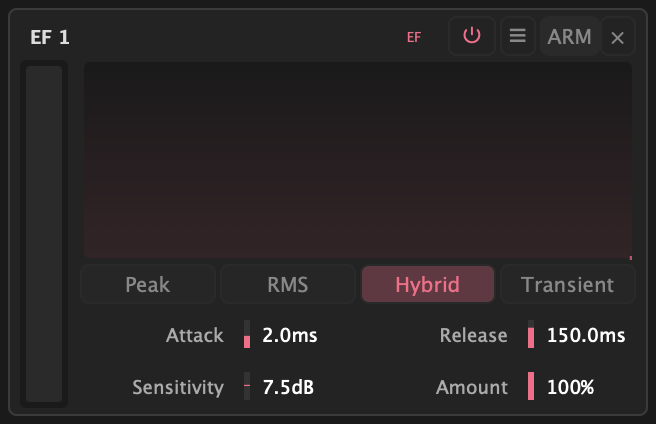
Turns the loudness of your audio into modulation. Attack (0.1 to 100 ms) sets how fast it rises, Release (1 to 1000 ms) how fast it falls. Sensitivity (-12 to +24 dB) sets how much level it takes to reach full modulation: raise it for quiet sources. Detection mode chooses how it listens:
- Peak follows the literal level.
- RMS follows the averaged loudness, smoother and slower.
- Hybrid (the default) grabs the attack like Peak and releases smoothly like RMS.
- Transient ignores the sustained level and fires on each attack: a hit out of silence gives full modulation, a softer re-attack less, and a held note nothing after its onset. Turning the source down does not change it, since it measures how sharp the attack is, not how loud.
The Macro Card
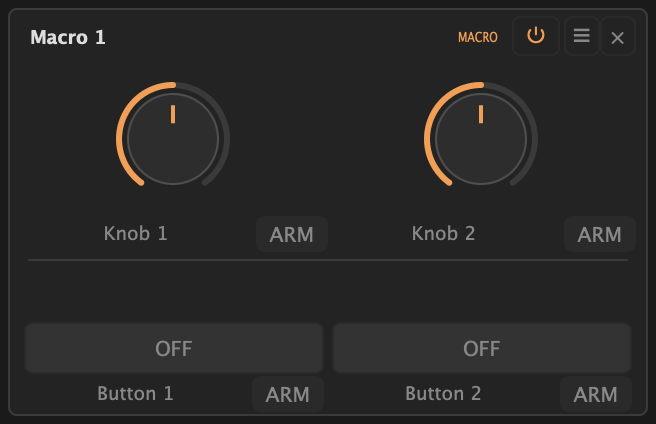
Four outputs, each routed on its own: Knob 1, Knob 2, Button 1 and Button 2. Route one knob to three things at once and a single gesture morphs them all.
The MIDI Card
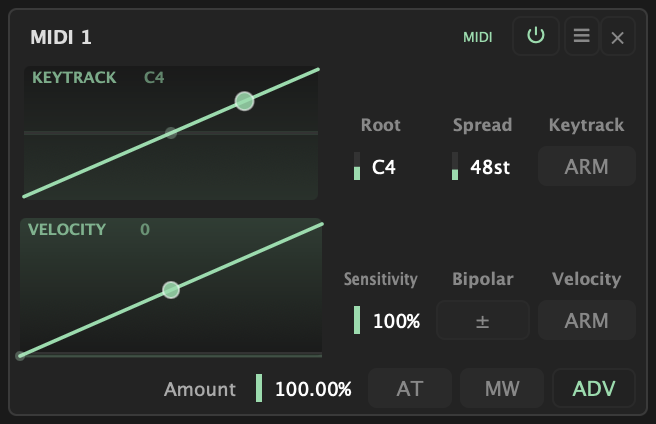
Four sources at once, each routed to its own destination: Keytrack (where you play on the keyboard, set with a Root note and a Spread in semitones), Velocity (captured at note-on), Aftertouch (channel pressure, and per-note pressure in CLAP hosts that send it) and Mod Wheel (CC1). Keytrack and Velocity each have their own ARM button, Aftertouch arms from AT and Mod Wheel from MW. The MIDI card needs MIDI sent to the plugin (see the FAQ).
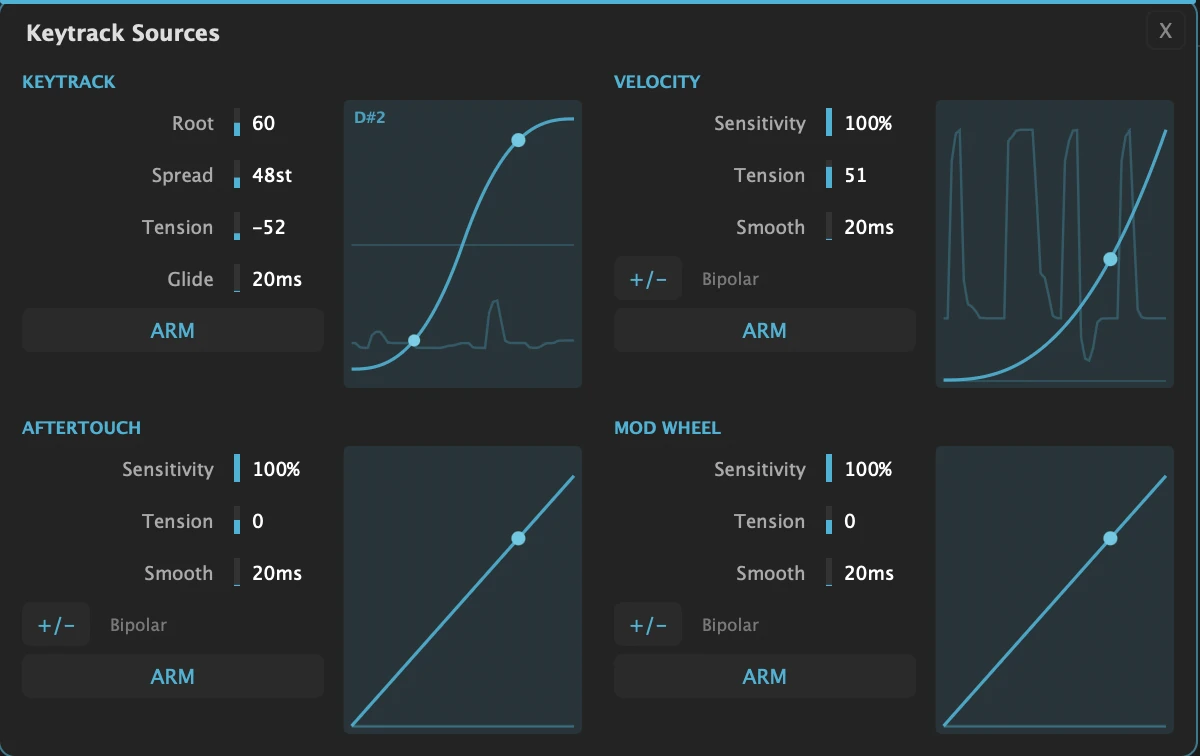
Click ADV to shape each source. Velocity, Aftertouch and Mod Wheel each get a Sensitivity, a Tension that bends the response curve (drag the handle on the curve), a Smooth time and a bipolar switch. Keytrack has Root, Spread, Tension and Glide instead. Every curve shows a live trace of what you play.
The XY Pad Card
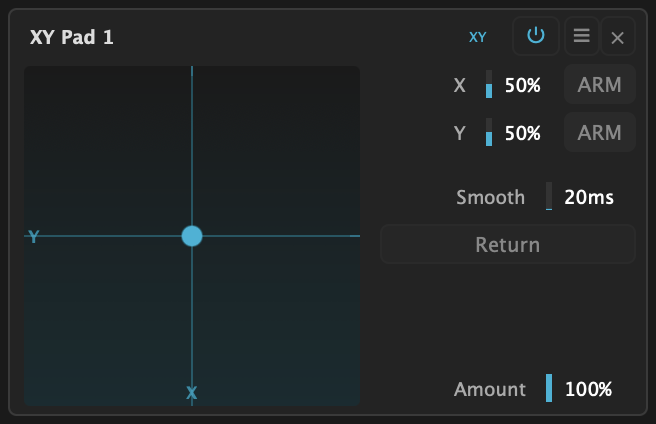
Two outputs, X and Y, each with its own ARM. Drag the cursor while the track plays for two-parameter moves. Smooth (0 to 500 ms) takes the jitter out of your hand, Return springs the cursor back to the centre when you let go.
Mod Routes
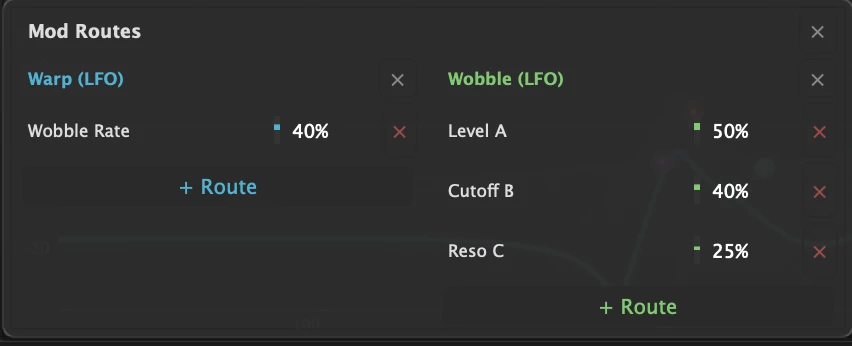
Click ☰ on any modulator card to open Mod Routes. Each modulator gets a column listing every route that leaves it, with its destination and amount (-100 % to +100 %). Drag an amount to fine-tune it, click × to remove the route. + Route adds a route from the full list of destinations, including the fields of the other modulators. The Macro column has a separate + for each of its four outputs.
Intermodulation
Modulators can modulate each other. Arm one, then drag up or down on a field inside another modulator's card. Examples:
- An LFO on another LFO's Rate: the wobble speeds up and slows down on its own. "Cross Mod" does this.
- An Envelope Follower on a Step Sequencer's Smooth: the steps glide when the source plays loud and snap back into place when it goes quiet.
- A Macro knob on the Rate of two LFOs (both in Hz mode): one knob sets the speed of all the motion.
The fields that take modulation are the LFO's Rate (in Hz mode), Amount, Phase and Curve, the Envelope Follower's Attack, Release, Sensitivity and Amount, the Envelope Generator's times, Sustain and Amount, the Step Sequencer's Smooth and Amount, the MSEG's Rate and Amount, the Audio Oscillator's Rate, Shape and Amount, the XY Pad's X, Y, Smooth and Amount, and the Macro's Knob 1 and Knob 2. The Audio Oscillator cannot drive an LFO or MSEG Rate: at audio rate that modulation averages out to nothing.
10. Advanced Tips & Workflows
Gain Staging
Most of the character lives in the saturation, and the saturation depends on how hard you hit it. Use IN to set that: +3 to +6 dB for more grind, -6 dB to clean up a hot source. Turn on LOUDNESS while you compare settings, so you judge the tone and not the volume. Set OUT last.
The limiter sits right after the three filters. An effect placed after the filter (a ring mod, a comb with high feedback) comes after the limiter, so keep an eye on your meters when you push those.
Chain Order Is a Sound
Moving an effect in front of the filter changes what the filter works on:
- Ring Mod before the filter: the triangle carves the sidebands into a new instrument. Try it with a notch, a band-pass and a lowpass on the three corners ("Ring Before").
- Comb before the filter: the metallic tail gets filtered, so the filter's motion plays the comb ("Crush Kit").
- Phaser before the filter: the sweep sounds like movement inside the tone rather than a coat on top ("Organ Grit").
Playing the Blend
There are three ways to move the dot without touching it, and they stack:
- Modulate Level A, B or C with an LFO, an MSEG or a follower. The blend follows the modulator, and the ghost dot shows where it is.
- Record a path with the motion recorder, or pick a Shape.
- Modulate SPREAD or SHIFT while a path plays, so the corners move while the dot travels between them ("Circle Wobble").
Self-Oscillation
On a model that sings, turn DRIVE up and push RESONANCE toward 100 %: CUTOFF becomes a pitch. On MooLadder, LushJup8, MorphPoleX and WildDiode3 it sings on the note shown under the CUTOFF knob. The other four sing off it, so tune them by ear against the track. Keep LIM on BRK to catch the peaks, turn HUSH on so it stops when the music does, and use the blend to decide how much of the tone you hear against the source. Two singing corners at slightly different cutoffs beat against each other ("Siren Call"). A Step Sequencer on a singing cutoff is a bass line ("Acid Scream").
Per-Note Filter Envelopes
For a filter envelope per note, the Envelope Generator in MIDI mode is the most reliable way: every note-on restarts it, legato included. Route it to one or two cutoffs at 30 to 60 %. Without MIDI, a fast Envelope Follower with a short release does a similar job from the audio ("Pluck Tight"), and the MIDI modulator's Keytrack makes the cutoffs follow the melody ("Three Body" tracks them at 60 %).
Stereo
On a full mix or a stereo bus, M/S filters the centre and leaves the sides alone, and each corner's W sets how much side comes back. Stagger W across the corners (80, 100, 130 %) and moving the blend becomes a width sweep. In L/R, the balance field places each corner left or right, so the blend pans as it moves.
CPU
A corner at 0 % is not computed at all. MONO halves the cost of the filters. Leave OS at 1x unless you hear harsh, folded highs on bright, driven settings: the automatic 2x above 8 kHz already covers the most common case. Each effect and each modulator adds a little, so switch off what you do not use.
11. Factory Presets
Filter Blender ships with 30 factory presets in eight categories. Every one of them moves on its own within a few seconds of playing, and each is level-trimmed to sit close to your dry signal. Click the preset name in the top bar to browse them.
Key Presets
| Preset | Category | What it sounds like | Try this |
|---|---|---|---|
| Init | Init & Basics | Transparent: three lowpasses wide open, no resonance, dot in the centre. | Pull the three cutoffs down together, then drag the dot: same corner frequency, three different slopes. |
| Loop Breather | Drums & Loops | The loop walks from a dark resonant ladder to a crunchy band and back, every bar. | Change the LFO's division for a faster or slower walk. |
| Acid Line | Bass | An acid squelch played by the line: hard notes open the filter, soft ones barely. | Lower the follower's Sensitivity if every note opens fully. |
| Auto Cry | Guitar & Keys | A wah played by the pick: hard picks hand the blend to the wah and sweep it up. | Raise the follower's Release for a slower return. |
| Air Lift | Vocals | Presence that follows the voice, lean when quiet, open when it sings out. | Move the Bell corner's CUTOFF to where the voice needs air. |
| Drift Pad | Synth & Pads | A pad that changes filter over two bars, with the phaser in tow. | Open the MSEG editor and redraw the path between the corners. |
| Ring Before | Sound Design | Ring modulation carved by the triangle into a new instrument. | Sweep the Ring Mod FREQ in the FX panel. |
| Rosette Bloom | Sound Design | A blend arpeggio: the path keeps returning to a pure corner. | Change the rate in the motion transport. |
| Ladder Song | Self-Oscillation | A singing ladder with a slow melody, against the material underneath. | Drag the dot away from the singing corner to hear more of the source. |
All Categories
- Init & Basics (1): Init.
- Drums & Loops (5): Break Glue, Hat Lift, Loop Breather, Step Carve, Crush Kit.
- Bass (3): Acid Line, Growl Wide, Pluck Tight.
- Guitar & Keys (4): Auto Cry, Rhodes Silk, Organ Grit, Wah Pedal.
- Vocals (3): Vowel Talk, Radio Cab, Air Lift.
- Synth & Pads (4): Drift Pad, Three Body, Glass Stack, Fat Unison.
- Sound Design (6): Circle Wobble, Rosette Bloom, Rosette Drift, Ring Before, Cross Mod, Phase Cancel.
- Self-Oscillation (4): Ladder Song, Acid Scream, Siren Call, Hive.
A preset carries every parameter, the modulators and their routes, the chain order, LINK and the motion path. It does not touch IN, LOUDNESS or BYPASS: those are the way you listen, not the sound.
Saving Your Own Presets
Click Save, name the preset, and it appears under User in the menu. Open Presets Folder... shows the files. User presets are .fbpreset files in:
- macOS:
~/Library/UB DSP/Filter Blender/presets - Windows:
%APPDATA%\UB DSP\Filter Blender\presets - Linux:
~/.config/UB DSP/Filter Blender/presets
Presets in Your DAW's Browser
In CLAP hosts with a preset browser (Bitwig Studio, REAPER), the 30 factory presets show up in the host's own browser, with tags, and load in full, modulation and motion included. Your own presets are only in Filter Blender's menu.
12. Controllers & Automation
Every knob of Filter Blender is a parameter your DAW can automate and a controller can play. The host shows each value the way the interface does: Cutoff A reads “1.00 kHz”, Resonance B “50.0 %”, Filter A “LushJup8”, Limiter Mode “Brickwall”. Type a value into the host (“2.5 kHz”, “LushJup8”) and it lands where it says. The corner parameters are named A, B and C, like the corners: Cutoff A, Resonance B, Phase Flip C.
Remote Control Pages (Bitwig Studio)
In Bitwig Studio (CLAP), Filter Blender puts itself on the eight knobs of any controller, in ten pages:
| Page | The eight knobs |
|---|---|
| Blend | Level A ±, Level B ±, Level C ±, SHIFT, SPREAD, DEPTH, MIX, OUT |
| Filter A, B, C | One page per corner: model, type, CUTOFF, RESONANCE, DRIVE, polarity, W and the stereo balance |
| Comb, Ring, Phaser, Vowel | One page per effect: on/off, then its knobs |
| Output | IN, OUT, the LOWS frequency, LIM, LOUDNESS, HUSH, Mid/Side, BYPASS |
| Perform | Prev Preset, Next Preset, Motion Play, Position |
The Blend page plays the three corner levels, never the X and Y of the dot: a triangle does not play from two knobs. Live and Push do not read these pages (see Other Hosts below).
Level A ±, Level B ±, Level C ±
Level A ±, B ±, C ± (-100 to +100 %, default 0 %)
What you hear: one corner pushed into the blend or taken out of it, without moving the dot. At 0 % they do nothing.
+100 % on Level A with the dot on corner B gives half A, half B. -100 % on Level A removes A wherever the dot is. They are host parameters only, not the LEVEL knobs of the interface: those move the dot. The ghost dot shows where the sound really is, and each LEVEL knob draws an arc to the level you hear. Modulation routed to Level A, B or C adds on top. They are saved with the session and with your presets. The factory presets leave them at 0, and loading a preset saved before 1.1.1 sets them back to 0.
Buttons You Can Reach
Prev Preset, Next Preset and Motion Play are parameters, so a controller button can press them. They are on the Perform page in Bitwig. In Ableton Live with Push (VST3), they come at the end of the parameter list: use Configure in Live to bring them forward. They work with the plugin window closed, and every press fires, whether the controller button toggles or springs back. Nothing records them: not the session, not undo, not presets.
Other Hosts
Hosts that do not read the remote pages, Live and Push among them, list the parameters in banks of eight, in the plugin's own order. Automation written with an earlier version keeps playing: only the names changed (Cutoff A used to be Cutoff 0).
13. About & Settings
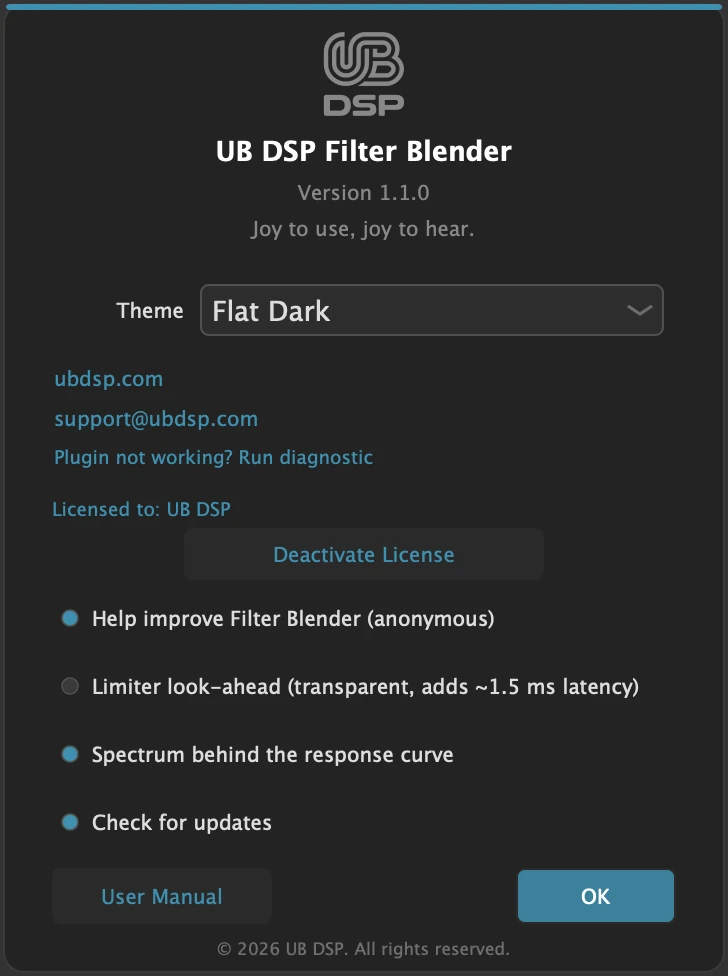
Click About in the top bar. Click outside the panel or OK to close it.
Theme
Modern Dark, Modern Light, Flat Dark, Flat Light, Classic Dark or Classic Light. The change shows at once. Flat Dark is the default.
Licence
Shows who the licence belongs to, or that the plugin is in trial mode. Activate License... loads your keyfile, Deactivate License removes it from this computer.
Help improve Filter Blender (anonymous)
Sends anonymous technical data to UB DSP, only if you tick this box. Telemetry is off unless you turn it on.
Limiter look-ahead (transparent, adds ~1.5 ms latency)
Makes the BRK limiter even more transparent on fast peaks, at the cost of about 1.5 ms of latency, which your DAW compensates. Off by default.
Spectrum behind the response curve
Shows or hides the output spectrum behind the curve. On by default.
Check for updates
When the plugin window opens, Filter Blender asks ubdsp.com whether a newer version is out. If one is, it tells you once, with Download, Skip this version or Later. On by default. Untick it to switch the check off.
Links and User Manual
ubdsp.com, support@ubdsp.com, Plugin not working? Run diagnostic and User Manual, which opens this manual.
Theme, look-ahead, spectrum and the update check are remembered for every new instance, in ~/Library/UB DSP/Filter Blender/settings.xml on macOS, %APPDATA%\UB DSP\Filter Blender\settings.xml on Windows and ~/.config/UB DSP/Filter Blender/settings.xml on Linux.
14. Installation & Activation
macOS
Run the installer (.pkg). It is signed and notarised. Each format is a separate component, so you can untick the ones you do not use. The plugins go to:
- AU:
/Library/Audio/Plug-Ins/Components/Filter Blender.component - VST3:
/Library/Audio/Plug-Ins/VST3/Filter Blender.vst3 - CLAP:
/Library/Audio/Plug-Ins/CLAP/Filter Blender.clap - AAX:
/Library/Application Support/Avid/Audio/Plug-Ins/Filter Blender.aaxplugin
To uninstall, delete the bundles listed above.
Windows
Run the installer. You can choose any of the formats, and the plugins go to:
- VST3:
C:\Program Files\Common Files\VST3\Filter Blender.vst3 - CLAP:
C:\Program Files\Common Files\CLAP\Filter Blender.clap - AAX:
C:\Program Files\Common Files\Avid\Audio\Plug-Ins\Filter Blender.aaxplugin
Linux
Unpack the archive and run install.sh. It installs for your user in ~/.vst3 and ~/.clap, or for every user in /usr/lib/vst3 and /usr/lib/clap with --system.
Restart your DAW after installing, and rescan plugins if it does not pick Filter Blender up.
Trial Mode
Without a licence, Filter Blender is fully functional, with 2 seconds of silence every 40 seconds (with short fades, so it does not click). The window shows TRIAL MODE across it, a DEMO - SILENCE badge during each silence, and an Activate License button.
Activating
- Download your keyfile (
.ubkeyfile) from your account on ubdsp.com or from your purchase email. - Click Activate License in the plugin window (or Activate License... in the About panel).
- Choose the keyfile. The plugin confirms with License Activated and your name.
Activation works completely offline: the keyfile is checked on your computer and the licence never touches the network. It is checked again at every launch. The plugin looks for your keyfile in its default folder (~/Music/Audio/Presets/UB DSP/Filter Blender/ on macOS, Documents\UB DSP\Filter Blender\ on Windows, ~/.config/UB DSP/Filter Blender/ on Linux), next to the plugin, and where you last loaded it from. Keep a copy in the default folder and you will never be asked again.
15. Troubleshooting & FAQ
Filter Blender does not show up in my DAW
Restart the DAW and rescan plugins. Check that the format your DAW uses was installed (see Installation). On macOS, Filter Blender is an Audio Unit music effect because it accepts MIDI for its modulators, so Logic Pro lists it under MIDI-controlled Effects.
How do I send MIDI to Filter Blender?
The MIDI modulator and the Envelope Generator in MIDI mode need notes sent to the plugin, which works differently in every DAW: in most, you route a MIDI track's output to the plugin. Everything else in Filter Blender works without MIDI.
The filter keeps singing after the music stops
That is self-oscillation: with DRIVE up and RESONANCE high, eight of the twelve models become oscillators. Turn on HUSH and the filter fades out after 400 ms of silence at the input. Or lower RESONANCE below the point where it starts to sing.
The resonance peak is not on the CUTOFF dot
The dot on the response curve marks CUTOFF, the frequency you set. The peak is where the filter resonates. On a resonant low-pass it usually sits below CUTOFF, by a few semitones up to more than an octave depending on the model. Each model resonates in its own place, so with LINK on, the three corners share one CUTOFF but not one peak, and the blend plays with that spread. Push RESONANCE toward the top and most peaks close in on CUTOFF.
Does an update change how my sessions sound?
No. When a new version improves a filter model, a session or a user preset saved before keeps the model it was made with and sounds exactly as it did. New instances and the factory presets get the improved one. In 1.1.0, WildDiode3, LushJup8, FunkyFollowIII, MooLadder and the MorphPoleX Notch changed, and sessions from 1.0.2 keep their sound. In 1.1.1, LushJup8 changed again: it now keeps its bass at the plugin's output, where 1.1.0 only kept it inside the filter. Sessions from 1.1.0 and earlier keep their sound. To hear the new models in an old project, open a new instance and set it up again, or load a factory preset.
It gets too loud when I push the resonance
Keep LIM on BRK: it holds the filter's peaks around -0.2 dBFS. Lower OUT if an effect placed after the filter pushes the level up again, since those come after the limiter. LOUDNESS keeps the overall level close to the dry signal.
The bass disappears
Turn on LOWS and drag its handle on the response curve: everything below it bypasses the filters and the effects. 80 to 120 Hz for a bass, 150 to 250 Hz for a drum bus or a full mix. If you want the resonance to touch the bass, put LushJup8 in LP on a corner: it keeps its low end as RESONANCE rises, where a MooLadder at the same setting loses most of it.
My host's bypass automation stopped working after the update
Before 1.1.1, the VST3 and AAX versions showed two Bypass parameters: Filter Blender's own, and one your host added, which its bypass button worked. There is now only one, Filter Blender's. Automation written on the old host bypass (or, in Pro Tools, on the plugin's Bypass) has to be written again. A VST3 session saved with the host's bypass on reopens with the plugin active.
I added a modulator but nothing moves
A modulator does nothing until it has a route. Click ARM in its card header, then click a control (the route starts at +50 %) or drag up or down on it to set the amount. Check that the card's power button is on, and open Mod Routes (☰) to see the routes and their amounts. The Envelope Follower and the Envelope Generator in AUDIO mode need audio, the MIDI modulator and the Envelope Generator in MIDI mode need MIDI notes. An Envelope Generator whose threshold sits above your signal never fires: drag the threshold down on its meter.
A follower preset stays wide open, or never opens
A follower reacts to the level of your track. Adjust its Sensitivity: down if it stays pinned open, up if it barely moves. The factory presets are set for a normally gain-staged track.
My motion path does not play
Press PLAY in the motion transport. Playback starts from Position. If the rate is set to a long note value (4/1 is four bars), the path moves slowly. The recorder follows the host tempo but does not start with your DAW's transport.
Loading a preset did not change my input gain or loudness setting
That is on purpose. IN, LOUDNESS and BYPASS describe how you listen, not the sound, so presets leave them as they are.
High CPU
Set OS back to 1x, switch off the effects and the modulators you do not use, and park the dot away from corners you do not need (a corner at 0 % costs nothing). On a mono source, MONO halves the cost of the filters.
The sound drops out for 2 seconds every 40 seconds
Filter Blender is in trial mode. See Activating. If you already activated and the silence came back after an update or a move to a new computer, load your keyfile again from the About panel.
Something is wrong and I need help
Open the About panel and click "Plugin not working? Run diagnostic". This opens the Diagnostic Tool page, where you can download a small application that checks your system, lists your installed UB DSP plugins and sends a full report to support. It is the fastest way to get help. You can also write to support@ubdsp.com.