
Grit Blender Manual
Version 1.3.1
1. Welcome & Overview
Grit Blender helps you add warmth, weight, and character to any track, from barely-there analog sheen to full-on fuzz destruction, using just a few controls.
Most saturation plugins give you one flavor. Grit Blender gives you twelve, and lets you blend them together in real time using an intuitive triangle interface. Stack two stages in series for complex textures, process Mid and Side channels independently for stereo control, and use built-in transient preservation (PUNCH) and harshness taming (SMOOTH) so your saturated signal always sits right in the mix.
Formats: AU, VST3, CLAP and AAX on macOS. VST3, CLAP and AAX on Windows. VST3 and CLAP on Linux.
Platforms: macOS (10.13+; versions before macOS 11 are not tested), Windows (64-bit), Linux (64-bit)
2. Quick Start: First Great Sound in 60 Seconds
- Insert Grit Blender on a vocal, drum bus, or any track you want to add character to.
- Load the preset "Warm Tape" from the Basics category using the preset browser at the top.
- Play your track and raise DRIVE until you hear the signal start to thicken and compress. Around 40–60% is a great starting point.
- Shape the tone: turn TONE left for a darker, warmer sound, or right for more bite and presence.
- Compare: click BYPASS to toggle the effect on and off. If the saturated version sounds louder, turn on LOUDNESS MATCH in the bottom bar for a fair comparison. Use MIX to dial in the perfect blend between clean and saturated.
3. Typical Use Cases
On Vocals
Load "Vocal Polish" (Psychoacoustic). This preset uses the Smile tone curve (bass + treble together), SMOOTH, and ANALOG. DRIVE is set around 38% for subtle presence and body. MIX at 85% lets a touch of the clean signal through for clarity.
Adjust DRIVE to taste (20–40%). If the vocal feels too thick, push TONE right (+10 to +20%). If it's too bright, pull TONE left. Try switching to the Presence tone curve for a focused 3 kHz boost that helps vocals cut through.
On Drums Bus
Load "Drum Punch" (Psychoacoustic). PUNCH is already on to preserve attack transients through saturation. The preset uses the Air tone curve (high-shelf sparkle) and MIX at 70% for parallel blending. The kick and snare will punch through the mix while the overall drum bus sounds glued and energized.
For more weight, push DRIVE to 50–70%. For subtle glue, keep it below 30% and lower MIX to 40–50%.
On Bass
Load "Bass Thickener" (Psychoacoustic). The Tape + Tube blend adds warmth and harmonic richness that helps bass translate on small speakers. The preset uses the Warm tone curve (low-shelf body) so the TONE knob adds weight and fullness. PUNCH and SMOOTH are both on for tight transients and controlled harshness.
Keep DRIVE moderate (30–50%). Turn on KEY TRACK and send MIDI from your bass part to keep the fundamental clean while saturating the upper harmonics. Leave LOW CROSSOVER off in the ADV panel, or KEY TRACK is disabled.
On Mix Bus / Master
Load "Master Glue" (Psychoacoustic). The preset uses the Presence tone curve (focused 3 kHz bell), SMOOTH, and ANALOG for cohesive mix bus saturation. MIX is at 50% for parallel blending. Turn on LOUDNESS MATCH for honest A/B comparison.
On the mix bus, less is more. Keep DRIVE around 20–35% and use MIX to control the intensity. Lower MIX to 20–40% for even more transparency. Try switching to the Smile tone curve for a broader bass + treble enhancement.
Creative Sound Design
Switch to Dual Stage mode in the right panel. Stage 1 could be Tape (warm), feeding into Stage 2 with Wavefolder + Fuzz (aggressive). Push both DRIVE 1 and DRIVE 2 high for evolving, complex distortion textures. The inter-stage filter automatically tames harshness between stages.
Try the "Desk into Fuzz" or "Lo-Fi Chain" presets as starting points, then experiment with the triangle positions.
4. Interface Overview
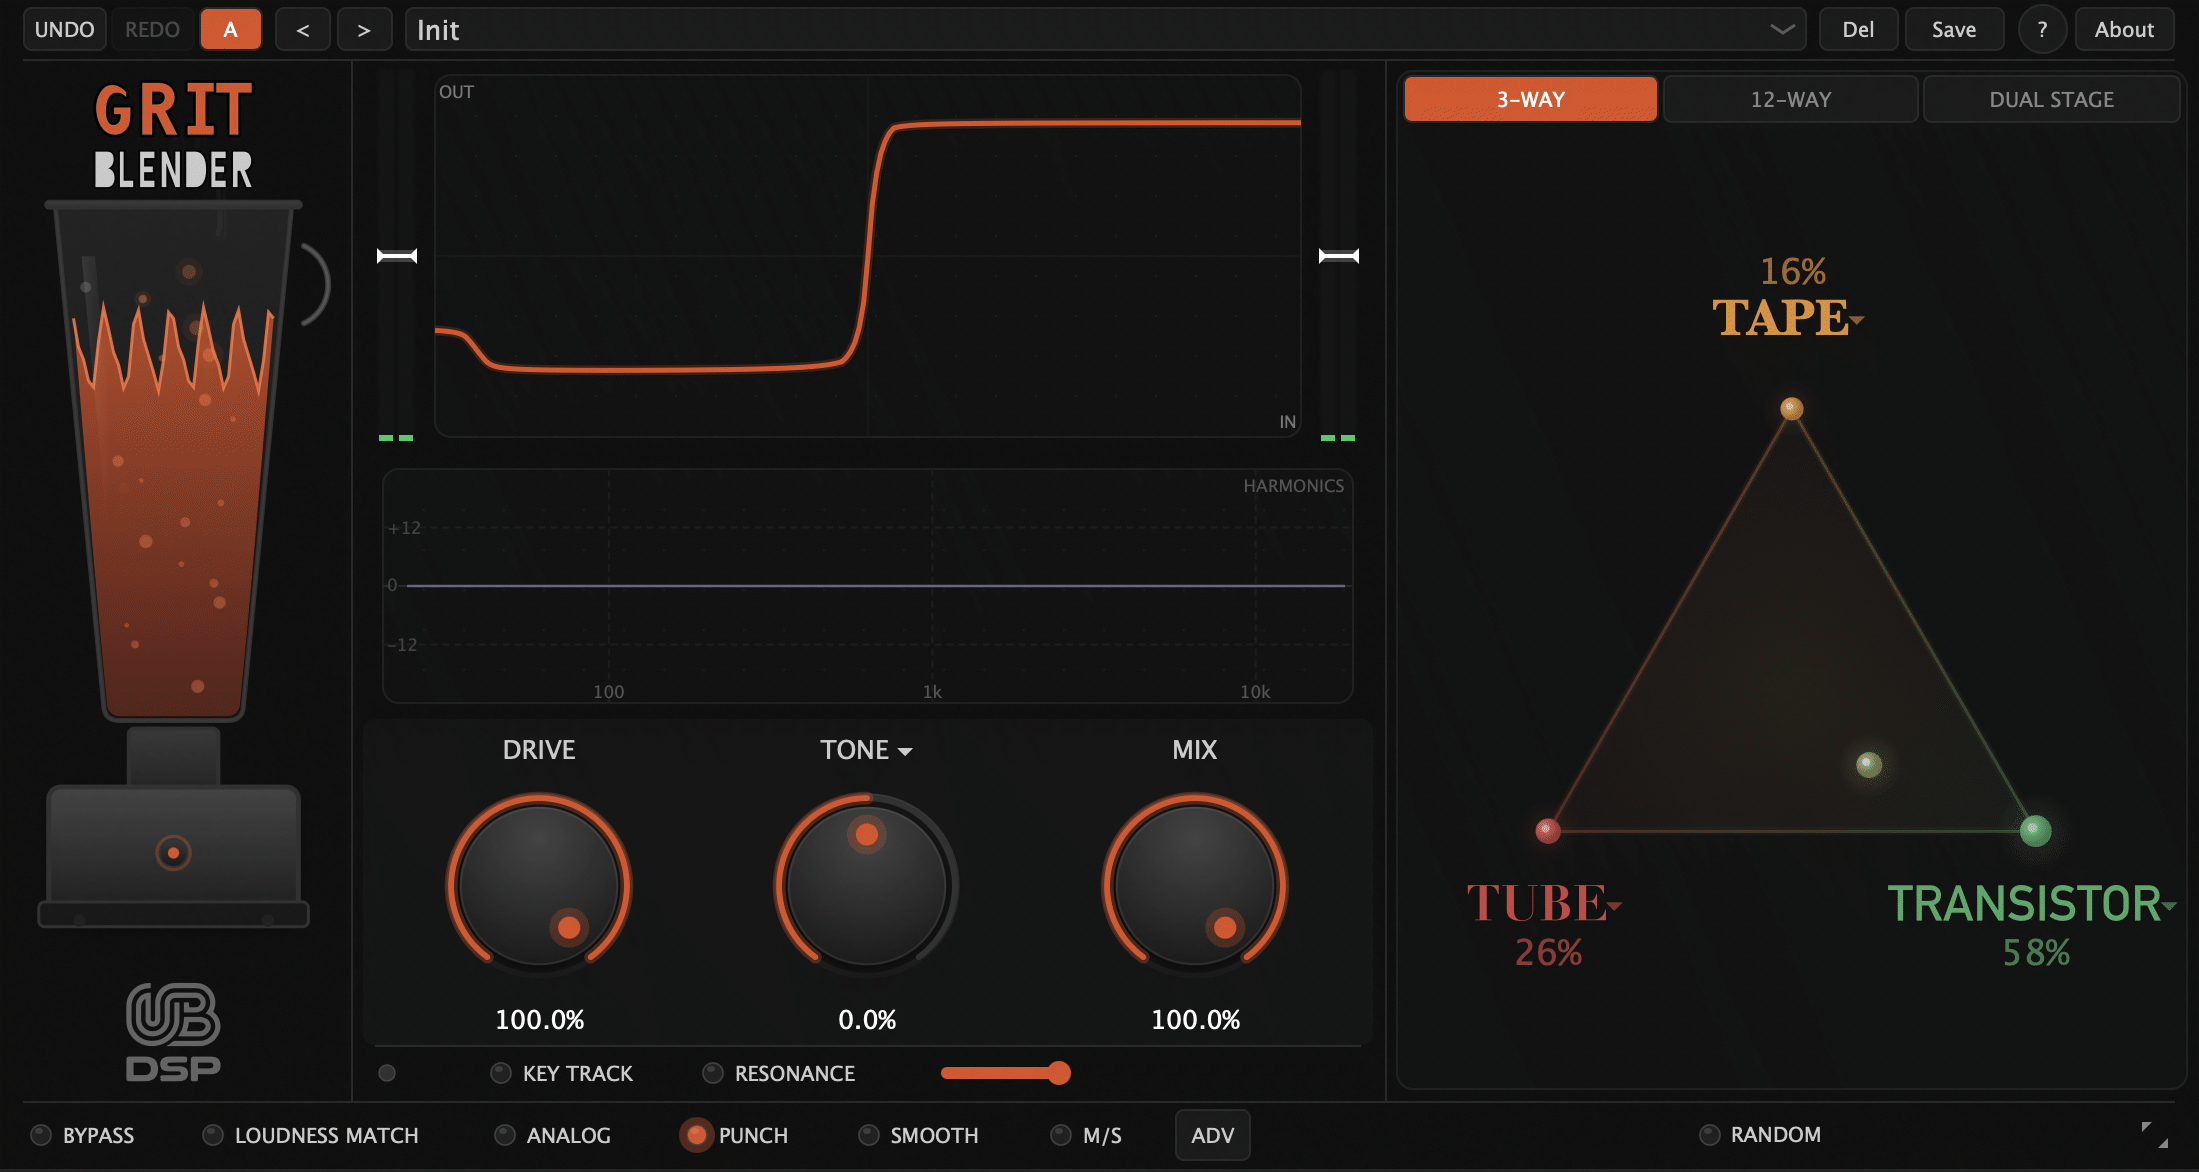
Grit Blender's interface is organized into five zones:
Preset Bar (top)
The top bar contains UNDO / REDO (up to 29 steps), A/B comparison (orange = Slot A, blue = Slot B), the preset browser with previous/next arrows, SAVE / DELETE buttons for user presets, the ? help toggle, and the ABOUT button.
Blender Panel (left)
An animated cartoon blender that responds to the DRIVE parameter. Higher drive makes the blender spin faster, with liquid waves, splash particles, and steam. It's visual feedback that makes saturation fun to watch.
Main Panel (center)
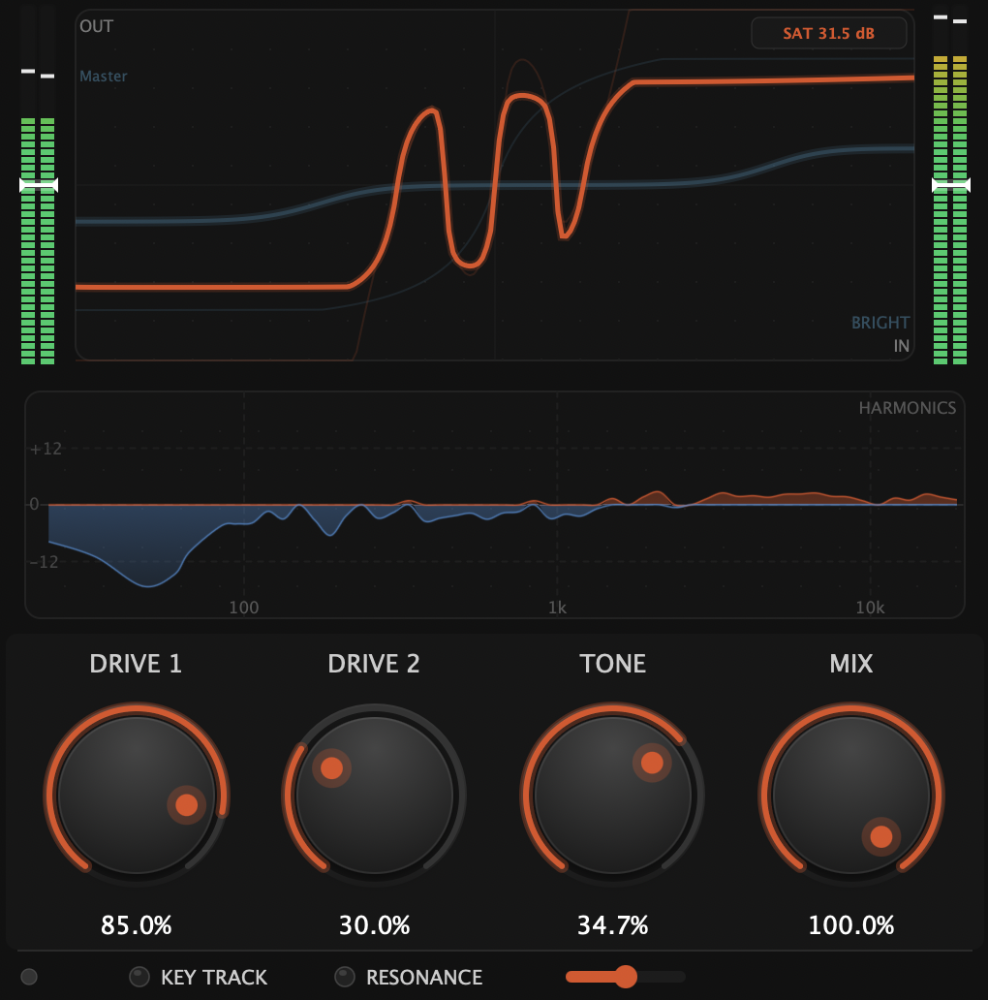
This is where you shape your sound:
- Transfer Curve (top): Shows how the saturator reshapes your signal in real time. A straight diagonal line means no saturation; curves and flattening show compression and clipping. A subtle blue curve overlays the Tone EQ frequency response when TONE is not at 0%, showing the shape of the active Tone Curve Type. In M/S mode, orange = Mid, brighter blue = Side. Context-sensitive endpoint labels update based on the active tone curve type (e.g., "DARK"/"BRIGHT" for Default, "THIN"/"WARM" for Warm) and a SAT indicator shows the saturation amount.
- Harmonics Spectrum (middle): An energy-normalized delta FFT display showing how saturation reshapes the spectral balance of your signal. Orange fill above the center line = frequencies gaining relative energy. Blue fill below = frequencies losing relative energy. The display is normalized so that overall loudness differences are removed: you see only the tonal redistribution, not volume changes. Dashed grid lines mark 100 Hz, 1 kHz, 10 kHz, and ±12 dB.
- Main Knobs (bottom): DRIVE, TONE, MIX (always visible). DRIVE 2 appears in Dual Stage mode. In M/S mode, DRIVE and MIX are relabeled M DRIVE and M MIX (Mid channel), and new knobs appear: S DRIVE, S MIX (and S DRIVE 2 in Dual Stage) for independent Side channel control.
- MIDI Bar (very bottom of center): MIDI activity LED, KEY TRACK, RESONANCE, and RES AMT controls. These respond to MIDI input.
Blend Panel (right)
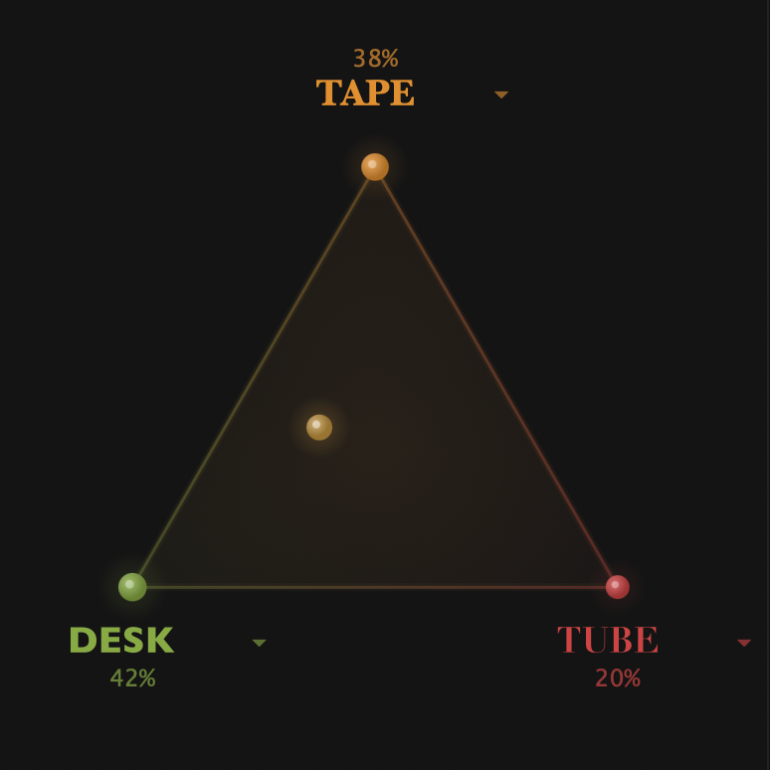
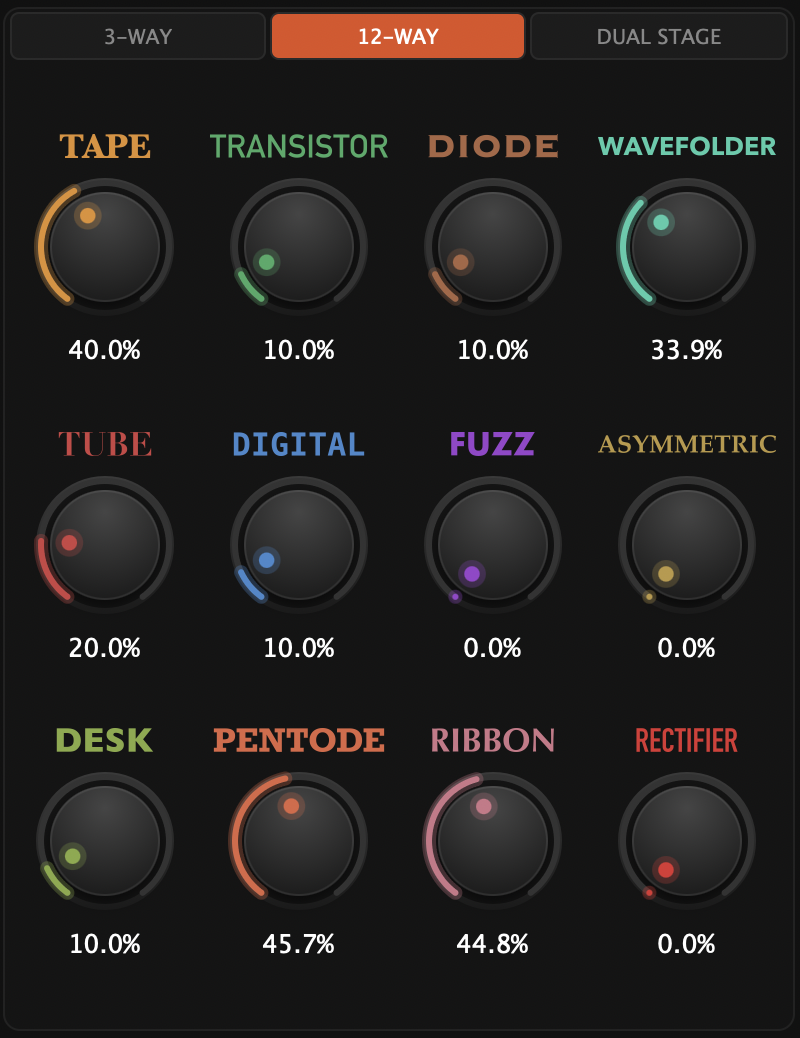
Choose how saturation types are mixed. Three modes are available:
- 3-Way Triangle: Drag the cursor inside a triangle to blend three saturation types. Each vertex is a different type. Position determines the mix ratio. Hold Shift while dragging for ~10× finer precision.
- 12-Way Advanced: A 4×3 grid of independent sliders, one per saturation type. Full control over the exact blend.
- Dual Stage: Two triangle panels in series. Stage 1 feeds into Stage 2 with automatic inter-stage filtering.
The RANDOM button generates a random blend based on the current mode.
Bottom Bar

DSP feature toggles: BYPASS, LOUDNESS MATCH, ANALOG, PUNCH, SMOOTH, M/S (or L/R when in Left/Right stereo mode), ADV (opens the Advanced panel), and the SIZE resize button.
Metering
Stereo input and output VU meters flank the transfer curve. Each meter has a transparent overlay slider for adjusting INPUT GAIN or LEVEL: drag the bar directly on the meter to trim levels. The input meter shows the signal arriving from your track, before INPUT GAIN, so moving INPUT GAIN does not move it.
5. Controls Reference
Main Controls
DRIVE (0–100%, default 50%)
What you hear: Turning DRIVE up pushes more signal into the saturator. At low values, you'll hear subtle warmth and body. At higher values, the sound compresses, distorts, and gains harmonic richness.
The lower half of the knob is very gradual, ideal for dialing in subtle warmth. The upper half drives progressively harder. Each saturation type is calibrated to reach its musical sweet spot around 50%. In M/S mode, this knob is relabeled M DRIVE and controls the Mid (center) channel only.
TONE (-100 to +100%, default 0%)
What you hear: Shapes the tonal balance of the saturated signal. What the knob does depends on the selected Tone Curve Type (see below): it could darken/brighten, add body, add air, scoop/boost bass+treble together, or push/pull the midrange presence. At 0%, the tone is neutral regardless of the curve type.
A post-saturation EQ whose shape changes fundamentally depending on the selected tone curve type. Click the TONE ▾ label to open a popup menu showing all 5 types with a description and mini EQ response preview. The transfer curve display overlays the active tone EQ response in blue when TONE is not at 0%. The endpoint labels on the curve update dynamically (e.g., "DARK" / "BRIGHT" for Default, "THIN" / "WARM" for Warm).
TONE CURVE TYPE (click TONE ▾ label to select)
What you hear: Completely changes the EQ shape that the TONE knob controls. Each type uses a fundamentally different filter topology: not just different frequencies, but different curves. The same TONE position produces a very different tonal character depending on the type.
Five types are available:
| Type | Shape | Left (−) | Right (+) | Best for |
|---|---|---|---|---|
| Default | Tilt EQ (320/3200 Hz) | DARK | BRIGHT | General-purpose brightness balance. Works on any source. |
| Warm | Low shelf (250 Hz) | THIN | WARM | Adding body & weight. Great for bass, vocals, tape-style presets. |
| Air | High shelf (8 kHz) | DULL | AIR | Top-end sparkle & shimmer. Great for drums, fuzz, bright sources. |
| Smile | Co-shelf (low + high together, 150/5000 Hz) | TIGHT | WIDE | Bass & treble boost together (the "smiley face" EQ). Great for vocals, lo-fi, stereo widening. |
| Presence | Bell (3 kHz, Q 1.2) | BACK | FORWARD | Midrange focus & cut-through. Great for leads, guitar, mix bus, mastering. |
The active type name and endpoint labels are displayed on the transfer curve when TONE is not at 0%. Tone curve types are saved with presets and assigned to factory presets based on their intended use.
MIX (0–100%, default 100%)
What you hear: At 100%, you hear only the saturated signal. Lowering MIX blends in the original clean signal for parallel saturation. At 50%, you get equal parts clean and saturated, a great way to add grit without losing clarity.
Phase-aligned crossfade between the dry input and the fully processed (saturated + toned) signal. In M/S mode, this knob is relabeled M MIX and controls the Mid (center) channel only. The Side channel has its own S MIX knob.
INPUT GAIN (-12 to +12 dB, default 0 dB)
What you hear: Adjusts the level going into the plugin before any processing. Higher input = the saturator reacts more aggressively.
Linear gain applied before the low split and the saturation curves. The input meter reads the signal before this gain. Drag the bar on the input meter to adjust, or double-click to reset to 0 dB.
LEVEL (-12 to +12 dB, default 0 dB)
What you hear: Controls the final output volume. Use it to match levels when comparing with bypass, or to compensate for volume changes from saturation.
Post-processing output gain. Disabled when LOUDNESS MATCH is active (automatic gain compensation takes over). Drag the bar on the output meter to adjust.
Dual Stage Controls
DRIVE 2 (0–100%, default 30%)
What you hear: Controls how hard Stage 2 saturates. With a warm Stage 1 feeding into an aggressive Stage 2, you can create complex, evolving distortion textures.
Only visible in Dual Stage mode. Automatic inter-stage filtering (HP 80 Hz, adaptive LP 5–16 kHz) cleans up the signal between stages. In M/S mode, this knob is relabeled M DRIVE 2 and controls the Mid channel only.
Mid/Side Controls
When M/S mode is active, the main knobs are relabeled for the Mid (center) channel, and new knobs appear for the Side (stereo difference) channel:
Mid channel
M DRIVE (0–100%, default 50%)
What you hear: Controls saturation intensity on the Mid (center) channel. This is the main DRIVE knob, relabeled to clarify it only affects the center content.
M DRIVE 2 (0–100%, default 30%)
What you hear: Stage 2 saturation for the Mid channel. Only visible in Dual Stage + M/S mode. This is the main DRIVE 2 knob, relabeled.
M MIX (0–100%, default 100%)
What you hear: Dry/wet blend for the Mid channel. This is the main MIX knob, relabeled. At 100%, the center is fully saturated; lower values blend in the clean center signal.
Side channel
S DRIVE (0–100%, default 50%)
What you hear: Controls saturation intensity on the Side (stereo difference) channel. At 0%, the Side passes through without saturation (clean stereo). Pushing S DRIVE adds harmonic richness and excitement to the stereo width.
S DRIVE 2 (0–100%, default 30%)
What you hear: Stage 2 saturation for the Side channel. Only visible in Dual Stage + M/S mode.
S MIX (0–100%, default 100%)
What you hear: Independent dry/wet blend for the Side channel. At 100%, the Side is fully processed. Lowering S MIX blends in the original stereo difference signal for subtler stereo processing. At 0%, the Side channel bypasses saturation entirely.
MIDI Controls
KEY TRACK and RESONANCE are driven by MIDI input (notes from your DAW or a controller). Send MIDI notes to Grit Blender and the crossover and resonance filters will follow the played pitch in real time.
KEY TRACK (toggle)
What you hear: When enabled, the fundamental of the played note stays clean, and the harmonics above it get saturated. Great for keeping bass fundamentals tight while adding grit to the upper range.
Splits the signal with a steep crossover filter that follows the MIDI pitch, half an octave above the played note, so the fundamental reaches the saturator 14 dB down. The low band bypasses saturation, the high band is processed. Between notes, the crossover holds the last note. When off, the crossover sits at a fixed 80 Hz. KEY TRACK is disabled while LOW CROSSOVER (ADV panel) is on: the manual crossover takes over and the KEY TRACK button is greyed out.
RESONANCE (toggle)
What you hear: Boosts the played note's frequency before saturation, exciting harmonics around that pitch. The saturator then emphasizes those harmonics further. The result is a resonant, singing quality that follows the source.
A pre-saturation peak EQ (Q=3.0) at the played note's frequency, with gain controlled by RES AMT (0–12 dB).
RES AMT (0–100%, default 50%)
What you hear: Controls how much the resonance peak boosts. Low values add subtle emphasis; high values create a strong resonant peak.
Maps 0–100% to 0–12 dB of boost at the played note's frequency.
DSP Feature Toggles
BYPASS
What you hear: Toggles all processing on or off with a smooth 5ms crossfade (no clicks). The transfer curve and spectrum displays fade when bypassed.
Automatable from the host.
LOUDNESS MATCH
What you hear: Automatically adjusts the output level to match the input loudness. Essential for honest A/B comparisons: without it, the louder (saturated) version always sounds "better" due to the loudness bias.
Uses asymmetric psychoacoustic measurement: the input and output are measured differently to account for the harmonic content that saturation adds. This prevents the common issue where auto-gain makes the saturated signal sound quieter than the original. Applies smooth gain compensation so you can A/B compare without volume bias. Disables the LEVEL slider when active.
ANALOG
What you hear: Adds the character of running your signal through analog hardware: gentle high-frequency roll-off (like a transformer), subtle even harmonics, a low-frequency bump (like a tape head resonance), and a touch of noise floor.
Models several analog behaviors in one toggle. Uses a small amount of extra CPU because the processing runs at a higher internal rate for accuracy. The Advanced panel provides an intensity knob (0–200%, default 100%) to scale the effect.
PUNCH
What you hear: Preserves attack transients through saturation. Drums hit harder, vocals have more presence, and plucked instruments keep their snap, even when heavily saturated.
Detects fast peaks and restores the natural attack shape that saturation tends to compress. Works automatically, with no threshold or ratio to set. The Advanced panel provides an intensity knob (0–200%, default 100%) to scale the effect.
SMOOTH
What you hear: Tames harshness created by saturation. If your saturated signal feels too bright or fatiguing, SMOOTH will dynamically reduce only the harsh frequencies, leaving the rest untouched. You'll hear a warmer, more polished saturation without losing detail.
Focuses on the upper-mid and high frequencies where saturation tends to create harshness. Only acts when it detects excess energy, so it stays transparent when saturation is gentle. The Advanced panel provides an intensity knob (0–200%, default 100%) to scale the effect.
M/S or L/R (stereo mode)
What you hear: Splits the stereo signal for independent per-channel saturation. In M/S mode, the signal is split into center (Mid) and stereo difference (Side). In L/R mode, the left and right channels are processed independently. You can drive one channel hard while keeping the other clean. Each channel gets its own drive and mix controls.
When active, the main knobs are relabeled for the primary channel (M or L), and new knobs appear for the secondary channel (S or R). The transfer curve shows orange for M/L and blue for S/R. Switch between M/S and L/R in the Advanced panel. Click the active stereo mode button to disable stereo processing.
On mono tracks: The M/S button (bottom bar) and the M/S / L/R buttons (Advanced panel) are dimmed and non-clickable. A mono signal has no Side or Right channel to process independently, so stereo modes are turned off automatically.
OVERSAMPLING (2x / 4x / 8x, in the Advanced panel)
What you hear: Higher oversampling means cleaner, more refined saturation with fewer digital artifacts (aliasing). Lower oversampling uses less CPU.
Open the ADV panel and click 2x, 4x or 8x. 2x = light CPU, 4x = default (recommended), 8x = highest quality. Affects the declared latency to the host. Changes take effect at the next audio block.
Preset Bar Controls
UNDO / REDO
Revert or restore parameter changes. Grit Blender captures a snapshot every 0.5 seconds when parameters change, keeping up to 29 undo steps per session.
A/B
Toggle between two independent parameter states. Orange = Slot A, blue = Slot B. Saves your current state before switching, so you never lose a setting. Great for comparing two different saturation approaches on the same material.
? (Help)
Activates help mode. Hover over any control to see a contextual tooltip describing what it does and how to use it.
SIZE
Opens a popup to choose from three preset window sizes: Small (850×450), Medium (1100×585), Large (1500×900). You can also resize freely by dragging the window edges.
6. The 12 Saturation Types
Each type models a different analog (or digital) nonlinearity. Blend them together using the triangle or advanced panel. The Hardness column indicates how aggressively the type clips: softer types compress gently, harder types distort more overtly.
| Type | Character | Best for | Hardness |
|---|---|---|---|
| Tape | Warm, soft-knee compression with even harmonics. Classic reel-to-reel character. | Vocals, mix bus, anything that needs subtle warmth | Soft |
| Tube | Asymmetric plate saturation with grid conduction. Rich and musical overdrive. | Vocals, guitars, bass: a versatile all-rounder | Soft |
| Transistor | Cascaded soft-diode clipping. Tight, aggressive, harmonically dense. | Drums, aggressive vocals, guitars | Medium-Hard |
| Digital | Quantization / bit-reduction crunch. Retro lo-fi artifacts. | Lo-fi effects, sound design, creative textures | Hard |
| Diode | Germanium (soft positive) + silicon (hard negative) asymmetric clipping. | Guitars, synths, character processing | Medium |
| Fuzz | Full-wave rectification with octave-up overtones. Heavy and thick. | Guitars, creative sound design, aggressive effects | Very Hard |
| Desk | Console channel saturation: transformer + op-amp coloration. Subtle and musical. | Mix bus, mastering, gentle coloration on any source | Soft |
| Ribbon | Magnetic tape hysteresis (Langevin function). Smooth compression and warmth. | Mastering, gentle processing, ribbon mic emulation | Very Soft |
| Pentode | Power tube push-pull with sag. Dynamic and responsive overdrive. | Guitars, organ, dynamic sources | Medium |
| Rectifier | High-gain cascaded 3-stage clipping. Tight and aggressive. | Heavy guitars, aggressive drums, metal tones | Hard |
| Wavefolder | Triple wave folding that treats both halves of the wave alike, so on its own it sounds an octave up, like Fuzz. Complex and metallic. Blend it with another type to keep the note. | Sound design, synths, experimental textures | Hard |
| Asymmetric | Pure even-harmonic generator (2nd + 4th order). Subtle tonal thickening. | Mastering, vocals, gentle coloration | Soft |
7. The Advanced Panel (ADV)
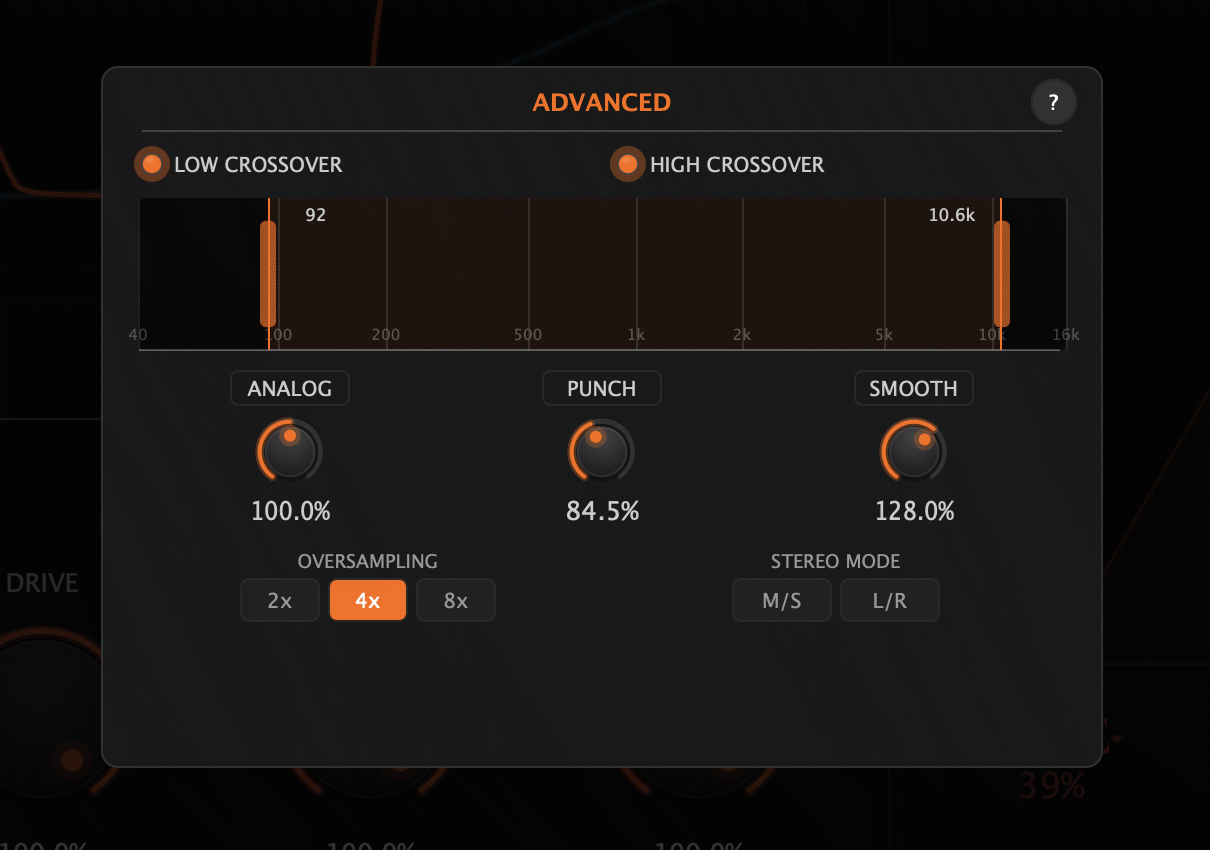
Click the ADV button in the bottom bar to open the Advanced panel. This overlay gives you access to frequency crossovers, effect intensity, oversampling and stereo mode settings.
Frequency Crossovers
The graph at the top of the panel shows a real-time pre-effect spectrum with draggable frequency handles.
- LOW CROSSOVER: When enabled, frequencies below the low handle bypass saturation. The bass stays clean while the rest of the spectrum is processed. Uses a steep 24 dB/oct Linkwitz-Riley filter with phase-aligned recombination, so a little of what sits just below the handle still reaches the saturator. While it is on, KEY TRACK is disabled.
- HIGH CROSSOVER: When enabled, frequencies above the high handle bypass saturation. Keeps treble clean while saturating the mids and lows.
Drag the handles to set the crossover frequencies (40 Hz – 16 kHz). When a crossover is disabled, its handle disappears and the frequency reverts to the default (80 Hz for low, 16 kHz for high). Both crossovers are disabled by default, and the high one then costs nothing. The low split never goes away entirely: with LOW CROSSOVER and KEY TRACK both off, everything below 80 Hz still bypasses saturation.
Stereo Handles
When a stereo mode is active (M/S or L/R), the graph shows 4 handles: orange handles for Mid/Left in the top half, blue handles for Side/Right in the bottom half. Each pair is independently draggable, allowing different crossover frequencies per channel. For example, you could saturate the sides from 200 Hz up while keeping the mid channel saturated from 80 Hz up.
LOW CROSSOVER and KEY TRACK are exclusive: enabling the low crossover disables KEY TRACK, and the handles set the frequency. Turn LOW CROSSOVER off to let KEY TRACK follow the MIDI note again.
Effect Intensity
Below the graph, three knobs let you scale the intensity of ANALOG, PUNCH, and SMOOTH:
- 0%: The effect is at its mildest (but still active if toggled on).
- 100%: Default intensity.
- 200%: Double intensity for more extreme processing.
Click the label above each knob to toggle the effect on or off (grey = off, white = on).
Oversampling & Stereo Mode
At the bottom of the panel:
- OVERSAMPLING. Choose 2x, 4x, or 8x. Higher values produce cleaner saturation at the cost of more CPU and latency.
- STEREO MODE. Choose M/S (Mid/Side) or L/R (Left/Right). Click the active button again to disable stereo processing entirely. On mono tracks, both buttons are dimmed and non-clickable since there is no second channel to process.
Help Mode
Click the ? button in the top-right corner of the panel to activate help mode. Hover over any control to see a description tooltip. Click ? again to deactivate.
8. Advanced Tips & Workflows
Gain Staging
Saturation responds differently depending on the input level. Use INPUT GAIN to set the right level going in. For balanced saturation, aim for peaks around -6 to -3 dBFS after INPUT GAIN. The input meter reads the signal before INPUT GAIN, so add the two: peaks at -12 dBFS on the meter with INPUT GAIN at +7 dB reach the saturation stage at about -5 dBFS. Too hot, and you'll get more distortion than intended. Too quiet, and the saturator won't engage properly.
Parallel Saturation with MIX
Instead of blending saturation types, you can use the MIX knob as a parallel processing tool. Set your saturation aggressively (high DRIVE, hard types), then pull MIX back to 20–40%. You keep the original dynamics and clarity while adding harmonic density underneath. This is one of the most effective mixing techniques with Grit Blender.
Dual Stage Strategies
- Warm into Aggressive: Stage 1 = Tape or Desk (gentle coloration), Stage 2 = Transistor or Rectifier (hard clipping). The first stage adds body; the second adds grit.
- Shape then Destroy: Stage 1 with low DRIVE shapes the harmonics; Stage 2 with high DRIVE pushes them into heavy distortion.
- Clean into Character: Stage 1 barely engaged, Stage 2 with a specific type at moderate DRIVE. The result is cleaner than driving a single stage hard.
M/S Processing for Mastering
Enable M/S mode on the mix bus. Use M DRIVE gently (20–30%) with Desk or Tape for center focus and glue. Use S DRIVE with slightly more intensity or a different type for stereo excitement. Lower S MIX to 50–70% to keep the stereo image natural while adding saturation. Try the Presence tone curve for focused midrange control, or Smile for broader bass + treble enhancement. The factory presets "M/S Master" and "Center Focus" are good starting points.
PUNCH + SMOOTH Together
These two features complement each other perfectly. PUNCH restores the transients that saturation compresses. SMOOTH tames the harshness that saturation creates. Together, you get punchy, warm saturation that never fatigues the listener.
Oversampling vs. CPU
Higher oversampling reduces aliasing artifacts (digital harshness in the upper harmonics). On a single track, the difference between 4x and 8x is subtle. On a bus with many harmonics, 8x makes a real difference. Drop to 2x when you need to conserve CPU during tracking or arrangement.
KEY TRACK & MIDI
Send MIDI from your synth or bass part to Grit Blender. With KEY TRACK enabled and LOW CROSSOVER off, the crossover follows the played note, half an octave above it: the fundamental stays clean while the upper harmonics get saturated. This keeps your low end tight even with heavy saturation.
For added expressiveness, enable RESONANCE to boost the played pitch frequency before saturation, creating a resonant emphasis that follows your playing.
Sculpting the Saturation Band
Open the Advanced panel and enable the LOW and HIGH crossovers to define exactly which frequency range gets saturated. Everything below the low crossover and above the high crossover passes through clean. Here are a few starting points:
- Bass protection: Low crossover at 80–120 Hz. Sub-bass stays tight and punchy even at high DRIVE. Essential on kick drums, bass guitar, and full mixes.
- Midrange focus: Low at 200 Hz, high at 6 kHz. Only the body and presence range gets saturated: lows stay clean, highs stay airy. Great for vocals and acoustic guitar.
- Surgical bite: Low at 1 kHz, high at 4 kHz. Saturate only the attack region of snares or the edge of an electric guitar without muddying the lows or adding sizzle on top.
In M/S or L/R mode, each channel gets its own pair of crossover handles. Try saturating the sides from 200 Hz up while keeping the mid saturated from 80 Hz up. This adds width without losing center punch.
Dialing Effect Intensity
The PUNCH, SMOOTH, and ANALOG knobs in the Advanced panel let you scale each effect from 0% to 200%. At 0%, the effect is at its mildest (but still active if toggled on). At 200%, the effect is twice as strong as the default setting.
- Subtle drums: PUNCH at 150%, SMOOTH at 50%. Transients pop through while harshness is barely tamed. The saturation sounds lively and forward.
- Thick vocals: ANALOG at 180%, SMOOTH at 130%. The analog stage adds noticeable transformer warmth and the SMOOTH EQ gently rolls off the sibilant buildup.
- Transparent bus glue: PUNCH at 60%, SMOOTH at 100%, ANALOG at 80%. Everything is dialed back below the default: the processing is felt more than heard.
L/R Mode for Creative Processing
The default M/S mode separates the center from the sides, which is ideal for mastering and mix bus work. L/R mode processes the left and right channels independently, which suits a different set of tasks:
- Stereo guitar bus: Pan a DI left and a mic right. In L/R mode, give each side a different DRIVE amount or a different crossover frequency to create tonal contrast between the two signals.
- Drum overheads: L/R mode lets you match the saturation intensity to each side independently, compensating for uneven bleed or cymbal placement.
- Sound design: Push L DRIVE high and keep R DRIVE low (or vice versa) for an asymmetric stereo field that moves and breathes.
9. Factory Presets
Grit Blender ships with 39 factory presets across 7 categories. Here are the key presets to get you started:
Key Presets
| Preset | Category | What it sounds like | Tweak tip |
|---|---|---|---|
| Warm Tape | Basics | Gentle tape compression with smooth even harmonics. Your go-to starting point. | Push DRIVE past 60% for more obvious tape saturation. |
| Tube Crunch | Basics | Classic tube breakup with musical asymmetry. Crunchy and warm. | Pull MIX to 50% for parallel tube warmth. |
| Fuzz Face | Character | Heavy, thick fuzz with octave-up overtones. MIX at 80% and Air tone curve for top-end sparkle. | Try SMOOTH on to tame the top end. Reduce DRIVE for a mellower fuzz. |
| Console Desk | Character | Subtle console coloration: British warmth without obvious distortion. | Great on every channel at low DRIVE for "expensive console" character. |
| Ribbon Hysteresis | Character | The smoothest saturation. Magnetic compression that rounds off peaks. | Ideal for mastering at low DRIVE (15–25%). |
| Rectifier Lead | Character | Tight, aggressive high-gain clipping. MIX at 80% with Presence tone curve for midrange cut-through. | Enable PUNCH to keep the attack. Lower TONE for a darker lead. |
| Console Tape | Blend | Desk + Tape blend. The "analog summing" sound. | Use on a bus for glue. Keep DRIVE below 40%. |
| Lo-Fi Digital | Special | Crunchy bit-reduction artifacts. Retro lo-fi character. | Lower MIX for subtle lo-fi texture; push it for full destruction. |
| Full Stack | Special | Pentode + Rectifier power amp blend at high drive. Dense, aggressive harmonic content. | Switch to 12-Way Advanced mode to tweak individual type levels. |
| Vocal Polish | Psychoacoustic | Warm presence with smooth top end. SMOOTH + ANALOG on, Smile tone curve (bass + treble together), MIX at 85%. | Adjust DRIVE to taste (20–40%). Try Presence tone curve for more vocal focus. |
| Drum Punch | Psychoacoustic | Punchy, glued drums. PUNCH on, Air tone curve (top-end sparkle), MIX at 70% for parallel blend. | Increase DRIVE for more aggressive drums. Try M/S for width. |
| Bass Thickener | Psychoacoustic | Harmonic richness for small speakers. PUNCH + SMOOTH on, Warm tone curve (low-shelf body), MIX at 85%. | Enable KEY TRACK (LOW CROSSOVER off) with MIDI for clean fundamentals + saturated harmonics. |
| Master Glue | Psychoacoustic | Subtle mix bus saturation. SMOOTH + ANALOG on, Presence tone curve (3 kHz focus), MIX at 50%. | Lower MIX to 20–40% for more transparency. Turn on LOUDNESS MATCH for honest A/B. |
| Warm into Crunch | Dual Stage | Tape warmth feeding into transistor grit. Rich layered saturation. | Adjust DRIVE 2 independently for more or less crunch on top of warmth. |
| Desk into Fuzz | Dual Stage | Console coloration into heavy fuzz. Controlled chaos. | Lower DRIVE 2 for "desk with attitude"; push it for full fuzz. |
All Categories
- Basics (4 presets): Essential starting points: Init, Warm Tape, Tube Crunch, Subtle. Start here and tweak to taste.
- Character (8 presets): Each preset showcases a single saturation type at its sweet spot. Great for learning what each type sounds like.
- Blend (4 presets): Pre-configured blends of 2–3 complementary types.
- Special (4 presets): Creative, unusual combinations for sound design and experimentation.
- Psychoacoustic (8 presets): Instrument-focused presets with PUNCH, SMOOTH, and tone curve types optimized for vocals, drums, bass, guitar, synths, and mastering.
- Mid/Side (6 presets): M/S mode configurations with independent M DRIVE / S DRIVE / S MIX settings for stereo widening, center focus, and mastering.
- Dual Stage (5 presets): Two-stage configurations from subtle layering to extreme serial distortion.
Saving Your Own Presets
Click SAVE in the preset bar to save your current settings as a user preset. User presets are stored at:
- macOS:
~/Music/Audio/Presets/UB DSP/Grit Blender/ - Windows:
%APPDATA%\UB DSP\Grit Blender\ - Linux:
~/.config/UB DSP/Grit Blender/
Factory presets cannot be overwritten or deleted.
10. About & Settings
Click the ABOUT button in the preset bar (top-right) to open the About dialog. This panel shows plugin version, license status, website and support links, and a Settings section with preferences you can toggle.
Settings Toggles
Check for updates
When enabled, the plugin checks for new versions on launch and shows a banner if an update is available. Disable to suppress all update checks. No personal data is sent: the check is a simple version request.
Help improve Grit Blender (anonymous)
Opt-in anonymous telemetry. When enabled, the plugin sends an extremely small anonymous report each time it loads, smaller than a single MIDI note. This helps the developer understand which features are used and prioritize improvements. No personal information is ever collected or shared. You can toggle this on or off at any time.
Enable blender animation
Controls the animated blender on the left panel. When disabled, the blender renders a static image with zero CPU cost. Useful if you prefer a minimal interface or want to save resources with many instances.
First Launch: Telemetry Consent
The very first time you open Grit Blender, a small popup appears asking “Help me improve Grit Blender”. It explains that anonymous usage data can be sent to help the solo developer improve the plugin. You have two options:
- “Sure, happy to help”: enables anonymous telemetry.
- “No thanks”: declines. No data will be sent.
You can also click outside the popup to dismiss it (same as declining). Your choice is remembered and never asked again. You can always change your mind later in the About dialog’s Settings section.
Diagnostic Link
At the bottom of the About dialog, you’ll see a link: “Plugin not working? Run diagnostic”. Clicking it opens the UB DSP Diagnostic Tool page, where you can download a standalone application that checks your system configuration, scans for installed UB DSP plugins, and can send a diagnostic report directly to UB DSP support. This is the fastest way to get help if you encounter any technical issue.
11. Installation
macOS
Download the .pkg installer from ubdsp.com/downloads. Double-click to open the installer, then follow the steps. You can choose which formats to install (AU, VST3, CLAP and AAX, all selected by default).
- AU:
/Library/Audio/Plug-Ins/Components/ - VST3:
/Library/Audio/Plug-Ins/VST3/ - CLAP:
/Library/Audio/Plug-Ins/CLAP/
The installer is signed and notarized by Apple. A PDF user manual is optionally installed to /Library/Application Support/UB DSP/.
Windows
Download the .exe installer and run it. The installer guides you through component selection (VST3, CLAP, or both). Administrator privileges are required.
- VST3:
C:\Program Files\UB DSP\UB DSP Grit Blender\ - CLAP:
C:\Program Files (x86)\Common Files\CLAP\
To uninstall, use the standard Windows “Add or Remove Programs” panel.
Linux
Download the .tar.gz archive, extract it, and run ./install.sh. The script prompts you to choose which formats to install.
- User install (default):
~/.vst3/and~/.clap/ - System-wide:
sudo ./install.sh --systeminstalls to/usr/lib/vst3/and/usr/lib/clap/
After installing on any platform, restart your DAW and rescan plugins if needed.
12. Licensing & Activation
Trial Mode
Grit Blender runs in trial mode until activated. All features are fully functional, but 2 seconds of silence are inserted every 40 seconds (with smooth fade-ins and fade-outs to avoid clicks). A "TRIAL" watermark is displayed on the interface.
This lets you evaluate the plugin's sound quality in your own sessions before purchasing.
Activating Your License
- Purchase a license at ubdsp.com.
- Download your
.ubkeyfilelicense file from your account. - In Grit Blender, click the ACTIVATE button (bottom bar, visible in trial mode) or go to About → Activate License...
- Select your
.ubkeyfile. The plugin validates it instantly (offline, no internet required). - Done! The trial silences and watermark are removed. The About dialog shows "Licensed to: [Your Name]".
License Storage
Your license is cached locally so you don't need to re-activate after updates:
- macOS:
~/Library/UB DSP/Grit Blender/ - Windows:
%APPDATA%\UB DSP\Grit Blender\ - Linux:
~/.config/UB DSP/Grit Blender/
13. Troubleshooting & FAQ
The plugin doesn't appear in my DAW
Make sure the correct format is installed for your DAW. Rescan plugins in your DAW's preferences. On macOS, some DAWs require an AU validation: check the DAW's plugin manager. If using CLAP, make sure your DAW supports the CLAP format.
High CPU usage
Reduce oversampling from 8x to 4x or 2x. Turn off ANALOG when not needed (it adds its own oversampled stage). SMOOTH uses envelope followers that consume some CPU: disable it on tracks where harshness isn't an issue.
I hear silence every 40 seconds
This is the trial mode protection. Activate your license to remove it. See Licensing & Activation.
The saturation sounds too harsh
Turn on SMOOTH to dynamically tame harsh frequencies. Pull TONE left (-10 to -30%) to darken the top end. Try softer saturation types (Tape, Ribbon, Desk, Asymmetric). Reduce DRIVE and use MIX for parallel blending instead of pushing hard.
The sound is too subtle / I can't hear the saturation
Check that BYPASS is off. Make sure DRIVE is above 30%. Check the transfer curve: if it's a straight line, the saturator isn't engaging. Try increasing INPUT GAIN by a few dB. Switch to a harder saturation type (Transistor, Fuzz, Rectifier).
Can I use Grit Blender on a mono track?
Yes. Grit Blender runs on both mono and stereo tracks. On mono tracks, the same DSP runs internally (saturation, ANALOG, PUNCH, SMOOTH, all 12 saturation types, every preset), but the stereo-specific controls are disabled: the M/S button and the M/S / L/R buttons in the Advanced panel are dimmed and non-clickable. In Pro Tools, you'll see two separate entries in the insert list: Grit Blender (mono) and Grit Blender (stereo).
M/S mode is dimmed and won't activate
You're inserting Grit Blender on a mono track. M/S and L/R modes split a stereo signal into two independent channels, so they only make sense when the plugin has a stereo input and output. Move the plugin to a stereo bus or duplicate your mono channel to a stereo one if you need stereo processing.
The plugin window looks cropped or too small
Use the SIZE button (bottom-right) to select a preset size that fits your screen. You can also resize freely by dragging the window edges. The minimum size is 850×450.
Presets sound different from what I expected
Presets are designed for specific input levels. If your source is very quiet or very loud, the saturation will respond differently. Use INPUT GAIN to adjust the level going into the plugin. Aim for peaks around -6 to -3 dBFS after INPUT GAIN: the peak on the input meter plus the INPUT GAIN setting, since the meter reads the signal before the gain.
Something is wrong and I need help
Open the About dialog and click “Plugin not working? Run diagnostic” at the bottom. This opens the Diagnostic Tool page where you can download a standalone application that automatically checks your system, scans for installed UB DSP plugins (with version and format details), and sends a full report to UB DSP support. It’s the fastest way to get personalized help. You can also reach us at support@ubdsp.com.