
Floating point took the ceiling away. It did not take the curve away.
A producer on Audiofanzine, a French forum, had a snare that sounded exactly right. The track meter was well past 0 dB. The snare went into a group that was clipping too, with its fader pulled down, then to the master, which had a limiter and didn't clip. Their question, in my translation: is it a problem that a track clips if, in the end, there's a limiter on the master and nothing clips any more?
And there was one thing they couldn't explain. Every time they put a limiter on the snare track itself, the sound changed completely.
The thread gets the first half right. The mixer runs in floating point, so a track in the red doesn't clip anything, and as one reply put it, plus n on the track and minus n on the bus comes to zero. The same reply adds that pushing the track does nothing to the sound, because digital doesn't colour the way analogue does when you add gain. Another suggests trimming every plugin input by 8 to 12 dB, as a habit, to keep some margin.
Then a long stretch of the thread becomes an argument about whether Cubase 6 runs a 32 or a 64 bit engine. Near the end, one reply says a limiter that works hard will always be heard, so set your levels properly. Both points are right, about different things, and nobody puts them together.
Here's how they fit. Floating point protects the number. It doesn't protect the curve. As soon as there's a nonlinearity in the chain (a saturator, an amp sim, a limiter, a compressor with a soft knee), the level you feed it stops being a volume and becomes a tone control. A trim is never neutral, even when nothing clips anywhere.
First, what floating point actually guarantees
A fixed-point format has a hard top. Values above it have nowhere to go, so they flatten, and flattening is clipping.
Floating point stores a number as a value plus an exponent, and the exponent slides. There's no practical top. A bus at plus twelve isn't damaged, and pulling the fader back down gives you the signal you had. Sum a thousand channels, scale the sum down, and you have the same sum.
So the forum's answer is correct as far as it goes. A hot meter inside the mixer harms nothing.
What it leaves out is that this only holds while every stage is linear. A fader is linear, so is a pan, and for our purposes so is an EQ. Push a linear chain up 6 dB, pull it down 6 dB, and you get your signal back exactly.
A saturator isn't linear. That's the whole reason you bought one.
A saturator is a shape, and a shape has a middle
Strip a saturation plugin of its interface and what's left is a transfer curve: a rule that says, for this input value, give out that output value.
Near zero, most of these curves follow a straight line. That's where the plugin sounds like a very slight colour. Further out, the curve bends, and the bend is where harmonics come from. A bent curve hands back a shape that isn't the one you put in, and a different shape means different harmonic content. Which harmonics you get depends on how it bends, which is the subject of Even and Odd Harmonics Are Not Warm and Harsh, They Are Intervals. Further out still, the curve flattens.
So one curve gives you a whole range of sounds, and your input level picks where you stand on it.
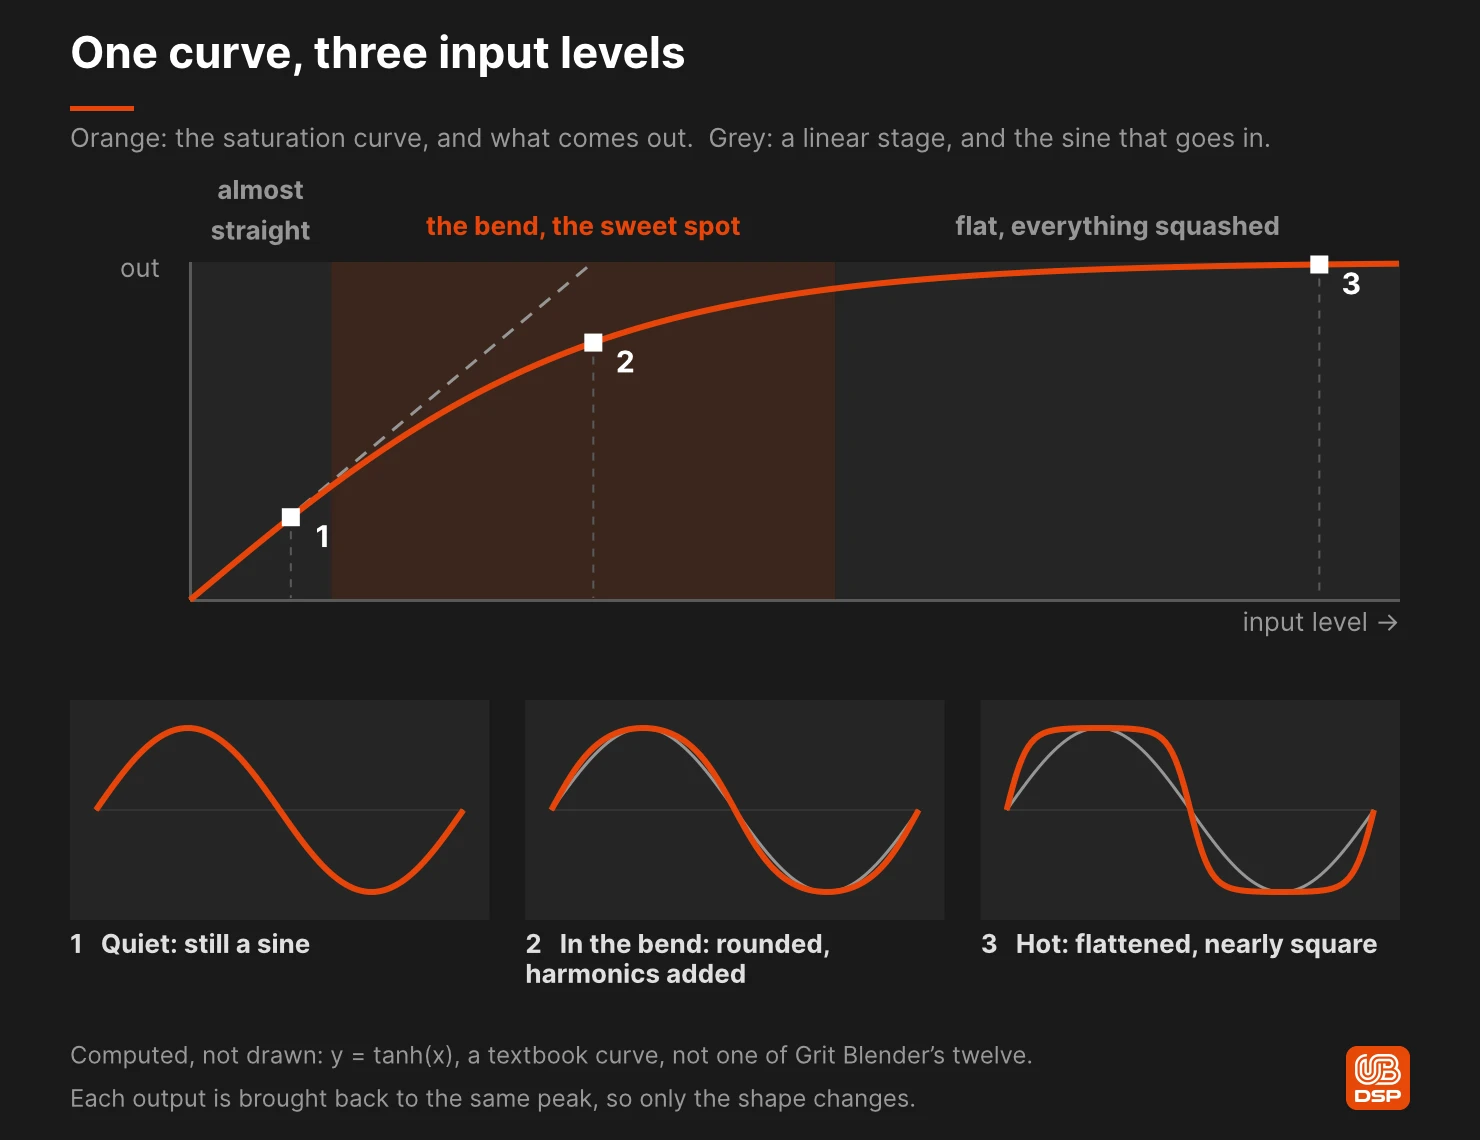
A trim before a saturator doesn't make it louder or quieter. It slides your signal along the curve. Quiet, and you're on the straight part, where the plugin barely does anything. Loud, and you're out on the flat part, where everything gets squashed into the same output and the character stops changing. In between there's a region where the curve is bending but hasn't given up yet, and that's the one you want.
That region is what people mean by a saturator's sweet spot. Nothing mystical about it: it's a place on a graph, and input level is how you get there.
Why the plugin has a reference level at all
If the curve is just a shape, why does the plugin care what level you feed it?
Because the shape has to be anchored somewhere. Hardware had no choice in the matter. A tube had a bias point, a tape machine a reference level, a transformer a level above which it got interesting and below which it did nothing. Those levels came with the components. The device sat at one operating point, and all you controlled was how hard you drove into it.
A plugin inherits that idea on purpose. Somewhere inside it there's a number that says "this is the level this curve is designed around", and everything the developer tuned by ear (where the bend starts, how fast it bends, which types sound right next to each other) was tuned with the signal sitting near it.
That's how I tune mine. In Grit Blender the twelve types are matched to each other in level, and each one's drive is set so that its useful range lands around the middle of the DRIVE knob. It's deliberate, and in practice it means you can change type mid-blend without the volume jumping, so you're comparing characters, not loudness. It also means the whole thing is calibrated around an expected input. Feed it something far from that and you're not exactly using it wrong, you're just standing somewhere other than where it was voiced.
That's why Grit Blender has an INPUT GAIN control in front of everything else, from -12 to +12 dB, and why its manual sends you there first when a preset reacts too little or too much.
It's also why the old rules of thumb survive. In a floating-point mixer, leaving comfortable headroom on a track no longer protects you from clipping. What it still does is put you somewhere near the operating point of whatever nonlinear thing comes next on that track, without you having to think about it.
Four things input level changes that the output knob can't put back
If a trim were neutral, you could undo it afterwards. You can't, and each reason why is something you can hear.
1. Which harmonics you get, not just how many
Early on the bend, a curve adds a little of its lowest harmonics. Push further and higher ones arrive, and the balance between them shifts as you go. Take one type at two input levels and match them for loudness afterwards: you don't hear more and less of the same thing, you hear two different tones.
If you keep one thing from this article, keep this one. The drive control is a tone sweep that happens to get louder.
2. Some curves have a floor as well as a ceiling
Everybody expects the top of a saturation curve. Fewer people expect the bottom.
Fuzz, in Grit Blender, is the clearest case. It's built from a rectifier with a dead zone in the middle, which is also why it sounds an octave up on its own, as the manual says. A dead zone means there's a level below which nothing comes out at all. Not a quieter version of the sound. Nothing.
On a sustained note that doesn't matter. On the tail of a note it does. The tail gets quiet, drops under the threshold, and Fuzz's share of the blend drops out while the other two corners of the triangle keep going. With Fuzz carrying a good part of the blend, the octave-up edge leaves before the note does. Lower your input level a few dB and it leaves earlier.
No output gain brings that back, because by the time the signal reaches the output knob there's nothing left of it to turn up. Rectifier has a gentler version of the same thing, a soft gate that fades out very low levels.
So "too quiet" is a real way for a saturator to fail, and it doesn't announce itself. On the quiet parts of the performance, it just sounds like the plugin isn't doing anything.
3. The curve isn't the only thing in the box that reacts to level
A static curve only ever looks at the sample in front of it. It has no memory. The chain around it usually does, and those parts react to level over time.
Grit Blender is deliberately gentler on the top of the spectrum than on the bottom, so a bright source and a dark source at the same peak level don't land in the same place on the curve. What counts is how much energy sits where the saturation works hardest, and peak level doesn't tell you that. It's one reason a hi-hat bus and a bass at the same meter reading respond so differently to the same DRIVE setting.
Tube and Pentode add sag, the behaviour of a power supply that can't keep up. It pulls the gain back when a loud passage arrives and lets it recover when the passage eases off. The sag is real, and it breathes with your playing. It also means the same curve at the same average level gives a different result depending on whether that level arrives as a steady pad or as a drummer leaning into a chorus.
You can't reach any of that from the output knob either.
4. The bass may not be going where you think
One more reason the meter is a poor guide. In Grit Blender the low band always bypasses saturation, under a 24 dB/oct split. With LOW CROSSOVER and KEY TRACK both off, the split sits at 80 Hz. A crossover has a slope, so a 50 Hz note still reaches the curve, just a lot quieter.
On a bass or a kick, then, a good part of the number on your meter is energy the curve barely sees. You can be staring at a hot meter while feeding the saturator very little. The Grit Blender manual has the detail on where that split sits and how to move it.
The two minute test, if you'd rather hear it than take my word for it
Put a gain plugin before your saturator and another after it. Set the first to plus 10 dB and the second to minus 10 dB.
Bypass the saturator and null the result against an untouched copy of the track, polarity flipped. It nulls. That's floating point doing its job, and it's the forum's answer, correct.
Now switch the saturator back on, trim pair still in place, and compare it with the same saturator with both gains at zero. Match the output loudness first so level doesn't fool you.
It won't sound the same. The trim moved you along the curve, and the only way back is to move the trim.
Do it once and gain staging stops being a rule you follow. It becomes something you can hear, and that's the part I like: the mystery turns into a knob you now know what to do with.
What this doesn't explain
It doesn't explain why saturation makes something feel bigger or louder when the meter says it isn't. That's about your ears rather than the curve, and it has its own article: Does Saturating an 808 Make It Hit Harder? It Makes It Audible, Which Is Not the Same Thing. This one is about what the plugin does, that one about what you perceive.
And it doesn't make 32 versus 64 bit float something to worry about. Both remove the ceiling, which is the half of the problem the forum thread solved. The other half is everything above.
How I set it, in four steps
- Set the level before the saturator, not with the fader after it. Use the saturator's own input control if it has one (INPUT GAIN in Grit Blender, which sits in front of the curves and the low split), otherwise a gain plugin or clip gain. In a plugin chain, what counts is the level going into the nonlinear plugin itself. Linear plugins before it don't care.
- From there, set the saturator's drive by ear, on the part of the performance you care about most. Usually that isn't the loudest bar.
- Check the quiet parts: note tails, ghost notes, the end of a phrase. If the plugin seems to stop doing anything there, you're sitting too low on the curve for this type.
- Only then match loudness and A/B. A saturator 2 dB louder than the dry signal tells you nothing, because your ear picks the louder one every time. In Grit Blender, LOUDNESS MATCH in the bottom bar does the matching for you.
There's no magic number. The right one depends on the curve you chose and on what the source is made of.
I built Grit Blender around all of this: twelve curves, three at a time on the triangle, with INPUT GAIN in front of them and LOUDNESS MATCH behind. The Grit Blender page has audio examples, and the trial has no time limit if you'd rather run the two minute test on one of your own loops.
Frequently asked questions
Does gain staging matter in a 32-bit float DAW?
Yes, but not for the reason it used to. In floating point a hot track doesn't clip and the gain stays reversible, so you no longer need headroom to protect the number. You still need it because every nonlinear plugin (saturator, amp sim, limiter, soft-knee compressor) has an operating point. The level you feed it decides which part of its curve you're using, and that's a tone decision.
Is it a problem if a track clips when the master bus doesn't?
Inside the mixer, no. A track meter past zero damages nothing in floating point, and lowering the fader after it gives you the signal back. It becomes a problem where the signal has to leave floating point (a converter, a fixed-point file) and at any nonlinear plugin along the way, which will sound different at that level.
Why does changing the input gain change the sound of a saturator and not of an EQ?
An EQ is linear: double its input and its output doubles, so a gain before it and the inverse gain after it cancel out. A saturator is nonlinear by design. Its output isn't proportional to its input, so the two gains don't cancel, and you end up at a different point on its transfer curve, with different harmonics.
Can I just turn the output down instead of the input?
No. The output control comes after the curve, so it changes how loud the result is, not what the result is. To get the character of a lower input level, lower the input.
Can a saturator receive too little signal?
Yes. Near zero most curves are almost straight, so a very quiet signal gets almost no saturation. Some types have an actual floor: Fuzz in Grit Blender is built on a rectifier with a dead zone, so below a certain level its share of the blend goes silent, which you hear on note tails.
What level should I feed a saturator?
There's no single number, because it depends on the curve and on where your source has its energy. Set the level before the plugin, set the drive by ear on the part of the performance that matters, check that the quiet parts still get treated, and only then match loudness to compare.
Sources
- The question and the replies: Audiofanzine, French forum thread "Saturation des pistes mais pas du bus master", 30 August to 22 September 2023, 22 posts. Translations are mine.
- The Grit Blender manual, for INPUT GAIN, LOUDNESS MATCH, the low split at 80 Hz with both crossovers off, Fuzz sounding an octave up, and the Advanced panel.
- UB DSP, Even and Odd Harmonics Are Not Warm and Harsh, They Are Intervals, and Does Saturating an 808 Make It Hit Harder? It Makes It Audible, Which Is Not the Same Thing.
Joy to use, joy to hear.
Ben, UB DSP