
You load a plugin, you press a key on your controller, and nothing happens.
Not "nothing useful". Nothing at all. The plugin sits there, the meters are dead, and you start wondering whether your controller is broken or whether you missed a setting.
Your controller is fine. You loaded an effect, and an effect does not listen to notes unless somebody explicitly hands them to it.
Here is the short version, then the long one.
Instrument or effect: the whole distinction in two lines
An instrument plugin takes notes in and produces audio out. It starts from silence. A synth, a sampler, a drum machine.
An effect plugin takes audio in and produces audio out. It never starts from silence. It needs something already playing. A compressor, a reverb, a saturator, a filter.
That is the entire difference, and every routing problem in this article comes out of it.
When you drop an effect on an audio track, your DAW connects two things: audio in from the track, audio out to the next device. Notes are not part of that picture. Your keyboard is sending them somewhere, but not there.
The part that trips people up
Some effects genuinely do want notes.
A vocoder wants to know which chord you are holding. A formant filter wants to know where you are playing. A saturator can want to know which note the bass is on, so it knows where to stop saturating. These are effects: they process incoming audio, they do not generate it. But they have a second input that most effects do not have, a note input.
The plugin formats have allowed this for years. VST3, AU, CLAP and AAX all let an effect declare that it accepts notes. So the plugin is ready.
Your DAW is the variable. Every host decided separately how to expose that note input, and some of them put it somewhere you would never look. That is why the same plugin, with the same feature, feels natural in one DAW and impossible in another. It is not the plugin being inconsistent. It is a handful of design decisions made by different teams who never had to agree.
Check the plugin before you fight the DAW
Do this first. It takes thirty seconds and it saves entire evenings.
Most effects have no note input at all. No routing trick will give a stock EQ a musical ear. Open the plugin's manual and look for a MIDI or note input section. If it is not documented, it is almost certainly not there.
For our two plugins, the note behaviour is documented rather than buried in a tooltip:
- Vowel Blender manual, for the MIDI card.
- Grit Blender manual, for KEY TRACK and RESONANCE.
If your plugin does have a note input, keep reading.
The three answers your DAW can give you
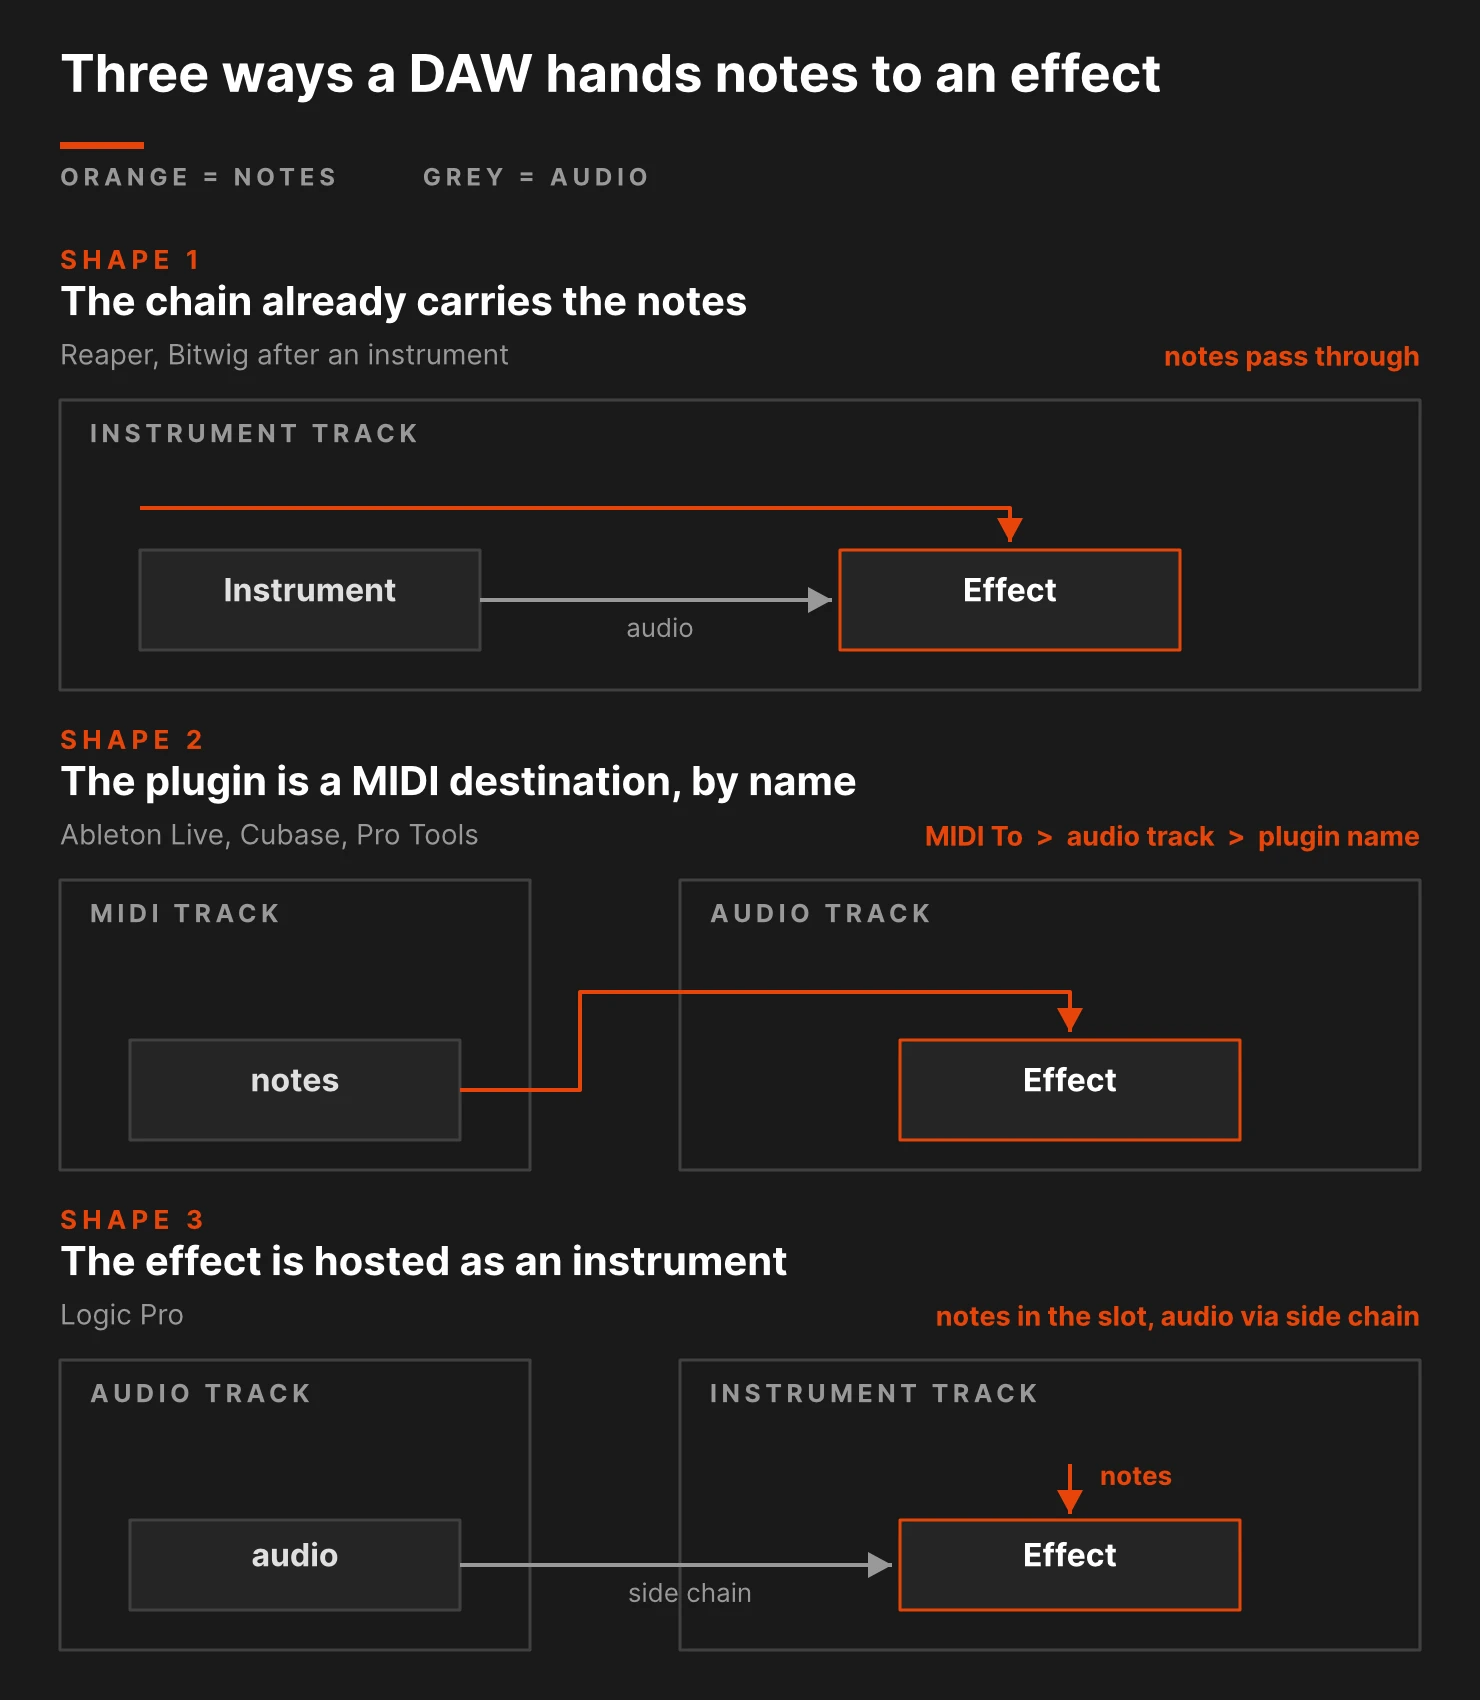
Rather than eight sets of click by click instructions that go stale with every update, here are the three shapes this takes. Yours is one of them.
Shape one: the chain already carries notes
Some DAWs let notes travel down a device chain alongside audio, so you do not route anything. You put the effect where notes are already flowing, and it receives them.
Reaper is the purest case, because it has no track types at all. A track is a track, it can receive MIDI, and everything in its FX chain sees that MIDI.
Bitwig splits by context. On an instrument track, an effect placed after the instrument receives the notes the instrument passes along. All of Bitwig's own synths do this, and so do most third party instruments, but not all: some plugins and some brands swallow the notes and pass nothing on. Worth a ten second test rather than an assumption. On an audio track there is no note stream to inherit, and that is where the Note Receiver device earns its place: it pulls notes from another track into this chain.
Shape two: the plugin appears as a MIDI destination, by name
Other DAWs keep notes and audio strictly separate, then let a MIDI track point its output at a specific plugin instance. The effect stays on the audio track where it belongs. You create a MIDI track next to it, aim its output at that audio track, and a second dropdown appears listing the plugins on that track that can accept notes. Pick yours.
This is what Ableton Live does, which surprises people, because the Live manual only ever talks about where devices can sit in a chain. Live also has a gotcha worth knowing: the MIDI track has to be armed or monitoring for the notes to travel. If Live is set to arm on focus, clicking the effect to tweak it un-arms the MIDI track and the notes stop. Turn off Exclusive Arm in preferences and arm both.
Cubase does the same with VST3 effects that declare note input. Pro Tools does too: a plugin with a note input registers a MIDI node under its own name, and that node shows up as a destination for your MIDI track.
Shape three: the effect has to be hosted as an instrument
Logic inverts the problem. Instead of sending notes to an effect, you load the effect in the instrument slot of a software instrument track, where notes arrive naturally, then bring the audio in through the side chain. It feels backwards the first time, and it is completely logical once you see what it is doing: it puts the plugin where notes already exist, then solves the audio problem instead.
Logic is also the strictest about who is allowed in. A plugin has to declare itself as an Audio Unit music effect (aumf) rather than a plain audio effect (aufx) at build time. Those are the plugins listed under MIDI-controlled Effects. If a developer never made that declaration, no amount of clicking will produce it, and that is the most common reason a plugin that accepts MIDI everywhere else appears to accept none in Logic.
Which shape is your DAW
| DAW | Shape | Where the effect lives |
|---|---|---|
| Reaper | 1, no track types, the chain sees the MIDI | Any track receiving MIDI |
| Bitwig Studio | 1 after an instrument, Note Receiver on audio tracks | Either, depending on the track |
| Ableton Live | 2, plugin picked by name | Audio track, MIDI track aimed at it |
| Cubase | 2, plugin picked by name | Audio track, MIDI track aimed at it |
| Pro Tools | 2, plugin exposes a MIDI node | Audio track, MIDI track aimed at the node |
| Logic Pro | 3, hosted as an instrument | Instrument slot, audio via side chain |
A myth worth killing. You will read on forums that MIDI routing to plugins does not work with Audio Units and that you need the VST version. That advice is about MIDI coming out of a plugin, which is a real AU limitation. It has nothing to do with notes going in. If your effect accepts note input, the AU version accepts it too. Reinstalling everything as VST3 will not fix a routing problem you have not diagnosed yet.
How to find out which shape you have, in thirty seconds. Load the effect on an audio track. Create a MIDI track next to it. Aim that MIDI track's output at the track hosting the effect, then look at the dropdown underneath: if the plugin is in the list by name, you are in shape two and you are done. If there is no such dropdown, play into the track that hosts the effect directly: if the plugin responds, you are in shape one. If neither works and your DAW has a category called something like MIDI-controlled effects, you are in shape three.
What you get once the notes arrive
Routing MIDI to an effect is a few minutes of admin. Here is what it buys, in the two shapes it usually takes.
Making an effect follow a part
The classic case is a crossover that stops guessing.
Multiband saturation asks you to pick a split frequency once, then live with it. A bass line does not stay at one frequency, so the split is right for two notes and wrong for the rest of the part. If instead the plugin knows which note is playing, the split can move with it.
That is what KEY TRACK does in Grit Blender. You send it the MIDI from your bass part, and the crossover follows the played note: the fundamental stays clean, everything above it takes the saturation. This works with LOW CROSSOVER (ADV panel) off, its default: switch it on and the split goes back to a fixed frequency. Turn on RESONANCE alongside it and the played pitch gets emphasised before the saturation stage, so the note is not just protected, it is pushed.
The point to keep in mind for this article: it needs the notes. There is no pitch detection reading the audio and guessing. The crossover moves because a note arrived, which means Grit Blender on a guitar bus, fed the MIDI from your bass track, is precisely the routing problem described above, in a real session.
A user on KVR described the idea better than our own product page did at the time:
"the key track feature is a genuinely smart idea. keeping the fundamental clean while saturating above it is essentially what multiband saturation tries to do, but driven by pitch rather than a static crossover frequency. way more musical on bass especially, because the crossover tracks the note instead of fighting it."
kernaudioio, KVR Audio, 12 March 2026
One practical note from building it: if the audio going through the plugin is silent, key tracking holds. An effect that follows a note has nothing to act on when there is no signal, and moving filter coefficients on silence produces clicks when the audio comes back. So if your routing looks right and nothing moves, check that sound is actually passing through.
Playing the effect with your hands
The other case is not following anything. It is performing.
Vowel Blender is built around that, and it is worth being precise about what it does with your keyboard, because "playing vowels" is not it.
Its MIDI card carries four sources at once, and each one is a modulation source you route where you want, at its own depth, with its own response curve and its own smoothing time:
- Keytrack, where you play on the keyboard. Set a root note and a spread in semitones, and note position maps across the curve. Play higher to open a vowel, lower to close it.
- Velocity, how hard you strike, captured at note on. Good for bite on accents.
- Aftertouch, channel pressure. Lean into a held key and the vowel shifts under your finger.
- Mod wheel, CC1. Slide between close and open vowels in real time.
So you are not triggering vowels like notes on a synth. You are handing the filter four independent streams of what your hands are doing, and deciding what each one moves. Velocity can stay instant while aftertouch glides.
Hold a pad, shape it with pressure while your left hand holds the chord, and you are doing something no automation lane gets to sound like, because you are performing against the sound rather than drawing on top of it.
That is the evening the routing is worth.
Frequently asked questions
Can I play any effect plugin with a MIDI keyboard?
No. Only effects that declare a note input can receive MIDI. Most compressors, EQs and reverbs have no note input at all, so no amount of routing will make them respond to a keyboard. Check the manual first.
What is the difference between an instrument plugin and an effect plugin?
An instrument takes notes in and produces audio out. An effect takes audio in and produces audio out. That is the whole distinction, and it is why an effect sits on an audio track, where no notes are travelling.
How do I send MIDI to an audio effect plugin in Ableton Live?
Put the effect on an audio track. Create a MIDI track next to it, set its MIDI To to that audio track, then pick the plugin by name in the second dropdown underneath. The MIDI track has to be armed or monitoring for notes to reach the plugin, so turn off Exclusive Arm if you want to tweak the effect and play at the same time.
Why does this work in one DAW but not another, with the same plugin?
Because the plugin formats allow note input on effects, but each host decided separately how to expose it. Some let notes travel down the device chain, some let a MIDI track pick the plugin as a destination by name, and Logic requires you to host the effect in an instrument slot and feed audio through a side chain.
Why doesn't my plugin appear under MIDI-controlled Effects in Logic?
Because it was not built as an Audio Unit music effect. That is a declaration the developer makes at build time, and Logic only lists plugins that made it. Nothing you can change on your side. Both Vowel Blender and Grit Blender declare it, so both appear there.
Do I need to use the VST version instead of the AU for MIDI routing to work?
No, not for notes going into an effect. The AU limitation people repeat is about MIDI coming out of a plugin, which is a different feature. If an effect accepts note input, its AU version accepts it too.
The routing looks right but the effect ignores the notes.
Check that audio is actually playing through the plugin. An effect that follows the note has nothing to act on when the track is silent, and some plugins, ours included, deliberately hold their note tracking until audio is present, because moving filter coefficients on silence produces an audible click when the sound returns.
My notes arrive but the timing feels late.
Note input and audio input do not always arrive on the same clock in every host, especially when the notes come from one track and the audio from another. Check your DAW's plugin delay compensation settings before assuming the plugin is at fault.
Where do I check what a specific UB DSP plugin does with notes?
The manuals: Vowel Blender and Grit Blender. Installation, activation and compatibility questions are on the FAQ.
Sources
- kernaudioio, KVR Audio, Grit Blender thread, 12 March 2026.
- Waves, How to Control the OVox Vocoder with MIDI in Ableton Live.
- iZotope, VocalSynth 2 documentation, DAW Setup.
- Ableton, Accessing the MIDI output of a VST plug-in.
- Apple, kAudioUnitType_MusicEffect.
Joy to use, joy to hear.
Ben, UB DSP